Showing posts with label Culinary School. Show all posts

Wednesday, October 12, 2011

Essential and Not So Essential Tools

Last night, while prepping out a cheese souffle for dinner with my fiancé, I realized how much pleasure I get out of whisking egg whites by hand. It, like whipping cream, is a task that has been made much more simple by the invention of electric hand mixers and stand mixers. I myself used to make mayonnaise and whip cream and egg whites in my stand mixer. It's so simple - place the ingredients in the mixer bowl, flip a switch and let the machine do the work for you.

Since completing studies at The French Culinary Institute, I no longer use my stand mixer for any of these tasks. It's either a result of being forced to do it by hand while I was in school, or the discovery that it is just not that difficult. I am not claiming that it is the easiest thing you will do in the kitchen this week - it certainly takes some elbow grease and a bit of patience - but the satisfaction I get from the finished product is increased ten fold when I use that elbow grease and make it happen myself.

To make the task a bit easier, make sure you have a balloon whisk - an essential tool for whipping ingredients by hand. The large spherical center of the balloon whisk helps to incorporate air into mixtures more quickly than a standard whisk. You also need to put the cream or egg whites in a large bowl so that you are working with a large surface area. If you use a small bowl with a large amount of liquid, you are going to be whipping forever. Good for your arm muscles, not so good for enjoying the process.

Any large bowl will do, but if you're interested in something truly beautiful and a bit of a splurge, check out this beating bowl from Mauviel:
Photobucket

It is definitely a non-essential tool, but isn't it beautiful? If you feel like splurging, you can buy this bowl here from Williams-Sonoma. I recently added it to my wedding registry in hopes that someone will splurge on me!

Balloon whisks are available from many retail outlets, but again, Williams-Sonoma carries a great selection. This whisk is an affordable, well-made option.

The Apples and Butter team is working on some short 'how to' videos, so hopefully soon we'll have one on whipping up egg whites. Perhaps you'll see this copper bowl make a cameo...

Wednesday, June 1, 2011

Canapé and Corn Cakes

Photobucket

The final two levels of classes at The French Culinary Institute take place in the kitchen of L'Ecole, FCI's restaurant. For someone like me who may never go on to work in a restaurant kitchen, it provides invaluable experience working the line and cooking food for paying customers. There is nothing quite like the feeling of finishing service on a Friday night, a busy one in particular, and knowing that all of your dishes went out on time and cooked perfectly (well almost perfectly?). It makes you feel like you can accomplish just about anything, at least, that's the way it made me feel.

In both level 5 and level 6, you move through the different stations of the restaurant, cooking the meat dishes for four nights, fish for four nights, pastry for four, and so on. When you get to level 6, you get to spend four nights at the canapé station where the amuse bouche that precedes each meal is prepared. In most restaurants the amuse bouche serves as a way to use up excess ingredients while giving customers a little more than they are paying for. At FCI, it is up to the team working the canapé station to come up with and prepare the amuse each night. It is one of the few opportunities we get to be creative and to not follow any FCI issued recipes. It's a fun station.

My team prepared the pictured canapé on a night when we were trying to use up some excess skirt steak. We braised the meat (not a usual treatment of skirt steak) and reduced the braising liquid to make a sauce to mix with the shredded meat. The base is a delicious corn cake recipe that my classmate Walter brought in for us to play with. I am providing the recipe for the corn cake below. The cakes would make a great side dish, or, if you have some leftover meat to use up, shred the meat, make mini corn cakes and impress your guests with your own amuse bouche before dinner. We topped the whole thing with a mango salsa - chopped mango, red onion and thai chili pepper. If the salsa gets too spicy, as it did in our case, you can temper it with some honey to tame the heat.

Corn cakes
Adapted from Delicious Magazine

60g plain flour
1 egg
1 t baking powder
Handful fresh coriander
300g sweetcorn kernels
1 red chili, deseeded and finely chopped
Vegetable oil for cooking

Place the flour in a food processor with the egg, baking powder, coriander and half the corn. Pulse until coarsely chopped. Transfer the mixture to a bowl and stir the chili and the remaining corn. Heat enough oil to just cover a large, non-stick frying pan and drop in teaspoonfuls of the corn mixture. Fry for 1 minute each side, until golden, then drain on paper towels while you cook the rest. Arrange the corn cakes on a platter and top with leftover meat or a simple salsa.

Tuesday, April 5, 2011

Harbinger of Spring

Photobucket

Growing up, eating artichokes meant simmering them until tender and serving them with a dip of mayonnaise mixed with a bit of soy sauce. Had we been hip to it at the time, we might have called it a soy aioli, but to us it was just the perfect creamy salty accompaniment to those boiled leaves and still, to this day, I can’t eat artichoke leaves without it. Luckily, my artichoke repertoire has expanded ever so slightly beyond boiled leaves.

At FCI we prepare artichokes by ‘turning’ them, or removing all the outer leaves and using a paring knife to remove the green skin until you’re left with the tender heart of the artichoke. Once you have the heart, you can braise, roast, grill or do just about anything you want with it. Currently, in the restaurant at FCI, we serve slivers of braised artichoke heart with a roasted rack of lamb. They are delicious.

One of the perks of working on set at a cooking show is the opportunity to bring home the occasional excess produce. Once the segment is complete, the produce that was used to dress the set is usually still perfectly good, but won’t be visually appealing if saved for another shoot on another day. After the crew has been fed and talent takes what they want, the rest is up for grabs. I am very lucky to be working on these shows as the spring season rolls in and great produce such as asparagus, dandelion greens, spring onions, and of course artichokes, are the topic du jour. I made off with a few artichokes last week and while I was craving my mother’s simmered artichoke with ‘soy aioli’ I decided to broaden my artichoke horizon a bit more and see what I could come up with.

Enter Plenty, the new cookbook from Yotam Ottolenghi. I won’t say much about the book today, because I am smitten with the recipes and have a feeling that you may be hearing a lot about it over the coming weeks. Just know this: If you’re looking for some inspiration in the vegetable department, you are sure to find it in this book. I found mine when a relish of fava beans jumped off the page at me via some gorgeous photography. Favas are my ultimate harbinger of spring and they seemed the perfect accompaniment to the artichokes I had waiting. And a little hint about that other accompaniment I love so much? Hold on to the leaves you remove from the artichoke. Simmered over low heat they go very nicely with a little soy aioli.

I am providing the recipe here as Ottolenghi wrote it, but I was out of panko so I used a mix of walnut flour and whole wheat flour to bread the artichoke hearts. Use whatever, even plain old flour works well too.

Globe Artichokes with Crushed Fava Beans
Adapted from Plenty by Yotam Ottolenghi

1 3/4 cups shelled fava beans
1 small garlic clove, crushed
4 T extra-virgin olive oil plus more for frying
Freshly ground black pepper
1½ t Maldon sea salt
2-3 globe artichokes
3 lemons
1 egg, beaten
3 T panko
3 T fresh mint, chopped
2 T fresh dill, chopped

Bring a pan of water to a boil, add the beans and blanch for three minutes. Drain, refresh and leave in a colander to dry. Remove the outer skins by pressing each bean gently between your thumb and forefinger. Put the shelled beans in the bowl of a food processor. Add the garlic, four tablespoons of oil, some black pepper and half a teaspoon of salt, then pulse until just roughly chopped – don’t overdo it.

Cut off most of the stalk from the artichokes and pull off the tough outer leaves. Once you reach the softer, pale leaves, trim off the top, so you're left with the heart and some very soft leaves around it. Scrape off any remaining tough leaves and the 'hairs' in the center. Rub with a cut lemon to keep the artichokes from turning brown.

Bring a pan of water to a boil, drop in the artichokes and simmer until a knife cuts easily through the flesh, seven to 10 minutes. Drain and dry on paper towels. Put the artichokes in a bowl with the beaten egg, mix, then lift them into a bowl filled with the panko and 1/2 a teaspoon of salt, and coat them well.

Add enough oil to a pan to come 1 1/4 inches up the side. Heat until almost smoking. Fry the artichokes until golden, for about four minutes, turning them as you go. Transfer to a plate lined with paper towels and sprinkle with salt.

Put the fava bean mixture in a bowl and stir in the chopped herbs and the juice of a lemon. Spoon some of this over each serving plate, top with an artichoke heart and spoon more of the beans on top. Finish with a drizzle of olive oil and serve with a lemon wedge, if desired.

Tuesday, March 15, 2011

When Culinary School Hands You Duck Skin...Render It

Photobucket

A year ago, if you asked me if I would ever post a picture of raw duck skin, the answer would have been a definitive no. Clearly, my definition of what constitutes a sexy food photo has changed.

Today, lipids are sexy. Fat is a necessary component of cooking, but we sometimes have a weird relationship with it. On one hand, we tend to shy away from away from it, opting for the fat-free version of anything at the grocery store, but on the other hand, we also drive our cars up to the fast food joint and ask to be supersized. As with most things, fat is good for us if we use it in moderation. It is a vehicle for flavor and there are many fat-soluble nutrients which means, if you’re pouring fat-free dressing over that salad of yours, you could be missing out on a lot of the nutritional benefits.

Now, before I get too preachy, because this blog is about good cooking, not food policy, let’s move on to the duck. If you have yet to cook with duck fat, you are in for a treat. The fat adds a wonderful, rich flavor to things like sautéed potatoes. If you ever cook your eggs in a bit of the bacon grease left in the pan, cooking with duck fat is the same concept. The animal fat comes with its own flavor that, when paired with the right food, just can’t be matched by cooking in olive oil or butter.

One downside to cooking with duck fat is that it is pretty pricey. So, one night at school, when we finished breaking down a case of whole ducks for the restaurant at FCI and were left with extra duck skin, I jumped at the chance to take it home. Three quart containers of duck fat (think about 16 cups) came home with me for rendering. It may sound like an involved project, but rendering your own duck fat could not be more simple. Here are the basics:

Place your duck skin in a pot. Add no more than one inch of water to the pan. If you only have a small amount of skin, add less. Place the pan over medium heat and let it come to a simmer. Over the course of an hour or so, the skin will render the fat and the small amount of water in the pan will evaporate. When the skin starts to turn golden, you know it has rendered its fat. You can drain off the fat and discard the skin or, if you want a double reward, let the skin continue to render until it turns a dark brown. The skin will be crisp and you are left with both rendered duck fat and delicious duck cracklings. Be sure to keep an eye on it at the end. If the skin goes from brown to burnt, you will impart a burnt flavor to the fat and all will be for not. Just keep in mind that with a bit of salt, duck cracklings can be highly addictive and then that whole moderation thing I mentioned earlier goes completely out the window. The choice is yours.

Three quarts of duck skin left me with about two quarts of duck fat, which is more than I will be able to use anytime soon so I am planning on giving some away as gifts. Trust me. Your food-obsessed friends will be forever grateful. The last time I checked, duck fat was going for about $20 a half quart.

Tuesday, January 4, 2011

Back to the Grind

Photobucket

I woke this morning slightly confused to find myself in New York City. See, I was supposed to be back here a week ago, but, like so many others, my travel plans fell victim to the blizzard in New York. My original flight was canceled and the earliest that Virgin America could rebook me was not early enough to make it back for my class at The French Culinary Institute last Wednesday. Rather than continue to fight lines and standby lists at the airport, I extended my stay in California and what was meant to be a five-day trip, turned into 12.

I would have been disappointed to miss any class at FCI, but last week was my buffet night. In level 4, students spend two weeks preparing food for a buffet that the entire school attends. I had been working on a foie gras terrine, head cheese, kimchi and bulgogi, a carrot sesame terrine, a dark chocolate crepe cake, duck confit, and cassoulet. I was enormously disappointed that I did not get to taste the final products or help my team present all of the food. Disappointed isn’t the right word, I was inconsolable.

But, as one learns to do, I made the best of it. I visited with old friends and enjoyed walking around town in sandals and a dress, soaking up the sun. So much so, that by the end of my trip, wool coats and waterproof boots seemed like a distant memory. Until of course, I awoke this morning to find myself in my Chelsea apartment, with the floors slanted ever so slightly westward.

I walked the 1.5 miles to work this morning to shock my body back into acceptance of the cold weather. After work, I am heading home to clean out the fridge (food tends to spoil when you are gone a week more than planned) and to make a bevy of soups, including this one, so I have a stockpile of lunches and dinners for the week.

This soup is comforting and hearty. Ground walnuts are used to add flavor and a bit of thickness. The original recipe calls for fresh tomatoes, but this time of year I always use canned in soups and stews. Tomatoes were not meant to grow in January and when they do, they have little flavor. If you are not comfortable with vermicelli or can’t find it, feel free to use a more traditional pasta.

Ground Walnut and Tomato Soup
Adapted from Real Food Magazine

4 T butter
2 medium onions, chopped
2 cloves garlic, minced
3/4 t salt, plus more to taste
1/2 t ground black pepper
1/2 t whole coriander seed
1 cup walnuts, finely ground
2 cups water
2 oz vermicelli, broken into pieces
28 oz can whole plum tomatoes
1/4 cup chopped parsley
1/4 cup chopped cilantro

Heat 3 tablespoons of butter in a large soup pot over medium heat. Add the chopped onions and sweat until softened. Place the garlic, salt, pepper and coriander in a food processor and process until ground and combined. Add the spice blend to the onions along with the ground walnuts and water, Bring to a simmer and add the vermicelli. Simmer covered for 20 minutes. In a separate pot, cook the tomatoes over low heat until softened. Add the tomatoes to the soup and simmer for five minutes. Add the parsley, cilantro and remaining tablespoon of butter to the pot and adjust the seasoning, if necessary, before serving.

Tuesday, December 14, 2010

Comfort in a Bowl

Photobucket

Most days I push myself pretty hard. I work full time and go to school at night. In my spare minutes I compose posts for Apples and Butter, do a bit of freelance writing and work my tush off at making contacts within my industry here in New York. During my best weeks, I even get up early to stop by the gym on my way in to work.

Today is not one of those days and it is certainly not one of those weeks.

I took my level three final last night at The French Culinary Institute. It was the midterm for the entire program at FCI and worth 50 percent of my grade. In other words, a big deal. While it is a relief to have the thing over with, I am feeling a bit worn down from the whole process.

The flip side of pushing myself so hard is that I also have learned how to hit the brakes and indulge myself a bit when it is truly needed. Today I have plans for a lunchtime trip to Strand to treat myself to a new (used) cookbook or two to flip through while I lay in my cozy bed watching movies, and a big bowl of warm, comforting soup for dinner.

There is something so restorative about a bowl of soup.

This is yet another riff (or shall I say variation? Somewhere between this week and last, I began to hate the word riff, which is entirely unfortunate since it seems to be the favored word of bloggers and established writers alike when referring to their own take on something: ‘My riff on Suzanne Goin’s bacon-wrapped dates,” or “we were riffing on different potato-based soups.” Ugh). I digress. This is yet another way to use my vegetable soup formula. Specifically, this is an example of how to use the formula to make a roasted vegetable soup. Butternut squash is the main ingredient, but I also threw in some roasted mushrooms. I find the savory flavor of mushrooms in pureed soup to add a creaminess that is particularly comforting and I may have mentioned this already, but today I am in need of some comfort.

Refer back to the original vegetable soup formula if you would like to make some changes to this basic variation. And by all means do. Your perfect bowl of comfort may not look exactly like mine.

Roasted Butternut Squash and Mushroom Soup

1 lb cubed butternut squash
8 oz domestic mushrooms, sliced or quartered, plus more for garnish if desired
Canola oil
1 small onion, or half of a larger one, diced
A few sprigs of tarragon
A few springs of thyme
1 1/2 – 2 quarts of vegetable stock (6 – 8 cups)
Salt and pepper to taste
Walnut oil (optional)

Preheat oven to 375˚
Toss the mushrooms and butternut squash with a bit of oil and salt pepper. Spread out the vegetables on a roasting pan and bake until the squash is tender, about 30 to 40 minutes. Add a bit of canola oil to a soup pot placed over medium heat. Add the diced onion and sauté until softened. Add the thyme and tarragon and sauté for a minute or two longer. Add the roasted vegetables to the pot and cover with vegetable stock. Simmer for 30 minutes. Remove the thyme and tarragon and transfer the mixture to a blender to puree, in batches if necessary. Return the pureed soup to the pot and season with salt and pepper. If desired, serve with a garnish of roasted mushrooms and a bit of walnut oil.

Monday, November 22, 2010

Dem Bones

Photobucket

I used to love the knowing looks butchers would flash my way when I would ask for beef bones, chicken carcasses or offal. I once received a marriage proposal after requesting three pounds of oxtail. Rather, I think the butcher told my boyfriend, who was with me at the time, to ask me to marry him right away. ‘Put a ring on that,’ may have been the exact words. You get the point.

That was at least four years ago when I first started making my own stocks and needed to ask butchers for things like chicken carcasses. Those days are pretty much over. It seems it is no longer uncommon for someone to make their own stock or request lesser known cuts of meat. This, in itself, is a good thing. I love that the food revolution has carried quality product and more homemade—fewer processed—ingredients into the kitchen of your average home cook. However, if I am being totally honest, I miss the knowing looks. And the marriage proposals.

One key thing I have learned about stocks at The French Culinary Institute, is that any kitchen without veal stock is an ill-equipped one. On occasion I have the opportunity to bring home from school a quart container of veal stock, or excess demi glace (veal stock that has been reduced by half), but last week I found that all of my reserves had been used up. It is getting cold here in New York and I am going to need a freezer full of stocks to accommodate all of the soup and stew making I have planned for the coming weeks. Unfettered by the lack of butcher attention received in recent years, I set out last week to gather the ingredients for a batch of veal stock.

Though not a difficult task, veal stock is slightly more complicated than the chicken or vegetable stock I make. Since I make a brown veal stock, I have to roast the bones and mirepoix before leaving everything to gently simmer on the stove for hours. Still, considering what a difference using a homemade stock makes in the final flavor of many, many dishes, the effort is minimal in relation to the payoff.

The recipe included below does not need to be followed exactly (I try to use up whatever vegetable trimmings I have stashed in the freezer when making stock), but a good guideline is to aim to include mirepoix (carrots, onion, celery) equivalent to about 20 percent of the weight of bones being used. So, for my seven pounds of veal bones, I included about one and a half pounds of mirepoix.

Once the stock has simmered for roughly eight hours, cool it down quickly by breaking it into smaller containers and chilling them over an ice bath. Once cool, place the containers in the fridge if you are planning on using the stock in a day or two. Otherwise, store them in the freezer for the next soup, stew or braise you make, all of which can benefit from a little homemade stock flavor.

Veal Stock
Makes about 5 quarts

7 pounds veal bones
Vegetable oil as needed
1/2 pound carrots or carrot trimmings cut into 3-in lengths
1/2 pound onions or onion trimmings, peeled and quartered
1/2 pound celery or celery trimmings, cut into 3-in lengths
Greens from one leek, thoroughly rinsed
1/2 cup tomato paste
1/2 cup tomato trimmings or 1 plum tomato, roughly chopped
6 cloves garlic, smashed
Bouquet garni (bay leaf, thyme sprigs, peppercorns, parsley sprigs)

Preheat oven to 450˚
Place a heavy bottomed roasting pan in the oven to preheat. Coat the veal bones in oil and place in the pan. Roast the bones for 30 minutes then turn the bones over and continue roasting for 30 more minutes. Toss the carrots, onions, celery and leek greens with the tomato paste and add them to the roasting pan for the last 15 minutes of cooking (after the bones have been roasting for 45 minutes). Place the roasted bones and mirepoix in a large stockpot. Deglaze the roasting pan with some water to loosen the browned bits, scraping them up if necessary. Add the water and browned bits to the stockpot along with the tomato trimmings. Add cold water to the stockpot until the bones are fully submerged (about 6 quarts of water depending on the pot) and bring to a boil. Reduce the heat to a simmer and skim well. Add the tomatoes, garlic and bouquet garni. Continue to simmer for eight hours. It should be a very low simmer with just a few bubbles breaking the surface every few seconds. Continue to skim the surface while the stock is simmering. Removing the scum that floats to the surface will result in a clear stock - a sure sign of success in a finished stock.

After the stock has simmered for eight hours, strain it and place in smaller containers to cool over an ice bath. I plug up my sink and fill it with an ice and water mixture. I then pour the stock into metal bowls and place the bowls in the ice bath to cool. Pour the cooled stock into quart containers and freeze or place in the refrigerator for later use.

Sunday, October 31, 2010

Tarte Aux Pommes

Photobucket

Lest all of you think that I skipped out of town with my extra copy of the Thinkfood cookbook, I think it is high time I announced the winner. Thank you all for the beautiful stories you shared in the comments section on the last post. I love hearing about other people's food memories.

I used a random number generator to select a number between 1 and 25 (I know this is a cop out, but there were just too many good stories and I was having a really hard time choosing just one). The web site selected number seven, so, Saint Tigerlily, you are the winner! I will get in touch with you to arrange delivery of the cookbook.

In the meantime, as fall is most certainly upon us here in New York City, I think it is time to get down to some apple business. My friend Tanitra, FCI classmate and fellow food blogger, brought me a bag of apples from her recent apple picking outing to Mead Orchards. They are delicious, juicy and just the right balance of sweet and tart. I am using some of them this afternoon to make the Apple Vinaigrette from Phil and Lauren Rubin's new book, The Comfort of Apples. I will be sure and share that vinaigrette and the resulting salad with you shortly, but first I want to get to the apple tart that we are now making nightly in level 3 at The French Culinary Institute.

Get all ideas of apple pie out of your head before you make this tart. There is not a lot of sugar in this filling. If you are looking for a sweet, syrupy interior, stick with your favorite apple pie recipe. However, if you love recipes that let the natural flavor of ingredients shine, definitely give this a go. The tartness of the apples really comes through in the final product.

Tarte Aux Pommes

4 large Granny Smith apples
2 T water
4 T sugar
2 Golden Delicious apples
4 T butter, melted
1/4 cup apricot jam
2 T water, more as needed to thin the jam
Lemon juice as needed
1 recipe of your favorite tart or pie dough

Preheat oven to 400°
Roll out your dough and fit it to an 8" tart shell and place it back in the fridge to rest. If you have just made your tart dough, be sure and let it rest in the refrigerator for an hour before rolling it out.

Peel the granny smith apples and roughly chop them. Add them to a saucepan with two tablespoons of water and 4 tablespoons of sugar. Loosely cover and cook until the apples start to break down. You want the mixture to be approaching applesauce consistency, but with some remaining apples chunks. Set aside to cool.

Peel and core the golden delicious apples. Cut them in half vertically. Cut each half into very thin slices, no more than 1/8". These slices will be used to decorate the top of the tart. If you are not decorating the tart right away, toss the slices with a little lemon juice to prevent browning.

Remove the tart shell from the refrigerator and fill it with the cooled apple filling. The filling should come about 3/4 of the way up the tart shell. Arrange the thin apple slices in two concentric circles. No filling should show through the topping. Place in the preheated oven for 10 minutes. Reduce the heat to 350° and continue cooking for an additional 50 minutes.

Combine the apricot jam and two tablespoons of water in a small pan. Heat gently to thin out the jam. Use a pastry brush to glaze the tart with the jam. Let the tart cool to room temperature before serving.

Tuesday, September 28, 2010

A Healthy Breakfast to Combat Culinary School's Pastry Section

Photobucket
Last night was day two of our two-week section on pastry. The French Culinary Institute believes that culinary students should have at least a background in pastry, and I couldn’t agree more. Take Top Chef as a prime example. Every season at least one, if not two, competitors get sent home for the ill-advised action of taking on a dessert course. We culinary students need to earn our chops in the fine art of dessert-making.

I have an insatiable sweet tooth and while it usually craves chocolate, I am happy to oblige it with a couple of weeks of pastry crèmes, tarts, ice creams, mousses, soufflés, puff pastry and crepes. Unfortunately, I can feel my pants tightening just from writing that list. That, in conjunction with the aftereffects of a serious sugar high in class last night, left me craving something good for my body this morning (when I say serious sugar high I mean serious. By the end of class, no one could stop laughing long enough to listen to the instructor, and after I got home at 11:30 pm, it still took me two hours to be able to go to sleep).

Luckily, in addition to the many food magazines I read, I also have subscriptions to a number of health and fitness publications. Someone who loves to eat as much as I do needs all the help she can get making sure she does not need to buy a new wardrobe every few months. These blueberry pancakes are from Health Magazine’s September issue and a part of their new CarbLovers Diet. I am not someone who has ever in her life been able to stick to a diet (please see previous comment about loving to eat and did I mention I am in culinary school?). However, I do love to take some of the best, healthy recipes from publications like Health, Cooking Light, Family Circle and others, and incorporate them into my cooking routine to bring balance back to my meals. These blueberry pancakes are delicious and easy to make, a combination that should earn them a repeat appearance in your cooking repertoire. At least, if like me, you need a healthy addition to your diet every now and then.

Photobucket

Blueberry Oat Pancakes with Agave-Sweetened Yogurt
Adapted from Health Magazine
Serves 2

1 cup rolled oats
1/2 cup low-fat cottage cheese
2 large eggs
1 t vanilla bean paste (or vanilla extract)
1 cup blueberries
Cooking spray
3/4 cup 0% Fage (or other low or non-fat Greek yogurt)
1 T agave (or maple syrup as the original recipe calls for)

Combine first four ingredients (through vanilla) in a blender and process just until smooth (if you take it too far as I did with my first batch the pancakes will turn out gummy). Place the batter in a medium bowl and stir in the blueberries. Heat a nonstick skillet over medium heat and coat with cooking spray. Spoon a few tablespoons of batter per pancake into the pan. Cook until golden, about three minutes per side. Combine the yogurt and the agave or maple syrup and serve with the pancakes.

Thursday, September 9, 2010

Years That Answer

Photobucket

There are years that ask questions and years that answer. So says the text on the card I received from my parents today for my 30th birthday. According to my mother, I am in one of those years that answers.

At the moment, I still feel as though as I am asking a lot of questions. Where will this year of culinary school take me? Where will I be working? At the end of this year will I get to stay in New York or head back to Los Angeles? Or somewhere else?

At least one question has been answered. Will I ever go to culinary school? Yes. In fact, I am doing that at this very moment. Every now and then I have to stop and remind myself that I am, in fact, doing that very thing. I have been putting this dream together for years and it is so easy to forget that I am finally here living it.

I feel particularly grateful today. It is 1:30 in the morning and I am up late riding the adrenaline of a day that included the 30th anniversary of my birth and the practical and written finals for level one of culinary school. As we were waiting in the hall at school for our exam to begin, a man walked by and asked if there was a final going on. I glanced up and realized that Jacques Pepin was standing in front of me wishing our class good luck. “Cook from the gut,” were his final words as he continued down the hall after graciously posing for pictures with some of my classmates.

Chef Pepin is a dean at FCI, but it’s not as though the man is there every day roaming the halls. It was, without a doubt, a celebrity sighting. I had already decided it was very apropos that I should spend the night of my 30th birthday chopping vegetables during the level 1 final, but Chef Pepin provided the icing on the cake for a notable evening.

There is a bit more icing in my life right now as I lay in bed eating the slice of devil’s food cake I picked up on my way home from school tonight. Final or no final, a girl has got to have cake on her birthday. Lest you start thinking I eat cake every night, I am including the recipe for one of my more common evening snacks.

By the time we finish with school and I catch the subway home, it is usually at least 11:30 pm. To help myself wind down from a busy and late night in the kitchen, I make a quick snack of pears on rye toast with ricotta and agave nectar. The pears and rye feel judicious after an evening that inevitably includes a butter-enriched something and the ricotta and agave sufficiently satisfy my sweet tooth to spare me yet another visit to Billy’s Bakery and a subsequent trip to the gym.

If you are not a fan of the combination of savory and sweet, you can leave out the salt and cracked pepper, but I think it would be a mistake. The more pepper the better and make sure it is freshly ground. It is the perfect offset to the creamy ricotta and sweet agave.

Pear and Ricotta on Rye Toast

1 large slice of rye bread
1/2 small pear
1/3 cup fresh ricotta
Sea salt and freshly ground pepper to taste
Agave nectar for drizzling

Toast the rye bread. Slice the pear thinly and place the slices on the rye bread. Spread the ricotta over the pear and sprinkle with salt and pepper. Drizzle the agave nectar over everything.

Monday, August 23, 2010

Nori Rolls or How To Use Up All Those Julienned Vegetables

Photobucket

I was pretty sure that when I moved to New York, at least 10 pounds were going to melt off of me with very little effort on my part. I knew I would be walking everywhere instead of driving and I guessed that the heat and humidity would be enough to serve as my own personal sweat lodge.

This may be true for some new inhabitants of New York, but not for me. If, like me, you happen to be attending culinary school, The French Culinary Institute in particular, then the increase of butter and cream in your diet is enough to offset any good that pounding the pavement of New York might have done.

Photobucket

Needless to say, when I am not in school, I am doing my best to keep my meals on the lighter side. These nori rolls have become one of my go-to snacks. I eat them like hand rolls, but I have also been known, in my lazier moments, to thrown some brown rice in a bowl, top it with veggies and use a sheet of nori to scoop everything up with my hands. These are delicious and good for you either way. Also, if you happen to be in culinary school, they have the added benefit of using up all those julienned vegetables you have laying around if you have been practicing your knife skills. If you haven’t been practicing, these rolls will give you a great excuse to start.

Photobucket

Nori Rolls
Makes 4 rolls

2 sheets roasted nori
1 cup cooked brown rice (leftovers work great here)
1 T Japanese fish sauce (preferably Ayu for its great, mild taste)
1/2 carrot, julienned
3 green onions, julienned
1/4 avocado, sliced thinly

Toss the brown rice with the fish sauce and set aside. If you just cooked the rice, let it cool before assembling the rolls. Cut one sheet of nori in half lengthwise to make two strips. At one end of each strip of nori, pile 1/4 cup of rice, leaving the bottom corner of the nori sheet exposed so you can use it to start rolling. Place a quarter of the julienned carrots and green onions on the rice on each sheet along with one or two slices of avocado. Fold the bottom corner of the nori sheet over your pile of rice and vegetables and continue rolling the sheet into itself until you form a hand roll. Use a bit of water to moisten the end of the nori sheet to get it to stick to the roll. A bit of brown rice may fall out as you are rolling. Just tuck it back in to the roll when you are finished. I eat these plain, but you may also serve them with soy sauce or extra fish sauce for dipping.

Monday, August 2, 2010

Roasted Beet Timbale

Photobucket

Week one of culinary school is officially behind me. In only four classes we covered knife skills, taillage, tournage (turning vegetables into cocottes and other maddening seven-sided football shapes that I am pretty sure are going to give me carpal tunnel), ServSafe and all the many ways I can kill you if I don’t handle food properly, cooking a l’anglaise and a l’etuvee, ratatouille, timbales, and a vegetable dish made up almost entirely of cocottes. At least, it was supposed to be made up entirely of cocottes. I have a long way to go before those seven sides come out evenly. It was an exciting if not slightly frenetic week and though I am not yet working during the day, I was grateful for this past weekend to catch my breath, find my footing and prepare for this week’s lessons.

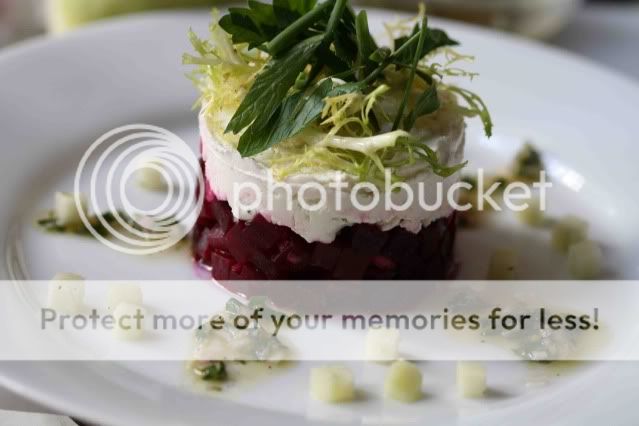
A roasted beet timbale was the most attractive dish we made last week. For that reason, and because of its surprisingly simple preparation, I recreated the dish at home to share with you here. Well, those reasons and I snagged the extra roasted beets from class. Aside from the precarious beet juggling it took to get them home on the subway without a bag, I was thrilled. Extra beets meant I could make this timbale for you without even turning on my oven. At the risk of beating a dead horse I must say, the idea of turning on my oven for anything is still a bit off-putting.

Photobucket

Once your beets are roasted (or donated by a generous culinary school instructor), this salad is just a few simple steps of chopping, mixing and stacking. It looks slightly intimidating because of its lovely composition, but trust me, this is simple stuff. I did not even look at the recipe the second time I made it.

In a few hours I am off to school for lesson five – stock night. I have made my fair share of chicken and vegetable stocks so I am hoping for a beef or veal stock assignment. Though I am not sure we will even make those in class this evening as they need to simmer for longer than the five hours we have available. Perhaps we will set them to simmer overnight and tomorrow’s day class will take it from there.

Photobucket

Roasted Beet Timbale
Adapted from The French Culinary Institute Level 1
Yield 4 Servings

3 large beets (approximately 1 lb), roasted
2.5 oz extra virgin olive oil
1 oz white wine vinegar
1 shallot, finely chopped
1/2 bunch fresh tarragon, chopped
1 granny smith apple
4 oz goat cheese
1 T chopped parsley
6 chives, cut into 1-inch segments
1 T chopped chervil
1/4 head frisee, picked, washed and dried
Salt and pepper to taste

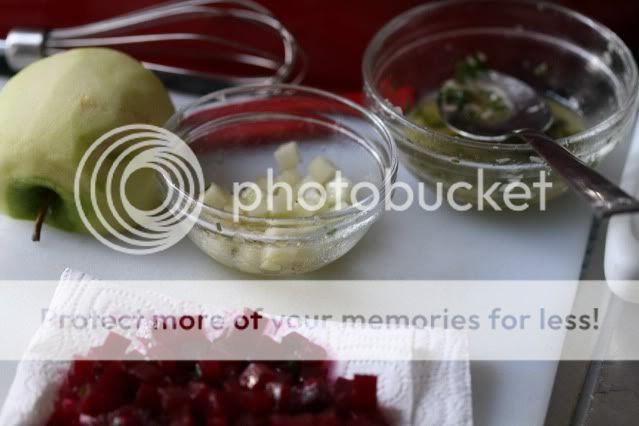
Peel the beets and cut into a small dice (to be exact, we cut them into a shape called macedoine which is a 1/2 cm x 1/2 cm cube). Place the chopped shallots in a small bowl and add the vinegar and a sprinkling of kosher salt. While whisking, slowly pour in the olive oil. Add the tarragon leaves and adjust the seasoning. Use a few spoonfuls of vinaigrette to dress the beets and set aside.

Peel the apple and cut into a small dice (again a macedoine if you want to be exact). Dress the apple with a bit of vinaigrette to slow oxidization and set aside.

Bring the goat cheese to room temperature. In a small bowl, work the goat cheese until it is spreadable and season with salt and pepper. Blot the beets with a paper towel to remove any excess liquid. Place a 3-inch ring mold on a plate and put the beets in the mold, pressing down slightly to create an even layer. Top with the goat cheese, smoothing the top so it is flush with the mold (my ring mold was too tall so the goat cheese was not flush with the top of the mold). Gently remove the ring mold.

In a separate bowl, mix together the herbs and frisee and season with salt and pepper. Add olive oil to lightly coat the leaves. Top the goat cheese with the small herb salad. Place some of the apples around the plate and spoon the vinaigrette over the plate in a decorative manner.

Note – you may have some leftover vinaigrette, salad and apple. Do not feel as though you have to fit it all on the plate. Toss them together and enjoy separately from the timbale.

Wednesday, July 28, 2010

Finally a Food Photo

Photobucket

I find it appropriate that Panzanella is the first thing I made in my New York kitchen. After a week-long restaurant binge that could rival my best vacation eating on record (Cookshop, Tipsy Parson, Crema Restaurante, Oyster Bar, Bleecker Street Pizza, Txikito, Shake Shack, a culinary tour through Chinatown, and Otto Enotecca) I needed to slow down and make a simple and affordable dish.

Panzanella is considered peasant food in Italy. At least it was when the salad was created as a way to use up stale bread. A bit of a peasant myself these days (no paycheck in site and a culinary education to pay for) I am trying to take on my own waste-not-want-not mentality. Rather than discarding stale bread, I can chop it up, sauté it with a little olive oil and garlic and toss it with some chopped vegetables already on hand. It means lunch is thrown together without running out for additional ingredients. Simply put, Panzanella is delicious and makes me feel good about my grocery budget. Added bonus? I do not have to preheat my oven in the sweltering New York heat.

I ate this salad right away, but it gets even better after a few hours as the flavors meld together.

Next up – finding ways to use up mounds of julienned carrots without turning on my oven. Practicing my knife skills at home, where there is no industrial pot of chicken stock waiting at the ready for my carrot donations, may turn me orange from carrot consumption.

Photobucket

Panzanella

7-inch long piece of baguette (multigrain or other)
3 T of extra-virgin olive oil, divided
1 garlic clove, smashed and skin removed
1/2 cucumber
6 baby roma tomatoes (or 2 regular roma tomatoes, roughly chopped)
2 oz buffalo mozzarella
2 t balsamic vinegar
Salt and pepper

Cut the baguette into 1-inch chunks. Heat a large sauté pan over high heat. Add 2 tablespoons of olive oil to the pan and fry the garlic clove for one minute. Add the bread and salt liberally. Reduce heat to medium and sauté until bread is crisp and golden brown, about 10 minutes. While the bread is cooking, peel the cucumber and chop into 1-inch pieces. Cut the tomatoes into quarters. When the bread is crisp, place it in a medium bowl along with the cucumber and tomatoes. Using your hands, rip the mozzarella into small pieces and add to the bowl. Drizzle the balsamic vinegar and remaining tablespoon of olive oil over the bread mixture. Season to taste with salt and pepper.

Thursday, July 15, 2010

Pantry Cooking and Boxes

Photobucket

Welcome to my breakfast. This is what I have come to call pantry eating. I have not been to the grocery store in a week and a half. I refuse to buy new groceries in an attempt to use up the many boxes of various grains that crowd my pantry and the stocks, proteins and numerous containers that are taking up my freezer. I am hoping to use, not throw away, the contents of my kitchen before I clear out.

The picture is of the grits and eggs and that are quickly becoming a staple for breakfast. I wish I had something more elegant to show you or even a recipe to share, but it is just not in the cards this week. My kitchen is in boxes halfway to New York and I have done next to no cooking.

Photobucket

Instead, my week has been filled with finding places to store boxes, trips to Goodwill and realizations that I really did not ever need so much stuff anyway. I think any move is a good time to go through your belongings and trim the fat, but a move to a small New York apartment will really show you how little you need to exist comfortably.

Today is day four of official unemployment and as I awake to find that I have already found a home for every box and that most of my furniture is spoken for, I realize it is time to slow down and start to say my goodbyes to those I care about in Los Angeles. I am much better at the busy ‘doing’ rather than the slow and sometimes painful feelings associated with goodbye. Unfortunately, with no more boxes to move and only four days left in Los Angeles, I cannot avoid the goodbyes any longer.

Monday, June 21, 2010

This is Not a Food Photo

Photobucket

So this is not a photo of food. ‘Obviously,’ you might point out. Well, it is obviously not a food photo, but it is actually, not so obviously, food-related. I know it is just a building and the residents would probably disagree, but to me, it is absolutely food-related. This photo is of the building I will be living in one month from now, when I move to New York City to attend culinary school.

There. I said it. It’s out.

I have researched and considered and pondered the thought of going to culinary school for years. I finally decided it was time to stop waiting to start the rest of my life. The timing was never going to be perfect, the circumstances were never going to be ideal and I certainly couldn’t wait for someone else to make it happen for me. So now I have made the decision to leave and low and behold, the timing couldn’t get much better, the circumstances are as good as they’re ever going to be and the best part, I made it happen for myself (with the help of a huge support network).

So, I am leaving. I am packing up and I am leaving. I am leaving behind my boyfriend, a steady paycheck, the comforts of a comfortable life and risking it all in the hope that someone will pay me to play with food.

The French Culinary Institute in SoHo will be my home away from home for the next nine months as I complete their Classic Culinary Arts program. I’ll be living not too far away in Chelsea, doing my best to take advantage of all that New York has to offer and sharing as much of it as I can with you here, at Apples and Butter.

No recipe today. Just this really exciting (for me) news.