Showing posts with label Chicken. Show all posts

Thursday, August 9, 2012

A Multi-Purpose Dressing

Photobucket

Well hello there. So. It’s been more than a little while since I last posted. 10 months to be exact. Things got busy, I planned a wedding, got married, went on a honeymoon and now, almost two months after The Big Day, I have recovered from the whole wonderful, exhausting experience just enough to get back in my kitchen and start documenting it again for you here, that is, if there are any of you left after my prolonged absence!

The meaning of this blog’s name (balancing the healthy – apples - with the delicious, but not-so-healthy – butter) could not be any more pertinent in my kitchen than it is right now. Since getting married I feel I am fighting the constant battle of trying to find dishes fabulous and flavorful enough to keep my husband (my ever-so-slightly picky husband) coming back to the dinner table, while trying desperately not to regain those 10 culinary school pounds I managed to lose for the wedding. Fun times in the Stanbrook kitchen.

Battle number one. Teach husband that chicken does not have to be flavorless diet food. Far from it! When cooked just until done (not to a dried out, parched mess of protein) I think chicken is absolutely delicious. However, properly cooked chicken does not, on its own, a fabulous and flavorful meal make.

Enter the one-two-punch of a marinade and grill. The flavor of chicken cooked on a grill will always remind me of the Cornish game hens my father grilled for our family at least once a week when I was a child. Perfectly cooked, with just the right amount of char, it is quintessential outdoor living, Southern California food to me. Use the following dressing that pulls on some of the season’s best flavors (pesto anyone?) as a marinade and I think you’ve got the perfect summertime dinner.

This dressing lives somewhere between vinaigrette and pesto. If you have extra basil, make as much of this dressing as you can and use it as a condiment for cooked meats or a salad dressing; toss it with freshly cooked vegetables or throw it over pasta. I have included directions below for using it as a marinade for grilled chicken breasts.

Photobucket        
Summer Pesto Dressing

1-1/2 cups loosely packed basil leaves
1/3 cup walnuts or walnut pieces
1 T white balsamic vinegar
2 T fresh lemon juice
1 t honey
1/2 t salt + more to taste
1/3 cup extra virgin olive oil + more as needed

Combine first six ingredients in a mini-food processor (or a regular food processor if you only have the full size) and pulse until combined. Add the olive oil and let the processor run until the oil has blended and somewhat emulsified with the other ingredients. I like to leave this dressing chunky, but if you prefer a smoother dressing, continue blending and add more olive oil until your desired consistency is reached. Taste and adjust seasoning.

To use this dressing as a marinade for chicken breasts:

Using a sharp knife, make three slashes in each breast, only cutting about 1/8” to 1/4”-inch into the breast. Reserve 1/2 of the dressing to serve as a condiment for the cooked chicken or to use later as a salad dressing. Rub 1/2 of the remaining dressing over the breasts and let them marinate in the fridge for as much time as you can – 30 minutes to three+ hours.

Fire up your grill. Let your chicken breasts start to come to room temperature while your grill heats up. Place the chicken on the grill and adjust the flames/charcoal to prevent flare ups. Close the grill cover and only lift it occasionally to baste the chicken with the remaining dressing. I wish I could tell you how long to cook the chicken, but every grill and every chicken breast is different. My chicken breasts were not gigantic and it took about six minutes on the first side and an additional four to five once I flipped them over. If your chicken is getting too black before finishing cooking, move it to a cooler area of the grill or a raised shelf and let it finish cooking with the grill cover closed. Serve the chicken with the remaining dressing.

Friday, December 17, 2010

Chicken Liver Pâté Round ??

Photobucket


Chicken liver pâté is one of my favorite things to make and to eat. The first time I prepared it, I was living with my parents for a short period of time after graduating from college and before starting to work. I was trying to make up for playing the part of the typical college student who returned home jobless, by making dinner for them on a semi-regular basis. I was just starting to delve into the world of cooking and my meals were always the result of experiments with new dishes. It is unlikely that we ate the same thing twice during those few months.

I remember my osso bucco being a particular hit with my father. Of course, there was also the day I fell asleep on the couch while there were chicken thighs braising on the stove. I awoke to a house filled with smoke and some chunks of carbonized, used-to-be-chicken thighs permanently fused to the now ruined pan. Luckily, I was just cooking for one that night and my parents were out of town.

The first time I made chicken liver pâté it seemed as if I was embarking on quite the endeavor. After all, pâtés and charcuterie, though delicious, were still a mystery to me and not the sort of things you made at home. My mother assured me over and over again that it was a very simple dish to make, but I did not believe her. It was too exotic. How could pâté be easy?

Turns out, it is easy. It is also cheap. A pound of chicken livers is never over $2 and that includes the livers that I picked up from high-end, specialty retailer Eataly, here in New York. Once I discovered how easy it is to make this rich, delicious and often impressive dish, it became part of my regular repertoire. Chicken liver pâté at the holidays, chicken liver pâté to go with every cheese plate, my mom and I even made it for an event during the weekend of my brother’s wedding. We have bounced back and forth between recipes and I am always on the lookout for new ones to try.

So, when I saw this latest recipe while perusing Sweet Paul, a visually stunning online magazine, I knew I would be making it that weekend. This is a great chicken liver pâté. I will not go as far as to say that it is my favorite (that title still belongs to this recipe), but it is delicious and, unlike my favorite recipe, perfect for placing in a beautiful jar, under a thick layer of clarified butter and giving as a gift this holiday season.

Chicken Liver Pâté
Sweet Paul Magazine

1 pound chicken livers, cleaned
1 cup milk
3 T butter
1 small yellow onion, chopped
1 t fresh thyme
1/2 t salt
1/2 t pepper
1/4 cup cognac (I used white wine)
4 T butter

Topping
1 stick butter
6 sprigs thyme

Place the chicken lives in the milk and soak in the refrigerator overnight (24 hours if possible). Drain the livers. In a large pan, melt 3 tablespoons of butter and sweat the onions until beginning to soften. Add the chicken livers and thyme and sauté until the livers are browned on the outside (about five minutes). Season with salt and pepper and cook for one more minute. Add the cognac or wine and cook until almost all of the liquid is gone. Transfer the mixture to a food processor and puree until smooth. Spoon the pâté into six ramekins.

For the topping: Melt a stick of butter in a small saucepan. As the milk solids float to the top, remove them with a spoon until the butter is totally clear and you are left with clarified butter (alternately you may purchase clarified butter and melt it until pourable). Cover each ramekin with a layer of clarified butter. Place one thyme sprig in the butter for decoration and chill until solid.

Tuesday, January 12, 2010

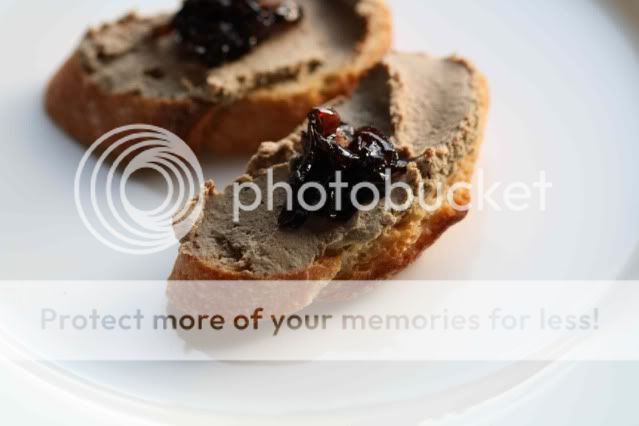
Chicken-Liver Toasts with Shallot Jam

Photobucket

If it is at all unclear how much I adore the restaurant Animal, let me reiterate it here: Animal is my favorite restaurant in Los Angeles. When I can’t make it up there for dinner, riffing on their poutine dish at home is a pretty decent substitute. When we do eat at Animal, we go for the indulgence factor. As much liver as possible please, which means starting with an order of chicken liver toast followed by at least one, if not two, foie gras dishes.

I realize this doesn’t exactly paint a picture of health, but I don’t think a restaurant with the name Animal is going after the health-conscious diner. Though some Angelenos seem slow on the uptake in this area. On a recent visit, we caught a neighboring table pleading with one of the waiters that they must have something, anything vegetarian?? I’m not sure what, exactly, was misleading about a restaurant named Animal, but this diner seemed thoroughly shocked at the lack of meatless options. I wanted to cheer the waiter on when he politely declined to make any substitutions. You just can’t make this stuff up.

As much as I love dining at Animal, I have often wished that I could expand my Animal-at-home repertoire, so I was thrilled to see them (Chefs Jon and Vinny), and some of their recipes, featured in Food & Wine's January issue. Liver aficionado that I am, chicken-liver toasts with shallot jam was the obvious choice from the three or four recipes offered up in Food & Wine. Oh, and if you know any non-liver loving friends? Try this recipe out on them, I think I may have finally converted a NLL friend of my own.

Photobucket

Chicken Liver Toasts with Shallot Jam
Vinny Dotolo and Jon Shook of Animal

12 T butter at room temperature, divided
1 pound chicken lives, trimmed of fat and connective tissue
1 medium red onion
4 thyme sprigs
1 long baguette
2 garlic cloves
Olive oil for brushing
Salt and pepper

Melt 2 T of butter in a large sauté pan over high heat. Season the chicken livers with salt and pepper and cook until lightly browned, about two minutes per side. Remove the livers to a plate. Melt 2 T of butter in the same pan over medium heat. Add the onion and thyme and cook until the onion is soft, about 10 minutes. Add the chicken livers to the pan and cook for an additional two minutes. Set mixture aside to cool. Once the livers have reached room temperature, discard the thyme and puree the mixture along with the remaining 6 T of butter in a food processor until smooth. Jon and Vinny strain the puree through a fine mesh sieve, but I skip this step for a slightly more rustic product. Your choice. Either way, season the puree well with salt, cover with plastic wrap directly on the surface and chill until set. Make the shallot Jam while the liver is chilling.

Shallot Jam

2 T vegetable oil
4 large shallots, sliced thin
1/3 cup brown sugar
3/4 cup balsamic vinegar
Salt

Heat the vegetable oil in a medium skillet and add the shallots. Cook until softened, about 10 minutes. Add the balsamic and brown sugar and simmer until reduced to a thick jam. Jon and Vinny seem to think this should only take about five minutes, but it takes me 15 to 20 minutes. Either way, cook it until thick and season with salt.

Once the liver is set, preheat an oven to 400*. Cut the baguette into thin slices and toast in the oven for 10 to 15 minutes until crisp. Immediately brush the toasts with olive oil and rub with garlic cloves. Spread a healthy helping of liver mousse on top of the toasts and top with some of the shallot jam.

Wednesday, February 11, 2009

Puff Pastry Tarts

Photobucket
I’m very lucky to have a lot of friends and family that appreciate good food. It means I have lots of partners in crime when it comes to discovering a new favorite restaurant (Animal), plenty of people to co-sign on my newly developed $30-a-weekend cheese habit, and best of all, no shortage of friends to try out my creations.

I was invited to a small gathering of some of these friends last weekend and, along with everyone else, was asked to prepare something for the meal. One of our friends is a vegetarian and that, along with the food’s portability, needed to be taken into consideration.

Pizza and flatbread creations always come to mind in these situations. They’re great finger food, easily transported and straightforward enough that I could make two – one with the vegetarian in mind and one for everyone else. To be sure to keep it simple, I decided to use puff pastry as my crust and turn my attention to the toppings.

Roasted vegetables seemed like the clear topping choice for a vegetarian. I decided to leave the selection of veggies open until I saw what looked good at the farmers' market. I don’t always like to do this because if I don’t have a focus, I tend to buy everything on site (as mentioned here), but looking for good veggies to roast seemed like enough direction.

I settled on small red onions, petite carrots and brussels sprouts. If you can’t find these or don’t particularly like them, choose whatever vegetables you prefer to roast for the topping. Try to keep color in mind - the more vibrant the colors, the more appetizing your tart will look.

The meat toppings were a cinch. Shredded chicken along with ridiculously thick cut bacon I picked up at Surfas matched perfectly with ricotta. I used fresh ricotta from Surfas, but if you’re feeling adventurous and want to make your own, you can find a recipe here.

I’m a carnivore to end all carnivores (just check out the menu at my new favorite restaurant listed above), but I have to say the vegetarian tart was my favorite. They were both delicious, but something about the way the roasted vegetables melded with the pea shoot pesto was really perfect.

Photobucket
Vegetable Puff Pastry Tart

1 small red onion
8 petite carrots (or 4 large)
1/2 basket of brussels sprouts (about 10)
2 T olive oil
3 – 4 thyme sprigs
1/2 sheet-sized piece puff pastry
1/2 recipe pea shoot pesto
Egg wash
1/2 cup shredded Cabra Romero
Salt and pepper to taste

Preheat oven to 400*
Cut the carrots on the diagonal into 1/8” thick pieces. Slice the onion so some of the rings remain intact. Quarter the brussels sprouts. Toss the vegetables with the olive oil and the thyme. Roast until beginning to soften and slightly brown on some edges (about 30 – 40 minutes). Leave the oven on at 400*. (recipe continues below)

Photobucket

Score the puff pastry with a pairing knife to create a 1-inch border. Spread the pea shoot pesto inside the border and use a pastry brush to apply the egg wash to the 1-inch border area (as shown above). Spread the roasted vegetables over the pea shoot pesto and bake the tart for 20 minutes. Remove from the oven and sprinkle the Cabra Romero over the vegetables. Bake for 5 – 10 more minutes until the cheese is melted and the border is golden brown.

Note – Cabra Romero is a hard Spanish goat cheese that is encased in rosemary. It’s faint note of herb is really delicious here, but if you prefer, a good parmesan would work as well.


Photobucket

Chicken and Bacon Puff Pastry Tart

1/2 sheet-sized piece puff pastry
Egg wash
1/2 recipe pea shoot pesto
1 roasted chicken breast
4 pieces of thickest cut bacon you can find
1 T olive oil
1/2 pound ricotta

Preheat oven to 400*
Score the puff pastry with a pairing knife to create a 1-inch border. Spread the pea shoot pesto inside the border and use a pastry brush to apply the egg wash to the 1-inch border area. Shred the chicken breast. You may use the method of taking two forks and pulling the chicken apart, but I prefer my hands. Cut the bacon into lardons (slices about 1/4" wide) and fry in olive oil. When well-browned, drain on paper towels. Spread the chicken and bacon evenly over the pesto and top with chunks of ricotta. Bake for 25 minutes until the ricotta is just starting to brown on some edges.

Thursday, November 20, 2008

Chicken Stock - Locally

I had no idea that the most valuable lesson I would learn about cooking would also be one of the simplest. Stock is the base for so many soups, sauces, braises and other dishes and from what I've read of Rulhman's experience at CIA, it's the first thing you learn at culinary school. You probably know how much you rely on it because of the number of containers of stock you go through, but do you know how easy it is to make at home? I had heard countless times from cookbooks and TV Chefs how important it is to make your own stock and what a difference it makes in flavor, but had never really taken them seriously. That's not to say I didn't believe them, just that I didn't think it was realistic for someone with a full-time job to make their own stock. How wrong I was.

It turns out that with a little bit of prep work, you can have stock made in an afternoon with most of that time being spent on unmonitored simmering. Even better, that one afternoon can provide you with enough stock to stick in the freezer to last a few months (as long as you're not making vast amounts of soup). If the idea of butchering a chicken at home is off-putting or if you're interested in making beef stock, talk to your local butcher about buying bones for stock. In most cases, they'll be happy to oblige.

Please keep in mind that this recipe is simply a guide. The water will vary according to how many bones you have and the aromatics should be adjusted to your personal taste. Since this is another piece to my short rib recipe with all local ingredients, I made sure that all of my vegetables were California grown by going to my farmers' market. I also took the time to search out fresh California bay leaves, as well as cage-free, locally raised chickens, etc. Don't feel like you have to go to those lengths if you're not as excited about cooking locally as I am!

Chicken Stock

Bones from two chickens

3 litres of water

2 onions, quartered

3 carrots, cut into 2-3 sections

3 celery stalks with leaves attached if you've got them, cut into 2-3 sections

3 thyme sprigs

2 bay leaves

4 peppercorns

The chicken bones should be relatively clean. Place them in the bottom of a large stock pot and cover with water. Add the onions, carrots and celery. I leave the leaves on my celery to act as a distiller. I have no idea if it actually works, but I get the sense that they help to soak up impurities that would otherwise need to be skimmed off as the stock simmers. Bring the mixture just to a boil and reduce the heat to simmer. Cook for 4 - 5 hours, checking the pot every 30 - 60 minutes to make sure it has not come up to a boil. All you want is a gentle simmer. Wrap the bay leaves, thyme and peppercorns in cheesecloth and add them to the stock for the last 30 minutes. 

After 4 - 5 hours of simmering, drain the stock and discard the vegetables and bones. At this point you can either painstakingly skim the surface to remove fat, or you can pour cooled stock into storage containers and place them in the fridge. After a few hours the fat will have risen to the top and solidified and you can simply scoop it out. Freeze whatever stock you aren't going to use within a few days. After defrosting, I always bring my stock up to a boil before using. Enjoy!

Monday, October 27, 2008

Soy Ginger Chicken

I am always looking for new ways to cook chicken. It's such a convenience meat - not too expensive and easy to keep around. So when I saw this recipe on Everyday Food's site, I couldn't wait to try it. Having a momentary lapse in judgement and forgetting that the boyfriend doesn't always dig the Asian flavors, I decided to make this for our Saturday night dinner. True to form, he was not a huge fan. He thought it was fine and ate it, but this won't likely be making it into regular rotation. I, on the other hand, loved it. The soy sauce and cilantro flavors really come through in the chicken, and the meat gets to that magical place of tenderizing and falling off the bone. Delicious. The original recipe was clearly lacking some stock or other cooking liquid from the ingredient list so I've added two cups of chicken stock to the mix.

Soy Ginger Chicken
Adapted from Everyday Food
Serves 2

1/3 cup soy sauce
2 T brown sugar
5 garlic cloves, thinly sliced
2/3 cup chopped cilantro
1 small piece ginger, peeled and cut into thin strips
1 T balsamic vinegar
1/2 t ground pepper
2 cups chicken stock
5 scallions, thinly sliced
2 chicken quarters, skin removed and leg and thigh cut apart
2 carrots, peeled and thinly sliced
1 T cornstarch

Preheat oven to 325*
Combine first eight ingredients and half the scallions in a medium dutch oven and stir to combine. Place chicken and carrots in the pot and stir to coat. Place in the oven for 1 hour and 45 minutes until the chicken starts to fall of the bone. Continue cooking if necessary. Mix cornstarch with 1 T water. Remove the pot from the oven and ladle one cup of cooking liquid into a a small saucepan. Mix the cornstarch slurry into the cooking liquid and cook until simmering and thickened. Return the thickened cooking liquid to the pot and mix. Divide chicken and sauce between two bowls of white rice and enjoy!

Thursday, October 23, 2008

Sweet Corn and Chicken Pizza

It may be a product of growing up in California with California Pizza Kitchen, but I'm a sucker for non-traditional pizza ingredients. Whether you call it flatbread, pizza or crostini, if it involves dough, cheese and off-base ingredients, I'm there. 

I can still remember my first meal at a California Pizza Kitchen. It was sometime in the eighties at the (original?) location in Brentwood. My Aunt Linda had taken my brother and I off my parents' hands for a night and was taking us to this cool, new restaurant. We decided on a BLT pizza, but then tried to confuse the waiter by adding in a few more letters for ingredients we wanted to throw into the mix. Not only were they going to bring us a BLT pizza complete with mayonnaise dressing on the lettuce, but they were going to throw in some avocado and other toppings we had requested. I was sold.

To this day, I love dressing up quick tortilla pizzas with unique ingredients. My current favorite is sweet corn. It gives you that wonderful sweet/savory thing going on with the pizza and the tortillas are easy to keep on hand and require no pre-baking. Talk about a quick dinner? This is it.

Sweet Corn and Chicken Pizzas
Serves 2 - 4 depending on your eaters

2 flour tortillas
1/2 cup marinara sauce
1 cup shredded chicken
1/2 cup sweet corn
3/4 cup mozzarella cheese

Preheat broiler
Spread 1/4 cup marinara and 2 T cheese over each tortilla. Divide shredded chicken and corn between each tortilla and top with remaining cheese, 1/4 cup for each tortilla. Place under the broiler for five minutes until starting to brown on top. Cut into wedges and enjoy!

Monday, October 20, 2008

White Bean Chili

I'm not a big chili-maker. To be honest, I haven't been much of a chili eater either. Since it takes so much time to get a beefy chili cooked down to deliciousness, I just don't make it at home very much. Don't get me wrong, if it's something I love, I will put all the time necessary into a dish, but chili just isn't one of those dishes for me.

I've seen a lot of white bean chili recipes lately and realizing that I could use chicken to make a lighter chili, I decided to make my own at home. The results were delicious. Next time, I'm making a pot of polenta so I can serve the chili on top.

White Bean Chili

1 T vegetable oil
1 can white kidney beans
2 chicken breasts
2 cups chicken stock
1 large onion, diced
4 garlic cloves, chopped
3 t chili powder
1 T tabasco sauce
1/2 t cumin
1/2 t salt
scallions for serving

Heat the oil in a heavy bottomed skillet or dutch oven and add the onion and garlic. Saute for five minutes and add the chili powder, tabasco sauce, cumin and salt. Continue to saute, stirring regularly and adding a bit of the stock if necessary to keep the onion mixture from sticking to the bottom of the pan. Place the chicken breasts in the pan and allow to sear on both sides. Add the remaining stock and simmer for 10 - 15 minutes until the chicken is cooked. Remove the chicken from the pan and set aside to cool. Add the kidney beans and continue to simmer. When the chicken is cool to the touch, shred it and return to the pot. Remove from heat and adjust seasoning to taste. Divide between four serving bowls, top with scallions and enjoy!

Thursday, September 18, 2008

Mom's Mustard Chicken

One of my favorite dishes growing up was my mom's mustard chicken. I used to love helping her make it. She would pull the chicken out of the pan and make a sauce right in the same pan. I didn't know it at the time, but she was teaching me how to make a pan sauce, the most basic sauce in cooking by my book. Make sure you don't use a nonstick pan on this one because you want to get those brown bits forming on the bottom of the pan - that's what makes a good pan sauce. I'm updating her recipe just a touch by pounding the chicken breasts flat and serving mixed greens on top. Delicious.

Mom's Mustard Chicken
Serves 2

2 chicken breasts
1 T canola or olive oil
3 T dijon
2 T grainy mustard
1/2 cup half and half
2 cups mixed greens
lemon vinaigrette (lemon juice, oil, salt and pepper)

Pound the chicken breasts flat between two sheets of saran wrap. Season lightly with salt. Heat the oil in a pan (not nonstick) and saute the chicken breasts until just done, then remove to a plate. Add the mustards and half and half to the pan and simmer gently for 2 - 3 minutes. Return chicken to the pan and heat through and cover with sauce. Dress the lettuce with the lemon vinaigrette. Place each piece of chicken on a plate and top each with half the mixed greens. Enjoy!

Thursday, September 4, 2008

Chicken Pinwheels

I didn't really start cooking until my senior year of college. My family can attest to this and would probably love to share stories of microwave Betty Crocker brownies cooked in the oven only to have the microwavable pan turn into a melted mess. What started me cooking was getting my first apartment alone. No roommates meant an empty fridge until I filled it and having to fill it meant I had to learn what to do with all of the things I brought home from the store.

This rolled up chicken breast is one of the first things I learned how to make. I think I first saw something similar in a basic chicken cookbook, but it has evolved a lot since that first recipe that was meant for the grill. My friend Jodi is starting to get into cooking and she asked me for some ideas of chicken dishes she could make. I dug back into what I liked to make when I first started cooking and immediately remembered this dish. It's pretty quick to make and was ready in no time after coming home from a day at work. I had the best intentions of making a homemade marinara sauce to go with it, but when I got home from the store, realized I had picked up the can of Marinara rather than the can of crushed tomatoes that was right next to it on the shelf. Hate it when that happens! So, for this one, just serve it on a bit of your favorite marinara (homemade or not).

Chicken Pinwheels
Serves 2

2 chicken breasts
4 T tomato paste
1/2 cup basil leaves
salt and pepper
2 T canola oil
1 cup marinara to serve (optional)

Preheat oven to 375*
Place each chicken breast between two sheets of plastic wrap and use a rolling pin to pound them down to an even thickness. Spread 2 T of tomato paste on each breast and lay the basil leaves over the paste. Sprinkle generously with salt and pepper and roll up the breasts. Secure with kitchen twine and sprinkle the outside generously with salt and pepper. Heat the canola oil in an ovenproof pan over high heat. Add chicken rolls to the pan and sear on all sides. Place the pan in the oven until fully cooked, about ten minutes. Remove from the oven and let it sit for at least five minutes before slicing to reveal the pinwheel design inside. Serve each breast over a 1/2 cup of warmed marinara. Enjoy!

Friday, August 15, 2008

BBQ Chicken Calzone

It was either Wolfgang or California Pizza Kitchen that first put a BBQ Chicken Pizza on the menu and it's something that I have been eating since I was a kid. It's one of those flavor combinations that I probably never would have thought of on my own, but am so glad that someone else did. When you bite into this calzone the sweetness of the BBQ sauce and caramelized red onions plays perfectly off the savory nature of the pizza. Dip the pizza in some cool ranch dressing and it's heaven. My Italian neighbor thinks it's blasphemy to utter the words pizza and ranch dressing in the same sentence. What do you think?

BBQ Chicken Calzone
Serves 2

2 cooked chicken breasts, shredded
1/2 cup BBQ sauce
1 small bunch cilantro, chopped
3/4 cup mozzarella cheese
1 small red onion
1 T canola oil
1 package store-bought pizza dough
flour for dusting rolling pin

Preheat oven to 375*

Slice the onion thinly. Heat the canola oil in a medium pan over medium heat and add the onions. Saute until caramelized and let cool slightly. Divide pizza dough in two and form into flattened round discs. Let rest while you prepare the filling. Combine the chicken, chopped cilantro, cheese and onion in a small bowl. Roll each disc of pizza dough out into a 10" circle (no points for perfection here - anything close will do). Mound half of the filling on one side of each disc and fold remaining half over the filling. Seal the calzones by folding the edges up and pressing down lightly. Press edges down with a fork to ensure a tight seal and use fork to poke a few venting holes in the top of each calzone to release steam. Bake for 24 - 26 minutes until golden brown. Enjoy!

Tuesday, July 22, 2008

Chicken Satay with Peanut Sauce

I love peanut butter. It's a lot more common in baking than in savory dishes, but the opportunity to use it in a main course should not be missed. You may be accustomed to peanut dipping sauces at restaurants, but this is a really easy one to make at home. I have to admit, the chicken skewers were an afterthought because I needed something to dip in the sauce, but with a protective coating of our friend Fage, these skewers came out really delicious on their own.

Chicken Skewers
Serves 6 as an appetizer or 2 - 3 main

2 large chicken breasts
1 t salt
1 t pepper
1 t cumin
3/4 cup Fage

Slice the chicken breasts into half inch strips and thread onto skewers (if using wooden skewers make sure you've soaked them in water for at least an hour to keep them from catching fire on the grill). Mix salt, pepper and cumin together and sprinkle seasoning over both sides of the chicken skewers. Brush Fage over the skewers so chicken is covered in yogurt and chill for at least an hour. Oil and heat grill to medium high. Cook skewers for four minutes, flip over and cook for an additional two minutes or until fully cooked.

Peanut Dipping Sauce

1/4 cup peanut butter
1/4 cup brown sugar
2 T + 1 t soy sauce
2 T canola oil
2 cloves crushed garlic
3/4 cup water

Add first five ingredients and 1/4 cup of water to a small pan and heat over low heat. Stir constantly with a whisk and as sauce begins to reduce add remaining water 1 T at a time. This can be made ahead of time and left resting until chicken skewers are finished. If the sauce has thickened too much while resting, add 1/4 cup of water and heat slightly over low heat. Serve alongside skewers and enjoy!

Friday, July 18, 2008

Chicken over Corn and Mango with Red Pepper Sauce

I love the combination of fresh corn and mango. Using fresh corn is important here as it's not cooked and that unique taste of corn fresh off the cob is what makes this great to me. Looking for a new way to use this salad was the inspiration for this dish (and of course the desire to make something on the lighter side).


Chicken over Corn and Mango with Red Pepper Sauce
Serves 2

The red pepper sauce is simply pureed roasted red peppers. You may want to have a little stock or water on hand to thin it out, but it shouldn't need it. Place 1 1/2 roasted red bell peppers in a blender and puree until smooth.

The chicken recipe can be found here. You'll have enough sauce and salad for two so cook two chicken breasts.

Corn and Mango Salad
2 ears of fresh corn
1/2 mango diced
1 T lemon juice
2 t honey
Salt

Remove the corn from the cob into a bowl. Peel and dice the mango into similar sized pieces as the corn and add to the bowl. In a separate small bowl, whisk together the lemon juice, honey and a pinch of salt. Dress the salad and place half in a mound on each of two plates. When the chicken is finished and has rested for a few minutes, slice it on the diagonal and place it on top of the salad mounds. Finally, drizzle the purreed red peppers over the chicken and enjoy!

Thursday, July 17, 2008

How to Cook a Chicken Breast


This may seem like a really simple concept, but if you haven't tried this technique, you may be missing out. The secret to getting a chicken breast that is still moist when it's done cooking is starting it on the stove and finishing it in the oven. The way I do it is to preheat the oven to 375 and heat a little oil in a small, oven-safe pan (or a large one if you're cooking a lot of breasts). Salt and pepper the chicken and add it to the pan. Brown on one side and flip over. After you turn the chicken over, place the whole pan in the oven. if it's a small piece of chicken you should start checking it after 5 minutes. After you've done this a few times, you'll be able to tell just by touching the chicken if it's done, but if you still need to double check, I find that nothing works quite as well as cutting into the chicken a tiny bit and making sure that pinkness is gone. Enjoy!

Monday, June 30, 2008

Chicken LaBamba


This one was made with the boyfriend in mind. Chicken LaBamba is a Mexican casserole that is cheesy, creamy and can definitely be classified as comfort food. My mom used to make this for us when we were little and when I had an intense craving for it a few weeks ago, she reminded me which cookbook to look in. Luckily, I had an old copy of hers on hand. There is some disagreement as to how it got in my possession. It may have been permanently "borrowed" without permission though my recollection is that there were two copies laying around and I ended up with one. Either way, I love having her hand me down cookbooks because she has a tendency to take notes on the recipe directly on the page. It's not only sentimental, but provides a great road map for me on where to take the recipe.

Her notes recommended skipping the special topping and using chips instead. I followed her suggestion and sprinkled my chips with some shredded cheese and salsa as well.

Chicken LaBamba
Adapted from California Sizzles
1 cup light sour cream
1/3 cup milk
1/2 cup chopped onion
1/2 t cumin
1/2 cup chopped cilantro
1 t chile powder
1/2 t salt
1 can cream of chicken soup
10 oz frozen chopped spinach, thawed and drained
4 oz diced green chiles (I used mild, go for hot if you like more spice)
2 cups diced chicken
1 cup shredded jack cheese, divided
1/2 cup shredded cheddar cheese
1 1/2 cups broken tortilla chips (I used blue corn)
1/2 cup salsa plus more for serving

Preheat oven to 350*
Combine sour cream and next nine ingredients and set aside. In a separate bowl, combine chicken with 1/2 cup of jack cheese and all of the cheddar. Spread half of the spinach mixture in a greased casserole, top with half of the chicken mixture and repeat layers. Top with broken tortilla chips and sprinkle with remaining half cup of jack cheese and salsa. Bake for 40 minutes and let sit for 10 minutes before serving. Enjoy!