Friday, March 27, 2009

Pissaladiere

Photobucket

I read recipes frequently enough that by now, I usually know immediately if I want to make the dish. Often I’m drawn in by a picture and I know visually, the dish will be stunning. Then there are the times where the ingredients sound so perfect together that I just can’t wait to dive in, often being able to taste the flavors just from my imagination. When I get both of these reactions to the same recipe, I’m on my way to the market as soon as possible for supplies. Recently, I read a recipe for pissaladiere and almost immediately found myself at the Whole Foods olive bar.

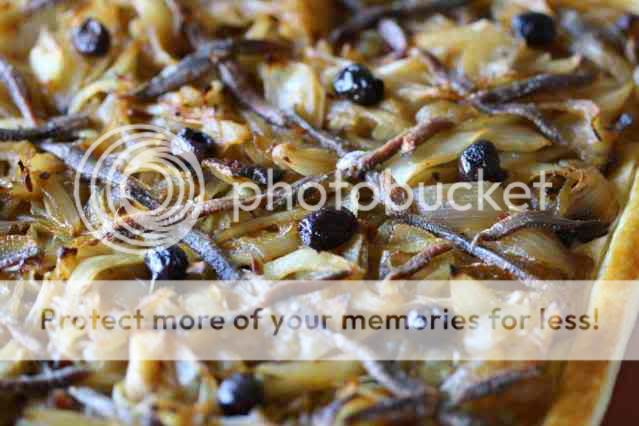
The technical definition of pissaladiere describes a pizza without cheese or tomato sauce, made up of sautéed onions, olives and anchovies. This dish dates back to the time of the Romans and while it may have originated as a pizza-like creation, it has since evolved into more of a tart. Of course, the star ingredients, olives, anchovies and sautéed onions, still come into play. The recipe I found used puff pastry as a base – one of my favorite starts to a tart, both for it’s simplicity of preparation and indulgent flavor. I knew the crisscross pattern of anchovies would make a beautiful photo and the sweet flavor of the caramelized onions would match beautifully with the salty, savory bite of the anchovies and olives.

That salty sweet combination is habit forming in my house and true to form, the majority of the pissaladiere was inhaled within minutes of being cool enough to eat. I was concerned with overwhelming the boyfriend’s palate with too much anchovy so I used fewer filets than called for and cut them in half lengthwise. I had enough anchovies for the pattern on the tart, but was able to reduce the strength of their pungent flavor. It seemed perfectly balanced to me (an anchovy fan) and I would recommend taking this route to all but the most dedicated devotees. And by the way, if you don’t count yourself as a fan, try this recipe anyway with the smaller amount of anchovies. I think you’ll find you like the salty contrast.

Pissaladiere
Serves four as a lunch dish or eight as an appetizer

1 sheet puff pastry, thawed
1/3 cup olive oil
2 1/4 pounds of onions (about four medium)
2 T sun dried tomato paste or sun dried tomato bruschetta
1 – 2 T red wine vinegar
1/2 t salt
2 t sugar
1 egg yolk whisked with 1 t water
2/3 cup olive tapenade
2 t fresh thyme leaves + additional sprigs for garnishing
3.5 oz jar of good quality anchovies (about 12 – 15 filets)
15 – 20 pitted nicoise olives

Peel onions, cut in half and slice thinly. Warm oil in a large, heavy sauté pan over medium low heat. Add onions, sun dried tomato paste, 1 T of vinegar, salt and sugar to the pan. Sauté until onions are tender and begin to caramelize, about an hour to an hour and 15 minutes. Only stir the onions every 10 minutes or so, just to keep them from sticking to the bottom of the pan. When finished cooking, taste the onions and add the additional 1 T vinegar, if desired. I did not desire.

About 20 minutes before the onions are finished, preheat the oven to 400*. Place the thawed puff pastry on a baking sheet covered in parchment paper or a silpat. Score a 3/4 inch border around the pastry and chill for 10 minutes. Spread the tapenade over the puff pastry, inside the scored border. If your tapenade is chunky like mine was, the pastry won’t be fully covered. Just make sure it’s relatively evenly distributed and sprinkle with thyme leaves. When the onions are sufficiently caramelized spread them evenly over the tapenade.

Drain anchovies and slice them in half lengthwise. Lay them over the onions in a crisscross pattern as shown in the picture above. Place one olive in the center of each diamond area created by the anchovies. Brush egg wash lightly over the border area. Bake the pissaladiere for 10 minutes, then reduce the heat to 350* and cook for an additional 10 – 15 minutes until the border is golden and flaky and the crust is cooked through. Scatter thyme sprigs over the tart if desired and let cool slightly before slicing.

Photobucket

Tuesday, March 24, 2009

Yogurt Panna Cotta

Photobucket

Unless you count the odd batch of Jell-O growing up, I haven’t done much cooking with gelatine. It’s not that I have anything against the substance or the wobbly forms created by it; I just have not been drawn to recipes that call for it. That is until I came across a recipe for vanilla yogurt panna cottas in a recent issue of Delicious. The recipe called for some of my favorites: Greek yogurt and vanilla bean paste (truth be told it calls for real deal vanilla beans, but I knew the paste would work great) and if it meant I would have to run out for a rather unfamiliar ingredient – gelatine, that would make it all the more fun of an experiment.

This dessert was easy to make and turned out perfectly. In fact, the most challenging task was finding a good mold for the panna cottas. After a trip to Sur la Table and a number of internet searches turned up nothing, I ended up with a silicone muffin tin that provided the flat bottom and slightly rounded sides I was looking for. This turned out to be less than ideal for unmolding the desserts since I couldn’t unmold each one individually. If you can track down shallow, individual molds with the rounded sides and flat bottom, by all means use them and please tell me where you found them!

Since these desserts are so simple and use ingredients that I almost always have on hand (even gelatine now that I’ve stocked up on envelopes), they would make a great last minute end to a fabulous meal if it weren’t for their necessary four hour chilling time. Be sure to start these early in the day so you have ample time for them to set.

Now that I’ve had success with gelatine and gotten to enjoy the slightly firm little wobbly desserts that it can create, I think I’m hooked. After all, it really is one of the earliest forms of molecular gastronomy. Don’t you think?

Yogurt Panna Cotta
Makes 6 - 8 (depending on size of molds)

1 envelope gelatine
1 1/4 cups milk
1 1/4 cups heavy cream
1/2 cup sugar
1 1/2 T vanilla bean paste
3/4 cup Greek yogurt

Dissolve the gelatine in 1/4 cup of the milk. Place the remaining milk, cream, sugar and vanilla in a medium sauce pan and bring to a simmer. Remove the pan from the heat and stir in the milk with the dissolved gelatine. Strain the mixture through a fine mesh sieve and cool to room temperature. Whisk in the yogurt. Divide the mixture between your 6 molds (or more if you have additional liquid) and chill for at least four hours. Dip the molds in hot water briefly before unmolding to help the panna cotta slip out. Serve with fresh fruit.

Friday, March 20, 2009

First Day of Spring

Photobucket

Welcome spring! The first day of spring is one of my favorite times of year. There are certainly moments I treasure more, like when I bite into the season’s first homegrown tomato or the first really warm Saturday where you can host a BBQ and not need to put your sweater on, even after the sun has set. But there is something about the anticipation that comes with the first day of spring that is unmatched in any other season. This weekend, I will be setting out some of the seedlings that I started indoors almost six weeks ago and next weekend it will be time to head to the annual Tomatomania festival held in various different parts of Los Angeles. With more than 200 heirloom tomato seedlings to choose from, I’m sure to get some beauties for the summer.

So, with all the anticipation of the season to come, I decided to mark the first day of spring with a meal that highlights some of the season’s greatest offerings. Traditionally, eggs symbolize the rebirth of spring. It’s why we spend hours decorating and hiding eggs on Easter. Some argue, including Russ Parsons in his book, How to Pick a Peach, that asparagus might be a more fitting representation; certainly, there are legions of asparagus fans who would agree. After all, asparagus is one of the first spring vegetables you’ll find at the farmers’ market, even before the season has officially begun. Finally, there is no arguing with the lamb that graces many a springtime table. I knew if I could put all of these ingredients on the same plate, I would have a fail-proof first meal of spring.

The lamb and asparagus were easy. I think simple cooking is best with fresh wonderful ingredients; all either needed was a bit of oil and salt and pepper before roasting. To incorporate the egg, I did a very simplified version of a mimosa dressing by just barely taking the eggs to hard boiled and then dicing them to top the roasted asparagus.

Photobucket

Spring Dinner for Two

1 frenched rack of lamb (about 1 – 1 1/2 pounds)
1 bunch asparagus
2 eggs
8 thyme sprigs
Olive oil (about 3 – 4 T)
Salt and pepper to taste

For the lamb:
Preheat oven to 425*
Allow lamb to come to room temperature. Place in a baking dish large enough to hold the rack and drizzle or rub with olive oil. Sprinkle with salt and freshly cracked pepper. Remove leaves from half of the thyme sprigs and sprinkle over the lamb along with two whole thyme sprigs (reserve additional thyme for the asparagus). Place in the oven and roast for 15 – 18 minutes for medium rare. Allow the lamb to sit, tented with tin foil, for 10 minutes before cutting and serving.

Photobucket

For the asparagus:
Break off by hand or cut off the bottom woody stem of the asparagus. Use a vegetable peeler to remove the tough outer skin. Peel from about an inch or two below the tip to the base. Toss asparagus with a little olive oil. Sprinkle with salt and pepper and the leaves from the remaining two thyme sprigs. Roast in the same oven as the lamb for 15 – 20 minutes until just starting to soften.

For the eggs:
Place eggs in a small pot of cool water and bring to a gentle boil. Allow the water to boil for 4 minutes and remove from heat. Let the eggs sit in the hot water for about five minutes more. Rinse under cool water until eggs reach room temperature, then peel.

To serve:
Place 3 – 4 lamb pieces on each plate. Place 4 – 6 asparagus next to the lamb. Roughly chop the egg yolks, reserving the whites for another purpose. Sprinkle the egg over the asparagus and serve.

Tuesday, March 17, 2009

Buttermilk Cinnamon Bread

Photobucket

Spring is clearly right around the corner. It’s touted on the cover of my March and April foodie mags, apparent in the changing selection at my Farmers’ Market and obvious with the quickly approaching spring planting season. However, it is most definitely not clear in the weather right now in Southern California. After an unseasonably warm January and February (we had weeks in the 80s), it has been quite cold (relative I know) as of late. This is made all the more unbearable by the expectation that spring and its warm, sunny days should be on the way.

Baking bread is the most comforting thing I have found to take the chill off on these cold, weekend afternoons. The warmth of the oven does double time with my heater to give the house a nice toasty feeling, the smell that fills the kitchen as the bread is almost finished warms the senses and you just can’t beat the taste and feeling of freshly baked bread as you rip it apart with your hands and take down a whole loaf in one sitting.

Since I received the book, Artisan Bread in Five Minutes a Day, for Christmas this year, a day hasn’t gone by that I don’t have bread dough sitting in my fridge. As soon as one batch is used up, I mix the next batch, right in the same container. I’ve recently gained the confidence to move on from the master recipe and start experimenting with what the rest of the book has to offer. I had some buttermilk to use up after making my cornbread madeleines and decided to put it to use with the buttermilk dough recipe in the book. After mixing and letting the dough rise, I took a look at the recipes that are recommended for the buttermilk bread. As soon as I saw it I knew, without a doubt, that I had to make the cinnamon raisin bread. The only thing better than fresh-baked bread to warm up a chilly afternoon is sweet, fresh-baked bread with a gooey center.

Buttermilk Bread Dough
Adapted from Artisan Bread in Five Minutes a Day
(Cinnamon Raisin Bread Directions Included Below)

2 cups lukewarm water (between 100* and 110*)
1 cup lukewarm buttermilk (between 100* and 110*)
1 1/2 T yeast
1 1/2 T salt
1 1/2 T sugar
6 1/2 cups unbleached all purpose flour (I use 6 1/4 of King Arthur which has a higher protein content and makes the reduction in amount necessary)

Mix the water and buttermilk together, making sure that they are between 100 and 110 degrees. Whisk in the salt and sugar, then sprinkle the yeast on top, letting it develop (get a little foamy) for a few minutes. Pour the yeast mixture into a large bowl or your stand mixer and mix in all of the flour in one addition. You do not have to knead the bread, but use a wooden spoon (or dough hook if you’re using your stand mixer) to make sure the flour is thoroughly incorporated. Place the container in a warm place with a loose fitting cover and let rise for two hours. After the dough has risen you are ready to bake, but the authors recommend letting it chill in the fridge first to make the dough easier to work with.

Photobucket

Cinnamon Raisin Bread
Adapted from Artisan Bread in Five Minutes a Day
Filling amounts are for one loaf of Buttermilk Bread

1 1/2 pounds of buttermilk bread dough
1 1/2 t ground cinnamon
3/4 cup sugar (book suggests 1/3 cup)
3/4 cup golden raisins, chopped (I left these out for lack of raisins in the house)
1 egg beaten with a little water for egg wash
Butter for the pan

Butter a 9” x 4” bread pan and set aside. Roll out the dough (as shown below) to a rectangle approximately 18” long and as wide as the bread pan you are going to use is long (approximately 9”). If the dough is not stretching well, let it rest for 10 minutes and continue to roll. Mix the cinnamon, sugar and raisins together. Brush the egg wash over the surface of dough and sprinkle the sugar and raisin mixture evenly over the egg wash. Roll the dough up, using a bit of egg wash to seal up the ends and the seam. Place the roll in your bread pan and let sit in a warm place for at least an hour and as much as an hour and 45 minutes. 20 minutes before baking, heat your oven to 375 degrees. Bake the bread for 35 – 40 minutes until nice and golden on the outside. Let cool slightly before serving so the hot sugar mixture doesn't run out everywhere.

Photobucket

Photobucket

Thursday, March 12, 2009

PG Tips Granita

Photobucket
If I’m not mistaken, PG Tips is still the number one tea in England. Apparently, I drank a cup or two while living there during college, but I hardly remember the experience. I wasn’t reintroduced to the tea until I started dating my boyfriend who has a slight obsession with it. His father is British and he grew up drinking the tips. At the time, almost four years ago, you would be very hard pressed to find a box of PG Tips anywhere in California aside from very specific specialty stores. To surprise him for a birthday, I located a source online and ordered a $60 case of the tea. He was thrilled and supplied with all the PG Tips he could drink for at least four months.

PG Tips has since expanded distribution in the U.S. significantly. It started with Whole Foods and recently, I have been able to locate the pyramid shaped tea bags at my local Ralphs. This availability has increased the number of pots of tea we enjoy on weekends as well as given me an opportunity to try cooking with it. I love steeping the tea bags in different concoctions and seeing what I end up with. By far my favorite experiment was a PG Tips ice cream. I steeped tea bags in a mixture of cream and milk and added sugar to taste before freezing the whole thing in my ice cream maker - absolutely delicious and somewhat addictive.

More recently, I’ve been experimenting with granitas. They’re such a simple dessert and on the lighter side of ice cream. A granita is a semi-frozen dessert that is made up of sugar, water and any number of flavorings ranging from coffee and chocolate to pureed fruit. Fruit-based granitas have been my favorite so far and I’m sure as some of the best fruits of spring hit the markets, I will do a post or two on them here. However, this past weekend as I was wondering what to do with a half drunk pot of tea, I decided to try out a granita of PG Tips. I opted not to add any sugar because I love the taste of PG Tips that much and because I’ve been trying to give the waistline a bit of a break lately, but feel free to mix in sugar or any other kind of sweetener you like. Next time I may try out sugar and just a touch of milk so that the granita is just like a frozen cup of tea.

Photobucket

PG Tips Granita

4 cups brewed PG Tips (or more, this is just what I had left over)
Sugar to taste (or any other sweetener you like)

Pour tea mixture into a shallow baking dish or rectangular tupperware dish. Place the mixture in the freezer. Begin checking the dish after about 45 minutes. As soon as little ice sickles and a bit of frozen crust start to form, get out your fork and begin scraping the mixture and breaking apart the frozen pieces. Continue to check the dish every 30 - 45 minutes or so and scrape as necessary to break up the tea to keep it from forming into a frozen block. The end result should be a collection of frozen crystals that can be stirred with a fork or spoon. I served the tea granita alongside some fresh fruit for a very light dessert. It also would be lovely served in glasses as an afternoon refreshment on a warm day – an alternative to a large glass of iced tea.

Photobucket

Thursday, March 5, 2009

Good Food and Evan Kleinman's Beet Gnocchetti

Photobucket
If you live in Los Angeles and you listen to KCRW, chances are you’ve heard of Evan Kleinman (hint: if you don’t live in Los Angeles you can stream her show, Good Food, live on the internet every Saturday at 11 am Pacific). Kleinman is a chef/restaurateur turned part-time commentator who brings listeners news from the farmers’ market coupled with guests representing different aspects of the food industry. 

Most Saturdays I can be found driving around in my car, running errands and making my weekly farmers’ market trip with Evan Kleinman accompanying me on the radio. I can’t tell you the number of times something on the show has spurred me into action, changed my list of must-gets at the market or changed my course entirely to head straight to the bookstore to buy a new cookbook after hearing the author on Good Food. This happened just a few weeks ago when Karen Page and Andrew Dornenburg were on the show discussing their new book, The Flavor Bible. If you like to play with flavors and create your own recipes, this is a must-have. It examines ingredients, one by one, and lists their flavor profiles along with the other ingredients that best compliment it in a recipe.

In addition to listening to the show, I have recently started following the Good Food Blog on KCRW’s website. It’s a great place to get news on the happenings at Kleinman’s restaurant, Angeli Caffe, to follow up on what I may have missed on recent shows, and from time to time, to snag a great recipe from Kleinman. This past week, the recipe for Angeli Caffe’s Beet Gnocchetti was included. Beets are an extremely effective food dye and I could just imagine the bright pink color that they would impart to a gnocchi dough. I quickly added beets to my farmers’ market list and a pound of fresh ricotta to my weekly Surfa’s cheese stop.

This recipe was really fun and relatively simple to make. I should have followed my gut when the beets just did not look like there were enough. Next time, I’m either going to use more or, rather than grating on the large wholes of a box grater as Kleinman suggests, I’m going to process them in a food processor so I get more of a beet pulp that will impart color more effectively and more evenly. I still love the speckled pink color that the coarsely grated beets provided, but it just wasn’t what I had originally envisioned.

My gnocchetti ended up closer to the size of regular gnocchi. They were easier to work with that way and afforded me the opportunity to practice rolling them on my gnocchi board. This recipe made enough dough for at least four servings if not more. I used about a fourth of it to make my dinner and then froze the rest for future use. I have no idea how the dough will hold up to freezing, but I thought it better to try than to waste all those gnocchi.

Photobucket

Angeli Caffe Beet Gnochetti
Adapted from Evan Kleinman

1 medium or two small red beets, washed
1 pound ricotta, drained for a day in a colander lined with cheesecloth
1 egg
1 cup grated Parmesan cheese
Salt and freshly ground black pepper
2/3 cups all-purpose flour plus more for dredging
8 tablespoons (1 stick) unsalted butter
Fresh sage leaves

Wrap the beets in tin foil and bake in a 450* oven until tender, about 45 minutes. Let cool. Grate beets on the large holes of a box grater. Or, if you’d like to experiment, try pureeing them in a food processor. Place the beets in a bowl and add the egg, parmesan, drained ricotta and a sprinkling of salt and pepper. Mix well. Add the flour and mix until just incorporated. Let the mixture set for at least two hours in the refrigerator.

When ready to form the gnocchi (or gnocchetti if you prefer to do tiny versions as Kleinman suggests), line a baking sheet with parchment paper and place about a 1/2 cup of flour in a bowl for dredging. Take a gumball sized piece of dough and roll it in your hands to create a ball. If you are using a gnocchi board, place the ball on the board and use your thumb to roll the ball slightly upward, just enough to create lines on one side of the gnocchi and an indent from your thumb on the other side. Pull the gnocchi off the board and dredge lightly in flour. Place the gnocchi on your baking sheet and repeat until all the dough is used up (recipe continued below).

Photobucket

Place the butter in a large sauté pan and add the sage leaves. Melt the butter and steep the leaves until they’re crispy and the butter is starting to brown. Keep the pan with the butter warm while you bring a pot of water to a simmer. Slip the gnocchi into the pot. Once the gnocchi have floated to the surface, allow them to cook for one to two minutes more. Kleinman suggests straining them with a slotted spoon and transferring them to a platter to be topped with the sage brown butter sauce. I opted to strain the gnocchi and transfer them directly to the warm sauté pan where I tossed them with the brown butter sauce and then served them. This created a little bit of browning on the gnocchi that may not have looked as pretty, but certainly tasted amazing. Choose whichever option you like and make sure you have some crusty bread to sop up any leftover brown butter sauce.

Photobucket