Sunday, December 21, 2008

Cookie Party!

Every Christmas growing up, my mother would bake dozens of cookies and my brother and I would get to invite all of our friends over for a cookie decorating party. Since living on my own, it has never fully felt like Christmas without these parties. This year, I decided it was time to rectify the situation by having my own cookie party. I collected my mother's shortbread recipe, cheated with a gingerbread mix, and got the boyfriend's mother's recipe for frosting.

I knew the party was going to be a success when I tasted my mother's shortbread and was immediately transported back to the parties of the past. My boyfriend felt the same way when we finished his mom's frosting and the flavor was exactly as he remembered. We made three batches of frosting (adding red and green food coloring to two of the batches) and placed half of each batch in a piping bag and the other half in bowls for spreading. With the addition of some store-bought decorations we set up the table and were ready to go.

Photobucket

Mom's Shortbread
Adapted from Silver Palate's Shortbread Hearts

3/4 pound sweet butter softened
1 cup confectioners sugar
3 cups unbleached all purpose flour, sifted
1/2 t salt
1/2 t vanilla extract

Blend butter and sugar in a mixer fitted with the paddle attachment. Sift flour and salt together and add it to the butter and sugar in a few additions. Add vanilla and blend well. Gather dough into ball and flatten slightly on waxed paper. Place in the refrigerator and chill 4-6 hours.

Heat oven to 325*
Roll dough to 5/8 inch thickness and use cookie cutters to cut desired shapes. Place on ungreased cookie sheets and refrigerate for 20 - 40 minutes before baking. Bake for 20 minutes, until just starting to color lightly - do not brown. Cool completely on racks before frosting.

Mary's Frosting

16 oz confectioners sugar
6 T butter
2 T milk
2 T cream (not heavy)
1 1/2 t vanilla
1/8 t salt

Combine butter, milk, cream, vanilla and salt in a stand mixer and blend. Add confectioners sugar in small amounts until all the sugar has been incorporated. Place half the mixture in a piping bag and the other half in a bowl for spreading. *Note - when making red and green frosting, reduce milk by 1 T and add food coloring at the end.

There were so many amazing and creative cookies. I decided to include just two here, but could have easily included 15 or more. The whole day was a great success and a lot of fun. Cookie parties will again be a mainstay of my Christmas season. Merry Christmas everyone!

Photobucket


Photobucket

Sunday, December 14, 2008

Salt Cured Salmon

Photobucket

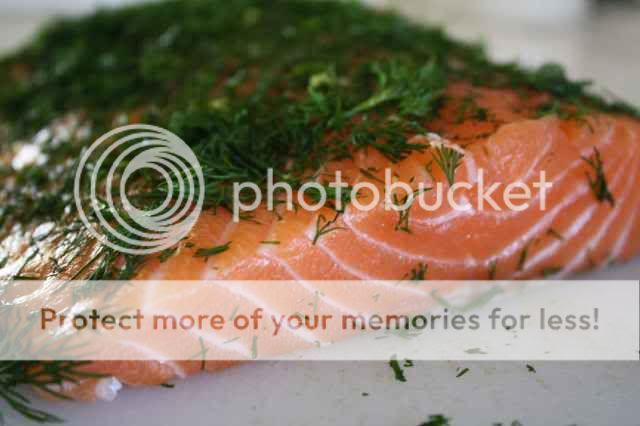
Beautiful pictures are my first attraction to a dish. It's why I subscribe to more food magazines than I know what to do with and why I continue to buy cookbooks when I have 30 at home that haven't had more than one or two recipes made out of them. I'm a sucker for food photography. It's why, when I was reading the latest issue of Donna Hay, I immediately knew I had to make their salt cured salmon. The beautiful pink flesh contrasted with the green of the dill made an amazing picture and since salmon is my favorite fish, this was a sure bet.

Photobucket

The recipe is very simple and I think the biggest secret was splurging on a beautiful piece of fresh salmon from my local fish monger. Not cheap, but worth it for this dish. I got home from the fish monger and within just ten minutes, had the fish curing in the fridge for brunch the next day. Then it was time to head off to Surfas, a restaurant supply store in Culver City. Heaven on earth for someone like me. I'm there pretty much every other week and am always spending more money than planned.

When I got to Surfas, I was pleasantly surprised to see that they had installed a cheese and charcuterie counter. When I realized that the person working the counter was a friend of mine, surprise turned to elation, followed quickly by a sense of loss for the recent progress on my workout routine and healthy eating. I knew having David as the gatekeeper to this wonderful world of cheese would be a blessing and a curse in my life. Mostly blessing, but there would be consequences, and mostly in the area of my clothes not fitting properly.

I spent the next fifteen minutes tasting different cheeses and talking about everything that David had available. I left with a great selection (after heading in with no intention to buy or having any specific need for cheese) and amongst that selection was a beautiful chunk of aged gouda called Beemster Classic. It's delicious and smooth with little crystals that crunch in the back of your mouth as you chew. We all agreed that if ever there was a breakfast cheese, this was it. I was excited knowing that I had the perfect dish, curing at home, that desperately needed a delicious cheese to go with it.

Photobucket

To cure the salmon use this simple recipe that I'm borrowing from Donna Hay. I cut the recipe since I'm only cooking for two, but this can easily be doubled to serve more. Smoked salmon is a tradition at my house on Christmas morning, but this year I think we'll be curing ours at home.

Salt Cured Salmon

1 1/2 pounds fresh side of salmon, skin removed
1/2 bunch of dill, chopped
1/2 cup rock salt
2 t white peppercorns
1 T sugar
2 t water

Coat salmon in chopped dill. Stir together salt, peppercorns, sugar and water. Place half the salt mixture on a piece of plastic wrap, place the salmon on top of the salt and coat the top and sides of the salmon with the remaining salt mixture. Wrap tightly in the plastic wrap and place in a rimmed baking dish (the salmon will give off a good amount of liquid). Place another dish on top of the salmon and weigh down with a few cans of food. Refrigerate for 24 hours. Remove from the plastic wrap and wipe off the salt. Slice thinly and serve with the following recipe or as desired.

Photobucket

Salt Cured Salmon and Beemster Classic on Toast
Serves 2

2 large slices good sourdough, or in this case, Gilroy Garlic Bread
6 - 8 shavings of Beemster
2 eggs
1 tsp vinegar
6 slices of salt cured salmon
Butter for the bread

Heat a small pot of water to poach the eggs. When the water is almost simmering, add the vinegar and swirl the water in a circular motion. Add one egg and cook for 3 - 4 minutes. Remove with a slotted spoon to drain on paper towels and repeat with the second egg. Toast and butter the bread. Layer the Beemster, salt cured salmon and finally the poached egg on the toast and enjoy! 

Monday, December 8, 2008

Beef Short Ribs - Locally


Bringing together all of the local ingredients for this dish has been a great learning experience for me and one that is having a lasting effect. While I've always loved shopping at the farmers' market, I'm now making a point to pass up produce at the market and waiting for my weekend market. It's not convenient, but it's one of the little changes I can make while trying to be a conscience eater.

All this effort has the added benefit of tasting delicious. The short ribs were amazing, I'm certain due to the high quality ingredients and the higher quotient of homemade goods that went into making them. The only thing I would change for the next round is doubling the recipe. They tasted even better the next day and I would have loved to have more on hand.

Beef Short Ribs - Locally
Serves 2

2 pounds J&J Grass-fed, California Short Ribs
3 T Tutta California Olive Oil
1 onion
2 carrots
3 celery stalks
4 cloves garlic
1/2 t salt
3 T Tutta California Cabernet Vinegar
4 thyme sprigs
2 California bay leaves

Preheat oven to 325*
Season short ribs with salt and pepper. Heat olive oil over medium heat in a dutch oven and brown short ribs on all sides. Remove short ribs to a plate. Cut celery, carrots and onion into chunks and add to a food processor with the garlic. Process until well-blended and almost paste-like. Place vegetable mixture in the dutch oven along with the salt and tomato paste and saute until vegetables begin to soften. Stir in two cups of the stock along with the vinegar, thyme and bay leaves. Nestle the short rib pieces in the vegetable mixture, adding more stock until the ribs are completely submerged. Cover and place in the oven for 2 - 3 hours until the meat is falling off the bone. Remove the thyme and bay leaves and discard. Serve the ribs with some of the cooking liquid and polenta. Enjoy!

Thursday, November 20, 2008

Chicken Stock - Locally

I had no idea that the most valuable lesson I would learn about cooking would also be one of the simplest. Stock is the base for so many soups, sauces, braises and other dishes and from what I've read of Rulhman's experience at CIA, it's the first thing you learn at culinary school. You probably know how much you rely on it because of the number of containers of stock you go through, but do you know how easy it is to make at home? I had heard countless times from cookbooks and TV Chefs how important it is to make your own stock and what a difference it makes in flavor, but had never really taken them seriously. That's not to say I didn't believe them, just that I didn't think it was realistic for someone with a full-time job to make their own stock. How wrong I was.

It turns out that with a little bit of prep work, you can have stock made in an afternoon with most of that time being spent on unmonitored simmering. Even better, that one afternoon can provide you with enough stock to stick in the freezer to last a few months (as long as you're not making vast amounts of soup). If the idea of butchering a chicken at home is off-putting or if you're interested in making beef stock, talk to your local butcher about buying bones for stock. In most cases, they'll be happy to oblige.

Please keep in mind that this recipe is simply a guide. The water will vary according to how many bones you have and the aromatics should be adjusted to your personal taste. Since this is another piece to my short rib recipe with all local ingredients, I made sure that all of my vegetables were California grown by going to my farmers' market. I also took the time to search out fresh California bay leaves, as well as cage-free, locally raised chickens, etc. Don't feel like you have to go to those lengths if you're not as excited about cooking locally as I am!

Chicken Stock

Bones from two chickens

3 litres of water

2 onions, quartered

3 carrots, cut into 2-3 sections

3 celery stalks with leaves attached if you've got them, cut into 2-3 sections

3 thyme sprigs

2 bay leaves

4 peppercorns

The chicken bones should be relatively clean. Place them in the bottom of a large stock pot and cover with water. Add the onions, carrots and celery. I leave the leaves on my celery to act as a distiller. I have no idea if it actually works, but I get the sense that they help to soak up impurities that would otherwise need to be skimmed off as the stock simmers. Bring the mixture just to a boil and reduce the heat to simmer. Cook for 4 - 5 hours, checking the pot every 30 - 60 minutes to make sure it has not come up to a boil. All you want is a gentle simmer. Wrap the bay leaves, thyme and peppercorns in cheesecloth and add them to the stock for the last 30 minutes. 

After 4 - 5 hours of simmering, drain the stock and discard the vegetables and bones. At this point you can either painstakingly skim the surface to remove fat, or you can pour cooled stock into storage containers and place them in the fridge. After a few hours the fat will have risen to the top and solidified and you can simply scoop it out. Freeze whatever stock you aren't going to use within a few days. After defrosting, I always bring my stock up to a boil before using. Enjoy!

Monday, November 17, 2008

Tomato Paste - Locally


On a recent Saturday morning I happened upon on a farmers' market that I had not been to before. I'm very lucky that in my general area there are multiple markets on every day of the week. My biggest complaint about the markets closest to me is that they never seem to have any protein. I can load up on produce or bread, but when it comes to my other staples, I always end up at the grocery store on my way home. I was thrilled when, walking through this new market, I discovered eggs, cage-free chickens, grass-fed beef and even locally harvested shellfish. I was in heaven. My first instinct was to immediately move so I could be within walking distance of my new favorite market, but after taking a moment to calm down, I set about getting the week's supplies.

My biggest sin at the market is buying something because I'm taken in by how great it looked or how fresh it was, but with no plan on how actually to use it. I either end up not using it or having to go back to the store to buy everything else I need to make whatever it is I have decided to create with said fresh item. This go around it was two pounds of short ribs. Having happened upon the market with so much protein, I just couldn't leave without getting some.

Shopping at the new farmers' market got me thinking more about locally grown food. I always prefer to buy my produce at farmers' markets because I absolutely agree with trying to use locally grown and produced food whenever possible, but I never really took it beyond produce. This market opened up the idea that I could do more than just get local produce. With that in mind, I set about creating a new short rib recipe using only locally grown or produced food in the recipe.

Finding local produce was easy. I didn't have to look further than my local farmers' markets. The first place I ran into some trouble was with locating locally produced tomato paste. It quickly became clear that I would have to make my own. After browsing the internet for some time, I found this method that turns 5 pounds of tomatoes into about a 1/2 cup of paste. It certainly isn't the economical way (with time or money) to get tomato paste, but the flavor was absolutely better and, it was from locally grown ingredients. Problem solved. Check back in a few days to see the stock I made to use as a braising liquid.


Tomato Paste
Yield approximately 1/2 cup

5 pounds tomatoes
2 T olive oil
salt to taste

Preheat oven to 350*
Chop the tomatoes. Uniformity is not important as the tomatoes will be passed through a food mill shortly. Heat the olive oil in a large saute pan and add the chopped tomatoes. Simmer for 4 - 5 minutes until the tomatoes are releasing their juices. Pass the tomatoes through a food mill fitted with the smallest disc. If necessary, take the tomato pulp still in the bowl of the food mill and return it to the saute pan to help it break down some more and release its juices. Once all the tomatoes have been processed, place the tomato liquid in a half-sheet pan (rimmed cookie sheet) and place in the oven for four hours. stir the mixture every hour until a tomato paste texture has been achieved. If storing in the fridge, pour olive oil into the container to cover the paste for storage. Enjoy!

Wednesday, November 12, 2008

Pear Custard Pie


I find it difficult to branch out from chocolate when making dessert. It's not that I don't appreciate the endless assortment of dessert varieties available, it's that I am such a chocoholic I'm always worried I will be disappointed. 

This week, I knew I was going to have branch out. I had a bag of D'Anjou pears on hand that I needed to do something with before they passed their prime. I turned to my trusty library of cookbooks and came across this extremely simple recipe. The most time consuming part is prepping the pears. After you have completed that process, this pie will be finished in no time.

Pear Custard Pie
Adapted from Everyday Food

1/4 cup melted butter
6 small D'Anjou pears, peeled, halved and cored
1/3 cup sugar
1/3 cup flour
2 t vanilla bean paste
3 eggs
3/4 cup milk
1/4 t salt

Preheat oven to 350*
Butter a 9" pie dish. Slice pears thinly and place in the pie dish in an overlapping circle. Pulse remaining ingredients in a blender to create a batter. Pour the batter into the pie dish gently as to not disturb the pear slices. Bake for 45 minutes until golden and firm to the touch. Dust with some powdered sugar if desired and enjoy!

Monday, November 10, 2008

French Toast - Leftover Vanilla Cakes

The vanilla cakes from last week were delicious, but we had two leftover and I hate having to throw food away. The perfect solution came to me when I woke up this morning and needed to figure out breakfast. It turns out that mini-cakes turned into french toast equals deliciousness. I was worried that the cakes would be too sweet or have too much vanilla in them, but I didn't add much vanilla to the egg soak and they turned out great.

Vanilla Cake French Toast
Serves 2

2 individual vanilla cakes
2 eggs
3/4 cup buttermilk
1/4 t vanilla
1/4 t salt
butter for cooking

Slice cakes into 1/2 " slices. Combine eggs, buttermilk, vanilla and salt in a small container and add vanilla cake slices to container to soak for 20 or more minutes. Heat butter in a non-stick skillet and fry french toast for 3 - 4 minutes per side. Top with fruit and maple syrup.


Wednesday, November 5, 2008

Individual Vanilla Cakes


I love the idea of giving gifts of food. It's something that you've taken the time and energy to make yourself, and there is something warm and comforting about getting a gift from someone's kitchen that can't quite be duplicated with anything else. So I was thrilled to see the article in this month's Cooking Light with ideas for gifts from your kitchen this holiday season. I knew I had to start trying out some of their recipe ideas right away so I would be prepared with great baked gifts when the holidays finally get here. I can recommend this one whole-heartily.

Vanilla Buttermilk Cakes
Adapted from Cooking Light
Makes 5 Loaves or 10 Mini-Cakes

13.5 oz flour
1 t baking powder
1/2 t baking soda
1/2 t sea salt
2 cups sugar
3/4 cup butter, softened
1 T vanilla bean paste
3 eggs
1 1/3 cups low-fat buttermilk

Preheat oven to 350*
Combine first four ingredients and stir together with a whisk. Place sugar and butter in a stand mixer fitted with the paddle attachment and beat until light and fluffy. Add vanilla, followed by the eggs, one at a time, making sure each is fully-incorporated before adding the next. Add flour and buttermilk to the sugar mixture in alternating additions, starting and ending with the flour. Place a mini-loaf pan (mine has room for eight) in the oven to preheat slightly. Remove the pan and spray with cooking spray. Pour batter into the pan and bake for 40 - 45 minutes until golden brown and slightly puffed on top. Let cool in the pan for 10 minutes before removing to a cooling rack. Enjoy!

Monday, November 3, 2008

Thai Coconut Shrimp Soup


Fish Water, aka Nam Bplah, aka Thai Fish Sauce is my newest staple flavor. It's a central flavor in Thai cooking and is used in similar ways to how westerners use salt as a flavoring. I would not say that the two are interchangeable. Fish sauce definitely imparts a flavor to Thai food that cannot be duplicated by just adding salt.

I'm not sure where my love of Asian flavors comes from. I started eating sushi with my family when I was very young and I'm guessing it has grown from there. The truth is that I have never met an ethnic food that I didn't like so let's just chalk it up to a love of all ethnic food. When I'm craving Thai food, this soup can be ready in 20 minutes and usually hits the spot.

Thai Coconut Shrimp Soup
Adapted from Everyday Food

1 T freshly grated ginger
4 minced garlic cloves
1 T canola oil
1 can coconut milk
4 cups water
1 T cornstarch
2 carrots peeled and cut into thin two-inch strips
1 oz Mee Krob noodles
2 scallions, sliced vertically
6 colossal shrimp
2 T lime juice
1 T fish sauce
Salt to taste

Heat oil in a medium pot and add garlic and ginger. Cook until just heated through and add coconut milk and water. Remove a small amount of cooking liquid to a bowl and stir in cornstarch. Return cornstarch slurry to the pot, add carrots and bring to a boil. Once carrots are just tender, add noodles and cook for 4 - 5 minutes. Add shrimp and remove from heat (shrimp will continue to cook). Stir in lime juice and fish sauce and salt to taste. Divide soup between two bowls, top with scallions and enjoy!

Friday, October 31, 2008

Sausage and Goat Cheese Stuffed Squash Blossoms

I have always admired the beautiful squash blossoms I see in my backyard and at my local farmers' market. But after all this time, it wasn't until last week that I finally bought some and brought them home, determined to stuff and fry them. 

I was planning on serving these for lunch with a simple salad and wanted to do more than just stuff them with goat cheese. I had recently picked up some delicious sweet Italian sausage that I threw into the mix to get something more substantial. Get creative with this recipe. Goat cheese is such a great background for so many flavors!

Sausage and Goat Cheese Stuffed Squash Blossoms

12 squash blossoms
4 oz goat cheese
1 sweet Italian sausage
1/4 t celery salt, divided
1 - 2 cups vegetable oil for frying
1 egg
3/4 cup flour

Remove the sausage from its casing and cook, breaking apart into small pieces as you go. Allow the sausage to cool, mix together with the goat cheese and a pinch of celery salt. Set aside.  
Remove the internal stem and pollen from the blossoms and rinse the exterior to remove any dirt. Whisk egg in a bowl and place flour in a second bowl. Heat about a 1/2" of oil in a cast iron skillet for frying. Stuff each blossom with 1 T of cheese mixture. Dip each blossom in the egg and then dredge in the flour. Shallow fry a few blossoms at a time to keep from overcrowding the pan. Once golden brown, remove to paper towels to drain and sprinkle with a little more celery salt while still hot. Serve on their own as an appetizer or over a salad for a light lunch. Enjoy!

Wednesday, October 29, 2008

Sage and Orange Infused Acorn Squash Creme Caramel

This month's Royal Foodie Joust called on all of us Foodie Blog Rollers to come up with a dish that incorporated oranges, sage and acorn squash - a very interesting flavor combination. At first I was stumped. Having never even cooked with acorn squash before, I knew this was going to take some thought. Plenty of pumpkin and butternut squash have passed through my oven, but never an acorn squash.

When I started brainstorming, I wanted to figure out something that would really let both the orange and sage flavors shine through in the main component of the dish and not just as an afterthought. After mulling over several ideas, I set out to create an acorn squash creme caramel. The sage would be steeped in simmering milk to infuse its flavor into the dish and the fresh-squeezed orange juice would be added to the acorn squash puree. Both flavors shined through in the finished product. To check out the Royal Foodie Joust, or to join The Foodie Blog Roll, head on over to the The Left Over Queen. I highly recommend it!

Sage and Orange Infused Acorn Squash Creme Caramel
Makes 6

1 cup sugar, divided
pinch of cream of tartar
2 T water
1 1/2 cups cream
3/4 cup milk
6 sage leaves roughly chopped + more for serving
1 cup roasted acorn squash flesh
1 egg + 2 egg yolks
4 T orange juice
6 orange segments for serving

Preheat Oven to 325*
Bring 2/3 cup sugar, cream of tartar and water to a boil in a heavy bottomed sauce pan. When sugar mixture begins to brown lightly, remove from heat and mixture will continue to cook until a caramel color is achieved. Pour sugar mixture into six five-oz ramekins to cover the bottom (Note: You may not use all of the sugar mixture depending on the width of your ramekins).

Place milk and cream in a medium sauce pan and bring mixture just to a simmer. Remove from heat and stir in chopped sage leaves. Set aside to steep. Combine eggs, egg yolks and remaining 1/3 cup sugar in a bowl. Puree the acorn squash in a blender to get a smooth consistency. Combine squash with sugar and egg mixture. Once milk mixture has cooled, strain it into the acorn squash mixture and mix to combine. Pour custard into the prepared ramekins until 4/5 full. Place ramekins in a water bath and bake for 40 - 45 minutes until only a slight jiggle remains on top of the custards when you move the pan. Place custards in the refrigerator and cool for at least 12 hours and up to two days. Turn upside down on a plate to unmold, dipping the ramekins in hot water for a few seconds to loosen if necessary. Top unmolded creme caramels with orange segments and sage leaves to serve. Enjoy!

Monday, October 27, 2008

Soy Ginger Chicken

I am always looking for new ways to cook chicken. It's such a convenience meat - not too expensive and easy to keep around. So when I saw this recipe on Everyday Food's site, I couldn't wait to try it. Having a momentary lapse in judgement and forgetting that the boyfriend doesn't always dig the Asian flavors, I decided to make this for our Saturday night dinner. True to form, he was not a huge fan. He thought it was fine and ate it, but this won't likely be making it into regular rotation. I, on the other hand, loved it. The soy sauce and cilantro flavors really come through in the chicken, and the meat gets to that magical place of tenderizing and falling off the bone. Delicious. The original recipe was clearly lacking some stock or other cooking liquid from the ingredient list so I've added two cups of chicken stock to the mix.

Soy Ginger Chicken
Adapted from Everyday Food
Serves 2

1/3 cup soy sauce
2 T brown sugar
5 garlic cloves, thinly sliced
2/3 cup chopped cilantro
1 small piece ginger, peeled and cut into thin strips
1 T balsamic vinegar
1/2 t ground pepper
2 cups chicken stock
5 scallions, thinly sliced
2 chicken quarters, skin removed and leg and thigh cut apart
2 carrots, peeled and thinly sliced
1 T cornstarch

Preheat oven to 325*
Combine first eight ingredients and half the scallions in a medium dutch oven and stir to combine. Place chicken and carrots in the pot and stir to coat. Place in the oven for 1 hour and 45 minutes until the chicken starts to fall of the bone. Continue cooking if necessary. Mix cornstarch with 1 T water. Remove the pot from the oven and ladle one cup of cooking liquid into a a small saucepan. Mix the cornstarch slurry into the cooking liquid and cook until simmering and thickened. Return the thickened cooking liquid to the pot and mix. Divide chicken and sauce between two bowls of white rice and enjoy!

Thursday, October 23, 2008

Sweet Corn and Chicken Pizza

It may be a product of growing up in California with California Pizza Kitchen, but I'm a sucker for non-traditional pizza ingredients. Whether you call it flatbread, pizza or crostini, if it involves dough, cheese and off-base ingredients, I'm there. 

I can still remember my first meal at a California Pizza Kitchen. It was sometime in the eighties at the (original?) location in Brentwood. My Aunt Linda had taken my brother and I off my parents' hands for a night and was taking us to this cool, new restaurant. We decided on a BLT pizza, but then tried to confuse the waiter by adding in a few more letters for ingredients we wanted to throw into the mix. Not only were they going to bring us a BLT pizza complete with mayonnaise dressing on the lettuce, but they were going to throw in some avocado and other toppings we had requested. I was sold.

To this day, I love dressing up quick tortilla pizzas with unique ingredients. My current favorite is sweet corn. It gives you that wonderful sweet/savory thing going on with the pizza and the tortillas are easy to keep on hand and require no pre-baking. Talk about a quick dinner? This is it.

Sweet Corn and Chicken Pizzas
Serves 2 - 4 depending on your eaters

2 flour tortillas
1/2 cup marinara sauce
1 cup shredded chicken
1/2 cup sweet corn
3/4 cup mozzarella cheese

Preheat broiler
Spread 1/4 cup marinara and 2 T cheese over each tortilla. Divide shredded chicken and corn between each tortilla and top with remaining cheese, 1/4 cup for each tortilla. Place under the broiler for five minutes until starting to brown on top. Cut into wedges and enjoy!

Tuesday, October 21, 2008

Shrimp and Orzo Salad

I am slightly obsessed with lobster rolls. Having never had the pleasure of actually eating one of these delicacies that I imagine are abundantly available as soon as you step off the plane in someplace like Boston or anywhere in Maine, they are starting to reach mythical existence in my mind.

Every-now-and-then the craving gets bad enough that I have to make something that I imagine to be similar, almost immediately. This orzo salad was the result of one such craving. I added shrimp and crisp celery to some cooked orzo and dressed the whole thing with a mayonnaise horseradish mixture. It absolutely hit the spot. Possibly more so than anything I've made to try and quell these cravings in the past. One day, I will eat a lobster roll on the East Coast. Until then, this salad will certainly suffice.

Shrimp and Orzo Salad
1 cup orzo
6 colossal shrimp
4 stalks celery, diced
2 T mayonnaise
2 T light sour cream
1 T creamed horseradish
1/2 t salt

Boil water, add the orzo and cook for 9 minutes. Add the shrimp to the water and cook until pink. Drain the pasta and shrimp and set aside. When the shrimp is cool enough to handle, chop. Mix the mayonnaise, sour cream, horseradish and salt together and add the dressing to the pasta along with the chopped shrimp and celery. Stir to combine and add more salt to taste. Enjoy!

Monday, October 20, 2008

White Bean Chili

I'm not a big chili-maker. To be honest, I haven't been much of a chili eater either. Since it takes so much time to get a beefy chili cooked down to deliciousness, I just don't make it at home very much. Don't get me wrong, if it's something I love, I will put all the time necessary into a dish, but chili just isn't one of those dishes for me.

I've seen a lot of white bean chili recipes lately and realizing that I could use chicken to make a lighter chili, I decided to make my own at home. The results were delicious. Next time, I'm making a pot of polenta so I can serve the chili on top.

White Bean Chili

1 T vegetable oil
1 can white kidney beans
2 chicken breasts
2 cups chicken stock
1 large onion, diced
4 garlic cloves, chopped
3 t chili powder
1 T tabasco sauce
1/2 t cumin
1/2 t salt
scallions for serving

Heat the oil in a heavy bottomed skillet or dutch oven and add the onion and garlic. Saute for five minutes and add the chili powder, tabasco sauce, cumin and salt. Continue to saute, stirring regularly and adding a bit of the stock if necessary to keep the onion mixture from sticking to the bottom of the pan. Place the chicken breasts in the pan and allow to sear on both sides. Add the remaining stock and simmer for 10 - 15 minutes until the chicken is cooked. Remove the chicken from the pan and set aside to cool. Add the kidney beans and continue to simmer. When the chicken is cool to the touch, shred it and return to the pot. Remove from heat and adjust seasoning to taste. Divide between four serving bowls, top with scallions and enjoy!

Friday, October 17, 2008

Maldon Sea Salt

I have what you might call an arsenal of salts. Sea salt, kosher salt, flavored salts, fine salt and even good old Morton's. I never met a salt I didn't like. Black lava salt from Maui? I'm totally there. 

If you have yet to try Maldon Sea Salt, I highly recommend you go out and find a box right now. It's not a cheap salt at $8 - $12 a box, depending on where you get it, but since it's generally used as a finishing salt, a box will last you a long time.

Most of the salt flakes come in the shape of little pyramids and have an amazing crunch when you bite into them. I like to sprinkle them over meat right after cooking and have even been known to sprinkle one or two flakes over freshly baked chocolate chip cookies. That salty crunch as you bite into something sweet and chocolaty is absolutely amazing.

You can find more information on Maldon's web site here. I used to only be able to find it at specialty shops, but I have started to see it at Whole Foods and some other major retailers. What are your favorite salts or seasonings that you couldn't live without in the kitchen?

Wednesday, October 15, 2008

Cream Scones

I was perusing some of my favorite blogs the other day and came across a wonderful scone recipe at La Bella Cook. I immediately started craving them and after putting water on for a pot of tea, I started making them.

The recipe comes from Dorie Greenspan and I, along with Bridgett at La Bella Cook, left out the currants. I like to add flavor to my scones with what I serve alongside them. Today it was a blueberry spread, butter and sage honey. Had I had any clotted cream on hand, it definitely would have made the mix. The final piece to this delicious breakfast was a large pot of PG Tips. Enjoy!

Cream Scones
Adapted from Dorie Greenspan

1 egg
2/3 cup heavy cream
2 cups flour
2 T sugar plus more for dusting
1 T baking powder
1/4 t salt
5 T butter, cubed and chilled

Preheat oven to 400*
Mix egg and cream together and set aside. Place flour, sugar, baking powder, salt and butter in a food processor and pulse until crumbs form. Turn out into a bowl and pour the wet ingredients over. Gently fold together with a spatula until just combined (do not over mix). Turn dough out onto a board dusted with flour and form into a circle. Cut the circle into 6 - 8 wedges and transfer to a baking sheet lined with a silpat or sprayed with cooking spray. Bake for 22 minutes and cool slightly before serving and enjoy!

Tuesday, October 14, 2008

Apple-Crusted Roast Pork Loin

Roasting a pork loin is a really quick and easy way to get a somewhat elegant dinner on the table without a ton of work. It's so simple in fact that I usually like to dress mine up with a crust or some sort of spice rub on the outside. The little added effort makes such a difference in the end result.

This recipe is a great one for the start of fall as it makes use of apples and sage in the crust. Dijon mustard is used as a "primer" of sorts to help everything stick to the meat. Variations on this crust are definitely encouraged!

Apple-Crusted Roast Pork Loin

1 lb pork loin
2 T dijon mustard
2 small apples
6 sage leaves
salt and pepper to taste

Preheat oven to 450*
Peel and core the apples. Cut the apples into chunks and place in a food processor with the sage leaves. Pulse until everything is finely chopped. Sprinkle salt and pepper over the pork loin. Coat pork loin with the dijon mustard. Spread the apple mixture on a piece of plastic wrap and roll pork loin in the apple mixture to fully coat. Place on a baking sheet lined with a silpat and bake for 25 minutes. Let sit for 10 minutes before slicing. Enjoy!

Monday, October 13, 2008

Coffee Cake Muffins

As much as I love weekends, it's a really good thing for my waistline that I don't have time to bake like this every morning. There's something about waking up early and having time to peruse the recipes I've set aside, check the shelves to see what's around and set about making something delicious for breakfast. I just love it. And given the time, I would probably do it every morning.

I found these little numbers through America's Test Kitchen. I've never made one of their recipes before, but after trying these, I plan to make many more. They were absolutely delicious. I changed up the recipe slightly by using light sour cream and subbing out walnuts for pecans (since that's what I had on hand). Use whichever nuts you prefer.

Coffee Cake Muffins
Adapted from America's Test Kitchen
Makes 12 Muffins

Topping
1/2 cup sugar
1/3 cup brown sugar
1/3 cup flour
1 T cinnamon
4 T butter, cubed
1/2 cup walnut pieces

Muffins
2 eggs
1 cup light sour cream
1 T vanilla bean paste
1 3/4 cup flour
1/2 cup sugar
1 T baking powder
1/4 t salt
5 T butter

Preheat oven to 375
For the topping:
Place the brown sugar, flour, cinnamon, butter and 1/4 cup of the sugar in a food processor and pulse until crumbs form. Scoop out 3/4 cup of mixture and set aside (this will be your cinnamon filling). Add remaining 1/4 cup of sugar and the walnut pieces and pulse until nuts are coarsely chopped. Set aside for your topping.

For the muffins:
Mix the eggs, vanilla and sour cream together. Place the flour, sugar, baking powder, salt and butter in a food processor and pulse until crumbs form. Use a spatula to gently fold the dry and wet ingredients together. Do not over mix. Spray a muffin tin with cooking spray and line with muffin liners. Place 1 T of batter in each muffin cup and press to cover the bottom. Next add 1 T of cinnamon filling, pressing into the batter, and then cover with more batter until all the batter is used up. Sprinkle 2 T of topping over each of the muffins and press gently into the batter. Bake for 22 - 24 minutes and let cool for 10 minutes before serving. Enjoy!

Friday, October 10, 2008

Oatmeal Chocolate Chip Cookies

I love these cookies. At least I did last night when I ate way too many of them. I love chocolate chip cookies, but I was craving something a little heartier (dare I say healthier?) when I made these. I am in no way claiming that these are healthy cookies, but something about adding oatmeal to cookies makes them seem heartier and good for you. It's not true, but I like the thought anyway. So for my 100th post, I give you Oatmeal and Chocolate Chip Cookies. Enjoy!

Oatmeal Chocolate Chip Cookies
Makes 18

1 cup butter (2 sticks)
1 cup brown sugar
3/4 cup sugar
2 eggs
1 T vanilla bean paste
1 3/4 cups flour
1 t baking soda
1 t baking powder
1/2 t kosher flake salt
3 cups rolled oats
1 1/2 cups semisweet chocolate chips

Preheat oven to 350*
Beat the butter and sugars together, using the paddle attachment of a stand mixer, until light and creamy. Add the eggs, one at a time, until just incorporated, then add the vanilla. In a separate bowl, sift together the flour, baking soda, baking powder and salt. Add the flour mixture to the butter a little bit at a time until just incorporated. Add the oats and chocolate chips and stir in by hand. Drop cookies in 3 T mounds on a greased cookie sheet. Bake for 14 minutes or until just starting to turn golden. Cool for a minute or two on the cookie sheet before removing to a wire rack to cool completely. Enjoy!

Thursday, October 9, 2008

Twice Baked Spaghetti Squash with Sweet Potato Puree

This time of year I always start to see a huge variety of squash at the store. I love using butternut squash in soups and pasta, but I never seem to branch out much from there. When it comes to winter squash, I'm a bit boring.
I was at the grocery store recently and decided it was high time to change my one track squash mind. I've heard about the flesh of spaghetti squash, how it pulls apart like thin strips of spaghetti when cooked, but had never made one myself. I decided to grab one, take it home and figure the rest out later.
Well, one week later and that squash was still sitting on my counter staring back at me. I looked around for what else I had and thought I would do something with a bag of cubed sweet potato that was laying around. This Twice Baked Spaghetti Squash with Sweet Potato Puree is what ended up happening. I am definitely a new fan of spaghetti squash. If you're trying to keep things healthier you can definitely replace the cream with stock. I just happened to have the cream on hand and well, sometimes heavy cream just sounds like a really good idea.
Next up, acorn squash?
Twice Baked Spaghetti Squash with Sweet Potato Puree
Serves 4 as a side

1 Spaghetti Squash
1 lb cubed sweet potato
3 T olive oil
1/3 cup heavy cream
1/2 cup shredded mozzarella and provolone blend plus more for topping
salt to taste

Preheat oven to 400*
Cut spaghetti squash in half lengthwise. Drizzle the squash and the sweet potato cubes with olive oil and roast (cut side down for the squash) for 30 - 40 minutes until fork tender. Remove from the oven and let cool so you can handle the squash. Scoop the seeds out of the squash and run a fork along the flesh to remove the spaghetti-like threads. place the flesh in a bowl. Using a potato ricer, mash the sweet potato into the same bowl. Stir in the cheese and cream then salt to taste. Grease an oven proof casserole and place squash mixture in the casserole. Sprinkle more shredded cheese on top of the casserole. Bake for 20 minutes until the cheese is melted and browning slightly on the edges. Serve piping hot and enjoy!

Wednesday, October 8, 2008

Marinated Goat Cheese Salad

It was finally time to pull the marinated goat cheese out of the fridge to find out how weeks of marinating went. The answer? Delicious. To be honest, the original recipe called for the jar to be kept in a "cool place." I have to believe that if I had a cool place in my apartment aside from my fridge, that the flavors would have infused the cheese even more. However, until just recently, there hasn't been an only mildly warm place in my apartment, let alone somewhere cool. I think I will have to try this again once it really gets cold this winter and see if the flavors change.

The reason for marinating the goat cheese in the first place was to make the salad from Anne Willan's The Country Cooking of France. So, without further ado...

Marinated Goat Cheese Salad
Serves 4

1 package arugula blend lettuce
8 slices bread
2 T red wine vinegar
6 T oil from marinating plus more for brushing bread
salt and pepper to taste

Heat the broiler. Cut a round from each slice of bread. Cut each slice of cheese in half horizontally and place one piece of cheese on each slice of bread. The oil still coating the cheese should be more than enough to coat the bread, but if necessary, brush a little more oil on the bread. Mix together the vinegar, salt and pepper and then drizzle in the olive oil while whisking vigorously to emulsify the dressing. Place the cheese bread under the broiler for approximately five minutes until golden. Dress the salad, adding more seasoning if necessary. Divide the lettuce between four serving plates and top with two slices of cheese bread. Enjoy!

Tuesday, October 7, 2008

Roasted Tomato Soup

Soup has been on the mind lately with the weather turning colder. We actually had a little bit of rain on Saturday which inspired the making of this batch. There's something about that first bit of rain each fall that is so welcomed. It's like those first few hot days of summer. They haven't been around in so long that you are just dying for them to come along.

I've been making a soup like this since I started cooking in college. It has changed much over the years, but the basic idea remains the same. Roasted tomatoes, pureed into a wonderful and warming dish.

Roasted Tomato Soup
Serves 6

2 lbs plum tomatoes
1 red bell pepper
1 onion
2 1/2 cups chicken or vegetable stock
1 T tomato paste
6 dill sprigs
1/4 cup heavy cream
1/2 t salt

Preheat oven to 450*
Halve the tomatoes and peel and quarter the onions. Remove the stem and seeds from the bell pepper and cut into large chunks. Place all the vegetables on a greased baking sheet and roast for 25 minutes until the edges start to char. Remove to a large pot and add stock. Tie the dill sprigs together with kitchen twine and add to the pot. Bring to a simmer and let cook for 30 minutes. Remove the dill sprigs and let the vegetables cool slightly before transferring to a blender and pureeing. At this point you can strain the soup, but I prefer to keep the thickness you get without straining it. Return the soup to the pot and add the heavy cream and salt. Split between six soup bowls and garnish with dill and creme fraiche. Enjoy!

Monday, October 6, 2008

Fingerling Potato Tart

I'm getting together with some girlfriends this week and needed something I could make ahead of time and reheat later. I adore savory tarts and seeing as they stand up pretty well to reheating, decided one would be perfect for this event. I've seen potato pies with layer upon layer of thinly sliced potato and gooey, melty cheese and have always wanted to make one. This is my attempt at something similar in a tart. The caramelized onions are what really pull the flavors together.

Fingerling Potato Tart
Serves 6

1 1/2 cups flour
1 t salt
4 dill sprigs
6 T butter
2 - 4 T ice water
3 medium onions
2 - 4 T olive oil
1 T dijon mustard
1 lb fingerling potatoes
1/2 cup shredded Italian cheese
2 eggs
1/2 cup heavy cream
1/4 t nutmeg
1/4 cup parmesan

Place the flour, salt and dill in a food processor and pulse until well blended and dill is chopped and distributed throughout the flour. Cut the butter into small pads and add to the food processor. Pulse until small crumbs start to form. Pour mixture into a bowl and drizzle in the water starting with 2 T and adding more if needed to get the dough to come together. Form a disc with the dough, wrap in plastic wrap and refrigerate for 30 minutes.

Peel the onions, cut in half lengthwise and slice thinly. Heat 2 T olive oil in a small pan. Add the onions and cook until brown and caramelized, stirring occasionally. If the onions begin to stick to the bottom of the pan, add more olive oil 1 T at a time.

Preheat oven to 375*. Place the fingerlings in a pot and cover with water. Bring to a boil and cook for 3 minutes until just starting to get tender. Drain and let cool slightly before slicing lengthwise into very thin slices.

Roll the dough out on a floured surface to fit a 9" tart pan. Transfer to the tart pan, line with foil and fill with pie weights. Bake for 30 minutes until golden on the edges and let cool.

Spread the mustard over the bottom of the tart crust. Sprinkle half the caramelized onions over the mustard, followed by 1/4 cup of the shredded Italian cheese. Layer fingerling slices in a concentric pattern and repeat (onions, cheese then potatoes). Beat eggs, cream and nutmeg together in a bowl and pour over the tart. Bake for 20 minutes, remove from the oven and sprinkle the parmesan cheese over the top of the tart. Return to the oven and bake for an additional 20 minutes. Let cool slightly before serving and enjoy!

Sunday, October 5, 2008

Proper English Fry Up

Breakfast can be a bit of a battle at my house. Are we having a quiche with sauteed leeks and a thick, rich custard? Or are we having bacon and fried eggs? While I'm usually pushing for the former or something similarly sophisticated, I don't entirely hate it when the boyfriend wins out. One of his favorite things to make on those mornings is a proper English fry up. Think bangers, fried eggs, baked beans, grilled mushrooms and tomatoes. Since I knew we would be having an English fry up this Sunday, I decided to bring in a little bit of sophistication by making some stuffed portobellos to go along with everything that the boyfriend was pulling together for the fry up. I'm giving you the mushroom recipe here, but to pull together the rest of the breakfast, here is what you will need: baked beans (preferably Heinz), toast (must be white), english bangers (sausage), bacon (if the sausage isn't enough meat for you and yours) and fried eggs (1 -2 per person). Often we also grill tomato halves as well if you'd like to throw those in the mix.

Stuffed Portobellos
Serves 4

4 stuffing portobellos (these guys are definitely smaller than regular portobellos)
2 slices thick cut bacon
1/2 cup baked beans
1 - 2 T olive oil
salt

Preheat oven to 425*
Remove the stems from the portobellos and use a melon baller to scoop out some of the flesh. Chop the removed stems and flesh and place in a medium bowl. Slice the bacon strips in half lengthwise and chop into small pieces. Cook until golden brown. Add the bacon and 1 T bacon grease to the chopped mushrooms along with the baked beans. Mix together, adding salt to taste, and divide mixture between the four mushrooms. Pour the olive oil in the bottom of a baking dish and add stuffed mushrooms. Make sure the bottom of the mushrooms are coated thoroughly in oil and cook for 20 - 25 minutes until tender. Serve alongside your English fry up and enjoy!

Saturday, October 4, 2008

Gnocchi Board

I finally gave in and bought a gnocchi board. Had I known it was going to cost me less than $10, I probably would have given in a long time ago. 

I really do have an unhealthy addiction to kitchen tools and cooking supplies. If my mom wants to treat me for my birthday, she knows we're going to the local restaurant supply store. If the boyfriend wants to cheer me up, he knows something that says KitchenAid has a bigger impact than flowers, though I still love flowers (just in case he's reading this).

While my kitchen is larger than any that I've had before (since living on my own), it's still small in the the grand scheme of things and certainly doesn't have the room to house my addiction. That seems not to matter as my purchasing has yet to be limited by the question, where will I put it?

Anyone else out there share my addiction? What is your weakness when it comes to kitchen gadgets?

Friday, October 3, 2008

Triple Chocolate Cookies

Sometimes nothing will do but chocolate. Lots and lots of chocolate. When you're trying to eat healthy, this can be a problem. I suppose the only real healthy option when eating chocolate would be one single ounce of dark chocolate. Great for the antioxidants, not so great for actually satisfying that craving.

I tried Ellie Krieger's recipe for triple chocolate cookies recently and while I still prefer the full force, butter-filler cookies I normally make, these ones are a great substitution when I'm trying to be good. I never thought 1 tablespoon of batter would make a big enough cookie, but one or two of these guys and my chocolate craving is satisfied.


Triple Chocolate Cookies
Adapted from The Food You Crave
by Ellie Krieger

Makes 20 - 24 cookies
(depending on how much batter you eat)

1/4 cup butter
1/2 cup brown sugar
1/4 sugar
1/4 cup canola oil
1 egg
1 t vanilla bean paste
1/2 cup flour
1/2 cup whole wheat pastry flour
1/4 cup cocoa powder
1/4 t kosher flake salt
2 oz 62% dark chocolate, chopped
2 oz 72% dark chocolate, chopped

Preheat oven to 350*
Blend the butter and sugar together using the paddle attachment. When light and fluffy, add the oil, egg and vanilla and mix until combined. In a separate bowl, sift together the flours, cocoa and salt and add to the butter mixture in stages. Stir in the chopped chocolate and place the batter in 1 tablespoon scoops on a cookie sheet. Bake for 12 minutes and let cool slightly on a rack before enjoying!

Thursday, October 2, 2008

Salmon Nicoise

I love it when restaurants will take a little twist on the traditional nicoise and use salmon instead of tuna. I like tuna, but I love salmon. Unfortunately, when I ordered a salmon nicoise out at lunch recently, it was somewhat of a disappointment so I knew I would have to make my own at home soon to make up for it. This was a great version and the vinaigrette was a new experiment using some grapefruit vinegar. If you don't have grapefruit vinegar on hand, just use whichever kind you prefer. 

Salmon Nicoise
Serves 1

1 salmon filet
1 T olive oil
3 small creamer potatoes
4 caper berries
6 green beans
1 tomato
1/4 cup nicoise olives
3 cups lettuce
2 T olive oil
1 T grapefruit vinegar
salt and pepper

Heat the olive oil in a small pan and cook the salmon for about four minutes on each side and remove to a cutting board. Microwave creamer potatoes for four minutes until soft and green beans for 1 minute until just tender. Slice the tomato into quarters and drain the olives and caper berries. Mix together the olive oil, vinegar, salt and pepper and dress lettuce. Place lettuce in a serving bowl and top with potatoes, salmon, green beans, capers, olives and tomatoes. Enjoy!

Wednesday, October 1, 2008

Philly Cheese Steak Number Two

I love the foodie blogroll. It's a great community of food bloggers started by The Leftover Queen. Every month she hosts the Royal Foodie Joust where bloggers come together to create dishes based around three ingredients. This month, the ingredients were fennel, dairy and parsley. I decided to take another go at the boyfriend's favorite sandwich and do a twist on the philly cheese steak. I've sauteed fennel instead of the traditional onion and made a parsley cheese sauce to top everything off. He seemed to think it was a keeper. I think he would still prefer the traditional version, but this is one for the rest of us.

Philly Cheese Steak with Sautéed Fennel and Parsley Cream Sauce

1/4 cup + 2 T Butter

1/4 cup flour

1 pint milk + more for thinning cheese sauce as necessary

1/2 bunch of parsley, chopped

3/4 cup shredded provolone or italian cheese blend

1 t fennel salt

1 fennel bulb

6 oz sliced mushrooms

1 T olive oil

1 lb thinly sliced beef sirloin tips

4 french sandwich rolls

Melt butter in a medium pan and sprinkle flour over. Stir until a roux is formed and cook for 1 - 2 minutes, stirring constantly. Heat milk in the microwave and began adding to the roux in half-cup increments. Make sure each addition is fully incorporated and allow mixture to cook down slightly before adding the next. Once the entire pint of milk is incorporated, remove from heat and stir in 1/2 t of fennel salt, parsley and cheese.

Quarter fennel bulb, core and slice thinly. Melt remaining 2 T of butter in a pan and add fennel. Sauté for 5 minutes and add sliced mushrooms. Cook until fennel is soft and starting to caramelize. While fennel is cooking heat 1 T olive oil in a pan on high and cook sirloin quickly, cooking in 2 rounds if necessary to avoid crowding the pan. Season with remaining 1/2 t of fennel salt.

Toast french rolls and spread cheese sauce over each roll (thinning cheese sauce with more warm milk before serving if necessary). Layer fennel mixture, followed by steak and finally more cheese sauce. Enjoy!

Tuesday, September 30, 2008

Butternut Squash Gnocchi

The last time I made a gnocchi dish, I used store-bought gnocchi and said that I probably wouldn't be making it from scratch until I purchased a gnocchi board. Well, I still have yet to get the board, but I could not resist the recipe for homemade butternut squash gnocchi in this month's Sunset Magazine. I love the idea of replacing the potatoes traditionally used in gnocchi with different flavors and butternut squash is one of those delicious fall flavors that I'm seeing everywhere right now and am loving using in my own dishes. Coming soon, butternut squash soup with sage.

Butternut Squash Gnocchi
Adapted from Sunset Magazine October 2008
Serves 4 (Sunset says 8, but three of us finished off most of this)

1 butternut squash 2 -3 pounds
2 t salt
1 t pepper
1/2 t nutmeg
3 1/2 cups flour
3 T butter
1/2 parmesan
additional nutmeg and pepper for serving

Use a fork to poke holes in the butternut squash and microwave on high for 20 minutes (Sunset said 10 and this was definitely not enough for mine). When you cut the squash in half lengthwise after microwaving, remove the seeds and discard. You should be able to scrape out the flesh easily with a fork or spoon. If it is not tender enough, return the squash to the microwave and cook on high for a few more minutes at a time. Place 2 cups of butternut squash into a bowl with the salt, pepper and nutmeg and mix well. Add flour, 1 cup at a time, until it turns into a dough. Turn the dough out onto a flour surface and kneed, adding flour as necessary if too sticky. Cut the dough into four sections and roll out into ropes as shown below. Cut these ropes into small gnocchi pieces. Bring a large pot of water to a boil and salt liberally. Add gnocchi and cook for 5 - 6 minutes. Remove straight from the pot to a serving bowl with a slotted spoon. Toss gnocchi with butter and parmesan and add more seasoning to taste. Enjoy!


Monday, September 29, 2008

Baked Apples

There's something about the fall and baked apples. That warm cinnamony smell just warms up the whole house as the weather starts to get cool. I needed a quick dessert to go with a dinner I was making for the boyfriend and his younger brother. Baked apples are not only easy, but they take care of themselves in the oven while you focus on dinner. I served these with some vanilla ice cream and a cinnamon stick from the baking dish as a garnish.

Baked Apples
Adapted from Everyday Food October 2008
Serves 6

3 gala apples
1/4 cup brown sugar
juice from half a lemon
6 cinnamon sticks

Preheat oven to 450*
Mix the brown sugar, lemon juice and 1/4 cup of water together in a bowl. Slice each apple in half and core with a melon baller. Add the apples to the bowl and stir together with the brown sugar mixture. Place in a baking dish, cut-side down and place cinnamon sticks around the apples. Pour the remaining brown sugar mixture over the apples and cover the baking dish with foil. Place in the oven and cook for 20 minutes. Serve with vanilla ice cream (see below) and enjoy!

Friday, September 26, 2008

Mediterranean Pot Pie

Mmmmmmm. Pot Pie. I loved chicken pot pie when I was growing up. All the warm dough, mixed in with the gooey filling. So comforting back then and it still is. Back then I thought it only came in "chicken." Now I know that you can make pot pie using a whole variety of meats or by not using meat at all. I had a half pound of leftover, seasoned meat from the lamb kofta and decided to make a mediterranean themed version. To make it mediterranean I added fava beans to the lamb and used phyllo dough instead of puff pastry or pie crust. I'm hoping this will just be the first of many more gooey, comforting pot pies to come as the season turns cold.

Mediterranean Pot Pie
Makes 2 Pot Pies

1/2 recipe of lamb kofta meat
2 T olive oil, divided
6 scallions, white part chopped (green part reserved for another use)
1 cup chopped mushrooms
3/4 cup pre-cooked fava beans
1 1/4 cup chicken stock
1/2 cup flour
1 t chile powder
1 t cumin
1/4 cup parmesan
1 roll store-bought phyllo dough

Preheat oven to 375*
If frozen, allow phyllo dough to sit out and come to room temperature (you can do this in the fridge overnight or let it sit at room temperature for about two hours). Heat 1 T olive oil in a medium pan and saute the kofta meat. When almost finished cooking, add the scallions, mushrooms and fava beans and continue to saute. Mix the stock and flour together in a bowl and add to the pan. Allow to simmer gently for 10 minutes, stirring occasionally. Stir in the chile powder and cumin and remove from heat. Spray two individual-sized, oven-proof dishes with cooking spray and cut phyllo to fit over the top. Put half of the meat mixture in each dish and cover with the phyllo. Use the remaining 1 T olive oil to brush the top of the phyllo. Bake the pot pies for 10 minutes and then remove from the oven to sprinkle half the parmesan over each pie. Return them to the oven and cook for an additional 5 - 10 minutes until the phyllo is golden and crispy. Let cool slightly before serving and enjoy!