Showing posts with label Sauces. Show all posts

Tuesday, September 17, 2013

Smoked Trout Pâté

Photobucket

A simple pulse in the food processor turns four simple ingredients into a delicious pâté. Perfect for serving with crusty bread as an appetizer or as part of my favorite Sunday supper - a platter layered with cheese, bread and European butter. The zing of the horseradish butter helps balance out the richness of the pâté.

Smoked Trout Pâté with Horseradish Butter
Adapted from Good Food

Pâté
1 oz unsalted butter
Zest 1/2 lemon
160g pack smoked trout
1 spring onion, roughly chopped

Horseradish Butter
1/2 oz unsalted butter
1 t horseradish
1 t chopped parsley + a few whole leaves

Combine melted butter, zest, trout and spring onion in a food processor and blend until smooth. Place the pate in a ramekin and smooth the top.

For the horseradish butter, melt the butter with the horseradish and stir in the chopped parsley. Pour over the pâté and lay the parsley leaves on top with a few grinds of cracked pepper. Chill thoroughly to set the butter. Serve with a baguette and extra butter.


Photobucket

Thursday, August 9, 2012

A Multi-Purpose Dressing

Photobucket

Well hello there. So. It’s been more than a little while since I last posted. 10 months to be exact. Things got busy, I planned a wedding, got married, went on a honeymoon and now, almost two months after The Big Day, I have recovered from the whole wonderful, exhausting experience just enough to get back in my kitchen and start documenting it again for you here, that is, if there are any of you left after my prolonged absence!

The meaning of this blog’s name (balancing the healthy – apples - with the delicious, but not-so-healthy – butter) could not be any more pertinent in my kitchen than it is right now. Since getting married I feel I am fighting the constant battle of trying to find dishes fabulous and flavorful enough to keep my husband (my ever-so-slightly picky husband) coming back to the dinner table, while trying desperately not to regain those 10 culinary school pounds I managed to lose for the wedding. Fun times in the Stanbrook kitchen.

Battle number one. Teach husband that chicken does not have to be flavorless diet food. Far from it! When cooked just until done (not to a dried out, parched mess of protein) I think chicken is absolutely delicious. However, properly cooked chicken does not, on its own, a fabulous and flavorful meal make.

Enter the one-two-punch of a marinade and grill. The flavor of chicken cooked on a grill will always remind me of the Cornish game hens my father grilled for our family at least once a week when I was a child. Perfectly cooked, with just the right amount of char, it is quintessential outdoor living, Southern California food to me. Use the following dressing that pulls on some of the season’s best flavors (pesto anyone?) as a marinade and I think you’ve got the perfect summertime dinner.

This dressing lives somewhere between vinaigrette and pesto. If you have extra basil, make as much of this dressing as you can and use it as a condiment for cooked meats or a salad dressing; toss it with freshly cooked vegetables or throw it over pasta. I have included directions below for using it as a marinade for grilled chicken breasts.

Photobucket        
Summer Pesto Dressing

1-1/2 cups loosely packed basil leaves
1/3 cup walnuts or walnut pieces
1 T white balsamic vinegar
2 T fresh lemon juice
1 t honey
1/2 t salt + more to taste
1/3 cup extra virgin olive oil + more as needed

Combine first six ingredients in a mini-food processor (or a regular food processor if you only have the full size) and pulse until combined. Add the olive oil and let the processor run until the oil has blended and somewhat emulsified with the other ingredients. I like to leave this dressing chunky, but if you prefer a smoother dressing, continue blending and add more olive oil until your desired consistency is reached. Taste and adjust seasoning.

To use this dressing as a marinade for chicken breasts:

Using a sharp knife, make three slashes in each breast, only cutting about 1/8” to 1/4”-inch into the breast. Reserve 1/2 of the dressing to serve as a condiment for the cooked chicken or to use later as a salad dressing. Rub 1/2 of the remaining dressing over the breasts and let them marinate in the fridge for as much time as you can – 30 minutes to three+ hours.

Fire up your grill. Let your chicken breasts start to come to room temperature while your grill heats up. Place the chicken on the grill and adjust the flames/charcoal to prevent flare ups. Close the grill cover and only lift it occasionally to baste the chicken with the remaining dressing. I wish I could tell you how long to cook the chicken, but every grill and every chicken breast is different. My chicken breasts were not gigantic and it took about six minutes on the first side and an additional four to five once I flipped them over. If your chicken is getting too black before finishing cooking, move it to a cooler area of the grill or a raised shelf and let it finish cooking with the grill cover closed. Serve the chicken with the remaining dressing.

Thursday, August 5, 2010

Rice Pudding, I’m just not that into you (usually) and why I want to be Noelle Carter

Photobucket

I’m not that into rice pudding. I’m really not. So, when I heard that I needed to try the rice pudding at Lazy Ox Canteen in Los Angeles, I didn’t give it a second thought. Thank goodness not everyone is as chocolate-focused as I am when it comes to dessert. On visit number three, a dining companion ordered it and I got a bite of what is now possibly my favorite dessert in any restaurant in Los Angeles. It is unlike any rice pudding I have ever had. It is light and fluffy and most importantly, lacking the gloppy quality that I associate with rice pudding It is so good that it set off a month-long craving and a newfound need to sample rice pudding wherever I went to see if I had been wrong all this time and was ignoring a dessert that I should actually love.

I was not wrong. I do not like rice pudding. I threw away the rice pudding from my otherwise favorite market on Third in Los Angeles and never took more than one bite of the stuff anywhere else. It always has that gloppy consistency and glop is not appetizing.

So, as one of my last meals in Los Angeles before moving to New York, I returned to the Lazy Ox in an effort to quell the rice pudding craving. A month of hankering had not grotesquely raised my expectations; it was even better than I remembered. I tried to sweet talk the waiter, but he wouldn’t offer forth so much as a hint. I then stooped lower. I waited for my boyfriend to leave the table, put a big smile on my face and let the waiter know I was moving to New York and wouldn’t be able to return to eat rice pudding for a year (poor me). Still no movement. I pushed harder and pleaded with him, letting him know that I was moving to attend culinary school and wanted to be a food writer and I was sure there was some whipped cream folded in at the end, but what else was going on that made this rice pudding such a standalone…nothing.

Enter Twitter one month later. I was checking my feed and noticed that Krista Simmons of the L.A. Times was on her way to Lazy Ox. I immediately messaged her to let her know that she would be my hero if she could secure the rice pudding recipe for publication. She then responded with surprising news. Noelle Carter had secured the recipe and it was already published.

If you are a measly culinary student begging a waiter for even just a hint at the recipe you get nothing. If you are Noelle Carter, head of the L.A. Times test kitchen wielding the power to provide a restaurant with mass amounts of publicity through publication in the L.A. Times food section, you get a full written recipe. Have I mentioned that I want to be a food writer?

Thank goodness for Twitter and that I happened to see that Krista Simmons was heading to Lazy Ox. I had missed the Culinary S.O.S. column the week the rice pudding was included because I was coordinating my move to New York. I am certain I would have found it eventually when the craving struck and I again tried a desperate Google search for any semblance of a recipe, but now I have been saved the trouble, and you, dear reader, are about to experience dessert bliss. Seriously. Make this now. I do not care if rice pudding isn’t your thing. It wasn’t mine and I think I would be happy eating only this dessert for at least the next year or so. Make it! And thank Noelle Carter for getting us what I was unable to secure.

Photobucket

Lazy Ox Canteen Rice Pudding
Adapted from Chef Josef Centeno by way of the L.A. Times
I did not make the almond brittle included in the original recipe found here

Rice Pudding Base
1/2 cup Arborio rice
2 cups water
Salt
1 (3-inch) cinnamon stick, preferably Mexican (canela)
1 quart half and half, more if needed
1/2 to 1 cup heavy cream
1/2 cup light brown sugar
1/3 cup condensed milk
1 t vanilla bean paste (the recipe calls for extract which is fine too)
2 cups whipped heavy cream to finish

Rinse the rice several times until the water runs clear. Bring the 2 cups of water, cinnamon stick and a pinch of salt to a simmer. Add the rice and simmer until of the water is absorbed, about 10 minutes. Add the half and half and bring to a boil. Reduce to a gentle simmer and cook for 30 minutes, occasionally stirring to keep anything from sticking and burning on the bottom of the pan. Stir in 1/2 cup of cream, the brown sugar, condensed milk and vanilla. Continue to simmer 20 – 30 minutes until the mixture is very creamy and the rice has no bite. Remove from the heat and add up to another 1/2 cup of cream if the mixture is too thick. The pudding will continue to thicken as it cools so you want a loose consistency. Place plastic wrap directly on the surface of the pudding and chill until firm (overnight in my case).

Fold the whipped cream into the rice pudding to achieve a light and fluffy consistency. Spoon into bowls or shape into quenelles (as pictured above and demonstrated here) and drizzle with caramel sauce (recipe included below).

Caramel
1 cup sugar
1/2 cup water
1 orange peel
1 cup heavy cream
2 T unsalted butter
Salt

Place the sugar and water in a medium saucepan and bring to a boil. Reduce to a simmer and cook until the mixture caramelizes to a light golden brown. Keep a pastry brush in a glass of water nearby and occasionally brush the sides of the pan to keep sugar from crystallizing on the sides. While the caramel cooks, place the cream and orange peel in a separate saucepan. Scald the cream and set aside to steep. As soon as the sugar caramelizes, use a wooden spoon to slowly stir in the butter. Remove the orange peel from the cream and slowly add the cream to the caramel. Season the caramel with a pinch (or two or three in my case) of salt and set aside to cool slightly.

Thursday, April 8, 2010

Ham and Eternity

Photobucket

“Eternity is two people and a ham," wrote Irma S. Rombauer in the original Joy of Cooking. Perhaps you can relate to this statement. I certainly know I can. It's the week after Easter and in my house that means we are diligently trying to use up the leftover Honey Baked Ham.

Every year I order more than we need. Perhaps I forget how hard it was to use up all the ham the year before or perhaps, because I only order Honey Baked Ham once a year, I get excited and order much more than could ever be consumed by two people in a reasonable amount of time. Whatever the reason, here I am, left with my piles of ham.

Photobucket

The ham bone was frozen for use in split pea or navy bean soup somewhere down the road, a half pound of ham was neatly diced and stowed in the freezer to have at the ready as a flavor base or to add to soups, and a ham and cheese quiche is on the menu for this weekend; still, I was in need of some new inspiration.

It came in the form of slices of ham and cheese sandwiched between two pieces of sourdough and smothered in a cheesy béchamel. In other words it came in the form of a croque monsieur. This happens to be my boyfriend's favorite sandwich and I am baffled at how it managed to escape me as a way to use up leftover ham.

The thick-cut Honey Baked Ham works perfectly in this sandwich. Gruyere is a traditional accompaniment, but I found that a blend of gruyere and swiss was particularly delicious. There is something about ham and swiss that just works.

This isn't the lightest or healthiest way to follow up Easter dinner, but let's be honest. Who hasn't already had a few too many pieces of Easter candy this week? Can one croque monsieur really do that much damage?

Photobucket

Croque Monsieur
Adapted from Ina Garten

2 T unsalted butter
3 T flour
2 cups hot milk
1 t kosher salt
½ t pepper
Pinch nutmeg
6 oz grated gruyere or gruyere / swiss blend
½ cup grated parmesan
8 slices sourdough bread
Dijon mustard
4 – 6 slices of Honey Baked Ham, or any thick-cut, cooked ham

Preheat oven to 400*
Melt the butter in a saucepan over medium heat. Sprinkle the flour over the butter and use a rubber spatula to combine. Cook the butter and flour for about two minutes, stirring constantly with the spatula. Add the milk, a half cup at a time, making sure the milk is fully incorporated before adding more. Let the béchamel simmer until thickened, stirring constantly for about five minutes. Turn off the heat and add the salt, pepper, nutmeg, ½ cup of gruyere and the parmesan cheese. Set aside.

Place the bread slices on a baking sheet and toast in the oven for five minutes. Turn the slices over and toast for an additional two minutes. Brush half the bread slices with mustard on one side and place one to one and a half slices of ham on top. Sprinkle the ham slices with half the remaining gruyere. Spread about a ¼ cup of béchamel over each of the remaining other slices and use them to top the sandwiches (béchamel side down). Spread the remaining béchamel evenly over the top of the four sandwiches and sprinkle with the remaining gruyere. Bake for five minutes. Turn the broiler on and place the sandwiches under the broiler until bubbly and browned, about five minutes.

Thursday, March 25, 2010

Pork Souvlaki on a Picnic

Photobucket

One of the many benefits of growing up in a warm climate is the option of eating outdoors on a regular basis. My mother made dinner for our family almost every night of the week and we ate it together, not in front of a television. As spring arrived each year and daylight extended a bit further into the evening, it would come time for my brother or I to set the table and my mother would ask, “are we eating inside or out tonight?” My answer was always, “out!” and if I could get outside fast enough, before any other family member had the chance to object, I would set our patio table and light the citronella candles to try and keep the bees away.

I’m not sure why I loved eating outdoors so much. Perhaps it was a change from the usual or maybe, even at a young age, I appreciated the amazing view of the Angeles Crest National Forest visible from my parents’ backyard. I couldn’t have known then that they wouldn’t live in that house forever and that I needed to make the most of the surroundings while I had the chance; luckily, I did it anyway.

Photobucket

I continue to love eating outdoors though I rarely get the chance to entertain in my own backyard. Busy schedules and the absence of my own family to cook for every evening mean eating outside is relegated to Saturday evenings and only then if I can round up a group of friends to come over for a BBQ.

Since the time change has already happened this spring and the sunlight hours are once again extending further into the evening, I need to make sure that my propane tank is full and ready to BBQ. Of course the first question that comes to mind and perhaps should not be addressed so late in this post is what to serve?

I love making skewers for picnics and BBQs. They can be prepared in advance and grilled on the spot or if you’re headed out on a picnic they can be cooked in advance and served at room temperature. Even more importantly, you don’t need silverware. Simply put, meat on a stick is easy outdoor food.

When meat on a stick is made with Greek flavors, it is often referred to as souvlaki or shish kebab, but still, at its base, it is meat on a stick. This recipe for Pork Souvlaki is marinated the night before so when it comes to cooking, all you have to do is skewer and grill. The accompanying honeyed apricots can also be prepared ahead, making the work when your guests arrive an exercise more in plating than in cooking.

Cooking note - Finding myself without a bottle of wine in the house, I substituted champagne vinegar for the wine, reducing the amount by two thirds. If you prefer to use wine, I’ve included the original amount called for. If you do use vinegar, be ready for a bit of a sour bite to the apricots, a bite that I found to be perfectly balanced by the Greek yogurt served on the side.

Photobucket

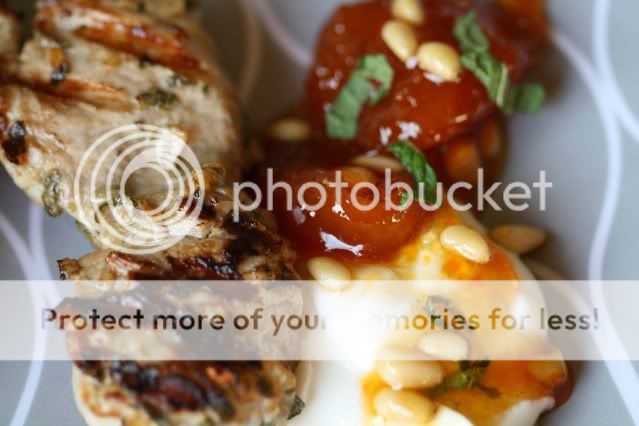
Pork Souvlaki with Honeyed Apricots
Adapted from Michael Symon
Serves 4 - 6

For the Pork:
2 shallots, minced
2 garlic cloves, minced
2 T fresh oregano, chopped
1 jalapeno, seeded and minced
Juice of 1 lemon
1/2 cup extra-virgin olive oil
2 pounds pork tenderloin, trimmed and cut into 1 1/2-to-2-inch chunks
Salt

For the Apricots:
Juice of 3 limes
3/4 cup white wine (or 1/4 cup champagne vinegar and 1/4 cup water)
1/4 cup honey (or, if using vinegar, 3/4 cup honey)
1 shallot, minced
12 or more dried apricots
1 T fresh mint, chopped
1 T toasted pine nuts
Greek yogurt for serving

For the Pork: Combine the shallots, garlic, oregano, jalapeno, lemon juice, olive oil and pork in a large Ziploc bag and turn to coat. Marinate overnight (or at least three hours if you don’t have that much time).

For the Apricots: Combine the lime juice, wine or vinegar, honey and shallots and bring to a boil. Add the apricots and simmer the mixture until syrupy, about 15 minutes. Remove from the heat and stir in the mint and pine nuts.

For the Pork: Soak 16 wooden skewers in water for half an hour if you are using a BBQ. If you are using a grill pan then there is no need to soak the skewers. Place two pieces of pork on each skewer, sprinkle generously with salt and cook over high heat until cooked through, about two minutes per side. Plate 2 to 3 skewers per person and serve with a dollop of yogurt and 2 to 3 apricots.

Monday, February 1, 2010

Dulce de Leche

Photobucket

Dulce de leche is something I used to think of as more of a flavor – one introduced to me by Haagen Dazs ice cream. I knew there was more to it than that, but I had never had a real dulce de leche sauce. Thanks to Alton Brown that all changed this past weekend.

I was flipping channels and landed on Alton’s milk episode. Always interested in all things dairy – especially if those things have anything to do with aged, bacteria-laden dairy – I stopped and watched. While this episode had little to do with cheese, it did reveal a few secrets of tres leches cake and, the subject of this post, dulche de leche.

Photobucket

I couldn’t resist the simple preparation. Milk, sugar, vanilla and baking soda combined and then left to reduce. It takes a good amount of time for the milk to cook down to a rich caramel-colored sauce, but most of that time you can totally ignore it. Just let it go (aside from the occasional stir) and two to three hours later you’ll be left with a generous cup of dulche de leche that will last up to a month in the refrigerator.

With that kind of shelf life, you have plenty of time to find your favorite uses. Mine? So far I haven’t been able to beat dulce de leche drizzled over homemade cream puffs (more on that coming soon.)

I use vanilla bean paste in place of a vanilla bean. If you stick with Alton’s use of a split vanilla bean, you need to remove the bean after one hour of cooking or it will impart a bad taste.

Photobucket

Dulce de Leche
Adapted from Alton Brown

1 quart whole milk
1 1/2 cups sugar
1 T vanilla bean paste
1/2 t baking soda

Combine the milk, sugar and vanilla bean paste in a large saucepan over medium heat. Once the sugar is completely dissolved, stir in the baking soda. Reduce the heat to low to maintain a bare simmer and let the mixture cook, uncovered, for 2 1/2 – 3 hours. Stir occasionally, being careful not to reincorporate the foam that forms on top of the mixture (you will strain this off at the end). After 2 1/2 – 3 hours, when the sauce is a deep-brown and you have just a bit more than a cup left, strain through a fine mesh strainer into a clean jar. Store in the refrigerator for up to a month.

Tuesday, September 1, 2009

Mayonnaise - How to Cheat

Photobucket
One thing I have noticed over the years is that mayonnaise is an oddly divisive substance. Many hate it with a passion, refusing to let it so much as touch a piece of sandwich bread, while others love it, slathering it on artichokes, mixing in herbs and calling it a sauce, even topping the occasional plate of scrambled eggs with a dollop just because they can. I am a card-carrying member of the latter group. It may be because both my parents are from the South where mayonnaise is more of a staple ingredient than just a condiment. Not a day went by at 3752 Chevy Chase Drive that we didn’t have a huge jar of Best Food’s (Hellman’s for you East Coasters) in the fridge, with another one on standby in the cupboard.

My appreciation of mayonnaise seemed perfectly normal amongst my own kind. In fact, I didn’t realize there was anything wrong with my level of mayonnaise consumption until my sophomore year of college when my roommates looked on, horrified at my decision to fold up pieces of Kraft American singles and dip them into my oversized jar of mayonnaise as a snack. Clearly, my gourmet tendencies had yet to take hold.

For someone who loves mayonnaise as much as I do, I find it surprising that this past weekend was the first time I tried to make mayonnaise at home. I guess it’s due to my devotion to Best Food’s. I never saw the need. I am here to tell you that I have been reformed. I still love my Best Food’s, but there is something completely different and luxurious about homemade mayonnaise. I am also here to tell you about a few mistakes I made with the first two attempts that never emulsified. Making mayonnaise is not as simple as it seems.

If you’re not in the Los Angeles area, then you don’t know that it topped 100 degrees this past weekend and not just in the Valley. It was a hot one and without the benefit of any air conditioning, the idea of vigorously whisking egg yolk while slooooowly adding oil, drop by drop at first, seemed like too much physical exertion for such a hot day. I decided to take a lovely looking recipe from Michael Rulhman and make it in my blender. After all, the blender will certainly whisk vigorously while I have my hands free to add the oil drop by drop. Right? Not so. It turns out, according to The Joy of Cooking, that you need to have egg white included in the recipe if you’re trying to make a blender mayonnaise. Clearly J o C must know what they’re talking about so I transitioned to their recipe which called for using a bit of egg white in addition to the yolk and a Cuisinart instead of a blender. I fitted my Cuisinart with the plastic blade as directed and attempted batch number two. Still no emulsification. Perhaps I added the oil too quickly? Possibly, but I have a sneaking suspicion that the plastic blade did not create enough agitation to get the mixture to emulsify.

Already having dirtied two of my major kitchen appliances, I eyed the third. Epiphany. If I used the whisk attachment on my KitchenAid mixer, then who, other than the all-seeing kitchen Gods, would ever know that it was, in fact, a mixing machine and not my own arm that was attached to that whisk? I reverted back to Ruhlman’s recipe and in about five or 10 minutes had a wonderful mountain of homemade mayonnaise sitting in front of me. Success. Who says cheating never gets you anywhere? Truth be told, the energy exerted while washing all of those appliances is at least equal to, if not more than what it would have taken me to whisk the darn thing by hand in the first place.

My final tip on homemade mayonnaise? Once you have succeeded in getting the mixture to emulsify, for God’s sake, don’t ruin it by throwing it in a blender to add fresh herbs. I lost two thirds of my beautiful mayonnaise by trying to turn it into basil mayonnaise in the blender. I managed to break the emulsification and ended up with a runny purple mess in front of me (purple basil). Thank goodness I had set some aside that I was able to combine with hand-chopped basil.

Photobucket
I served this basil mayonnaise next to a gorgeous skirt steak that the boyfriend grilled, but it would be equally delicious on just about any kind of sandwich.

Mayonnaise
Adapted from Michael Ruhlman

1 egg yolk
1/2 t salt
1 t lemon juice
1 t water
1 cup vegetable oil

Place egg yolk, salt, lemon juice and water in the bowl of a mixer fitted with the whisk attachment and whisk on medium to combine. Pour vegetable oil into a glass measuring cup, preferably with a pouring spout. Turn mixer up to medium high and use a spoon to add the oil to the mixer, drop by drop, until about a third of the oil is mixed in. You should see the emulsification coming together as a thick, white, creamy sauce. Each time you add oil you will see the emulsification loosen, then come together around the whisk and then start sticking to the sides of the bowl again. When the mixture sticks to the bowl, you know it’s safe to add more oil. I used the spoon method for the entire cup of oil, mainly because I had already broken two emulsifications that afternoon. If you are brave, feel free to start adding the oil in a slow drizzle after the first third is successfully incorporated. Once all the oil is incorporated, you should be left with glorious, luxurious mayonnaise. Use as you will.

Friday, February 20, 2009

Macerating Strawberries

Photobucket

Macerated strawberries are a very simple dessert component I learned during a brief apprenticeship as an assistant pastry chef at a local restaurant. The owner had tried to convince me that culinary school was a waste of money and that I could learn everything I needed to know by starting at the bottom rung of his kitchen and working my way up. While this may be true for restaurants whose style of food you appreciate and whose technique you hope to emulate, I’m not convinced the apprentice track applies to a local diner. Still, the experience provided an invaluable glimpse into the restaurant industry. Unfortunately, working at a stressful job, 50 – 60 hours a week, at the time and trying to deal with the physically grueling restaurant work on the weekends proved too much for me. After a few months, I thanked the folks for the opportunity and reclaimed my weekends spent cooking for friends and family.

One of the techniques I picked up from the pastry chef during my time there is how to macerate strawberries. Macerating is the process of softening or breaking down a food with a liquid (usually something acidic). It’s a simple process, but so versatile. I have found a multitude of uses for the delicious little red treats, not to mention how much fun it is to say you’re macerating something. Dessert is an obvious application, but I also like to use mine as a sort of relish in cheese courses and as a topping for breakfast dishes. Variations on a theme are a good thing here. Experiment with different wines, vinegars and flavored liqueurs as a macerating agent. My preference is balsamic vinegar. Also try varying the citrus you use. Lemon is often my choice, but on the morning when I made these strawberries, I had just freshly squeezed some orange juice for breakfast, so that’s what got thrown into the mix.

Culinary school is still on hold, for now. In the meantime, these strawberries are a great takeaway from an equally great learning experience. I hope you find them as useful and delicious as I do.

Photobucket

Macerated Strawberries
Makes about 2 cups

1 pint strawberries, hulled and sliced
1/4 cup balsamic vinegar
1/4 cup sugar
2 T orange or lemon juice
Pepper to taste

Pour vinegar, sugar and citrus juice over the sliced strawberries and let sit in the refrigerator for at least two hours. Before serving freshly crack some pepper over the strawberries. Mix well to redistribute the juices and serve as desired.

Sunday, February 8, 2009

Pea Shoot Pesto

Photobucket
Do you ever have those moments at the market – mainly the farmers market for me – when you buy something, having absolutely no idea how you’re going to use it? I do this all the time. In fact, I do it almost every time I enter a market. I get drawn in by beautiful colors, the freshness of the produce or often just the novelty of something I haven’t worked with before.

I had the epitome of one of these moments at the farmers market last week. Even though my list was already crossed off, I returned to one of the stalls to look for smaller onions. Upon entering I noticed something I had not seen the first time around – pea shoots! I don’t think they’ve been at my market before and I’ve never cooked with them, but I had to have them. They were a gorgeous green with fresh, firm stalks that had the most delicate trailing tendrils. It may have been my overexcited imagination, but I’m pretty sure they still had garden dew on them too.

Photobucket

In most cases, when I have these “moments” I spend the next few days trying to figure out how to use the purchased item, wondering why I had bought something I had no planned use for, yet again. Not so this time! It was only a matter of hours before I got a shot of inspiration.

While working on a puff pastry tart for a date with a group of friends, I realized I really needed a sauce to serve as the base. I dismissed tapenade as not everyone loves olives (they’re crazy, but it’s true) and decided a pesto would be perfect. Unfortunately I had no arugula or basil, my usual pesto bases, but I did have pea shoots. And what if I could turn those into Pesto?

A quick internet search revealed that I’m not quite the genius I thought I was and this has in fact been done before. Even so, not that many hits came up and since it would be a new experiment for me, ahead I trudged.

The resulting pesto was delicious. This is trite, but it really tasted like spring in my mouth. Fresh, like cut grass, it hinted at the approaching season when markets will be bursting with all that spring has to offer. For now, I’m happy with my Pea Shoot Pesto to tide me over.

Pea Shoot Pesto

1 bunch (about 8 oz) pea shoots
1/4 cup toasted pine nuts
2 scallions, cut into 1-inch pieces
1 garlic clove, minced
1/4 t salt
1/2 cup olive oil
1/4 cup shredded parmesan

Add first five ingredients to a food processor and pulse until roughly chopped. With the processor running, drizzle in the olive oil. You may not need a full half cup. Just keep drizzling until the pesto comes together and reaches a consistency you like. Remove the lid from the processor and stir in the parmesan by hand.

Photobucket

Thursday, January 29, 2009

Anchovies and Bagna Cauda

Photobucket
Anchovies. It’s a food that can bring thoughts of revulsion to many, along with memories of bad pizza experiences and those smelly, brown, tinned things that bear no resemblance to actual fish. And yes – anchovies are actual fish. A fact that is, surprisingly, news to some. But served fresh or preserved properly, they are somewhat sweet and quite good in many applications.

I picked up a pack of white anchovies from Spain for my pressed baguette sandwich. They were not cheap and therefore I wanted to be sure to find a good use for the remaining filets.

Enter Bagna Cauda. It’s an Italian dip that is traditionally served with fresh vegetables. I added a loaf of homemade bread and sautéed shrimp to my Bagna Cauda platter and a light lunch was served. Interestingly, I found that the veggies were not a very good pairing for the dip. However, the homemade bread and shrimp were fantastic. Aside from anchovies, the dip is made up of butter, olive oil and garlic – always a delicious sauce for bread and shrimp.

I saved my leftover Bagna Cauda to toss with pasta. All it needed was a light sprinkling of parmesan and I had a great dish. Two dishes for the price (and effort) of one. Love that!

Bagna Cauda
Makes about 1 cup

1/2 cup good quality olive oil
4 – 6 cloves garlic
12 white anchovy filets
1 oz butter (1/4 of a stick)

Heat the olive oil in a small pan over medium heat and add the anchovy filets. Stir occasionally until the anchovies begin to dissolve in the oil. While you’re waiting for the filets to dissolve, use a microplane to grate the garlic cloves into the sauce. Let everything simmer together for 8 – 10 minutes and then finish by stirring in the butter. This sauce needs to stay hot so serve it in a butter warmer or other dish that has a heat source. Serve with what you like, but I recommend the shrimp and fresh bread.

Saturday, January 24, 2009

Homemade Cherry Compote

Photobucket
The St. Agur ice cream needed something sweet to offset the pungent blue cheese flavor. Much like you would serve fruit on a cheese platter, this cherry compote was the perfect accompaniment and very simple to make. A simple syrup is cooked and combined with the cherries and a little balsamic vinegar. Delicious.

I have not cooked with cherries very much in the past and actually only bought them because I thought the red color would be such a beautiful contrast to the blue flecks in the ice cream. Since I don’t work with them a lot, I don’t have a cherry pitter, but after some research online, found a very useful tip that works perfectly for me. So much so that I will not be purchasing a cherry pitter, even though I love any reason to at all to buy a new kitchen tool. It involves nothing more than the small end of a pastry bag tip and I believe (according to the conversation on Chowhound) that this tip originates from Martha Stewart. Check out the pictures below for directions.

This compote also would be great along side many other desserts as well as breakfast foods like pancakes and waffles.


Cherry Compote

2 cups pitted sweet cherries
1/4 cup water
1/4 cup sugar
1 T balsamic vinegar

Mix water and sugar together over medium heat until fully combined. Allow the syrup to simmer over medium heat until the sugar just begins to darken to a very light caramel color, about five minutes. Add the cherries and cook for two minutes. Add the balsamic vinegar and cook until the cherries have softened and the syrup has thickened. Remove the compote from the heat and allow to cool slightly before serving with St. Agur ice cream.


Pitting Cherries with a Pastry Tip

Photobucket

Photobucket
Remove stem and place small end of pastry tip around the stem-base.

Photobucket
Press pastry tip firmly into cherry and rotate to the left and right to loosen the pit.

Photobucket
Pull the pastry tip out, making sure the pit comes with it (if it doesn’t, rotate a few more times to make sure it is separated from the rest of the cherry). Let the pit fall out the back of the pastry tip into a bowl and discard.

Photobucket
Your cherry is pitted and ready for compote. Now all you have to do is repeat this process about forty more times!

Monday, January 12, 2009

At Last - Artisan Bread in Five Minutes a Day

Photobucket

I consider myself a modern woman. I live alone and work hard to pay my rent and all of my own bills. I have found that where my true passions lie are in the kitchen and the modern work schedule certainly doesn't allow for days spent there, slow simmering and prepping everything from scratch. While I get to fill my weekends with long, drawn-out preparations and cooking the way I would cook every day if I had time, I wish I could do that more often during the week.

I've found one way to bring the feeling of cooking all day to the weeknights, in one of my most treasured Christmas gifts, the book Artisan Bread in Five Minutes a Day. It gives readers a chance to have the pleasure of homemade, prepared-from-scratch bread, while taking into account the limited time most of us have to spend in the kitchen. I know this book is not news to most of those in the food blogging community, but it has been such a delight in my kitchen, that I had to share it here, just in case you have not heard of it or have yet to pick it up.

I have barely scratched the surface of this marvelous book and already I am in love. Before getting this book, I had made a number of bread recipes at home and none turned out as well as even the first loaf I made from the master recipe. I have already blown through the first batch of dough and the second one is sitting in my fridge at this very moment. I'm trying to wait as long as I can to let the flavors develop, but the desire to use it all immediately is strong.

If you want more information on the book go to Artisan Bread in Five Minutes Day. The authors share great recipes and tips on how to get the most out of the book. I'm not comfortable sharing their master recipe (as it is one of the main points of getting the book), but trust me, you will not be disappointed if you make this purchase. In lieu of the master recipe, I'm posting the pressed sandwiches I made with my first batch of baguettes. If you're not interested in baking, by all means, pick up a baguette at the grocery store and be done with it, but you'll be missing out on the satisfaction that baking your own bread from scratch can give.

Photobucket

If you're not a fan of anchovies, substitute 3/4 cup good quality, Italian tuna packed in olive oil. If you want to use the anchovies, make sure you splurge on the good quality white anchovies found in gourmet food shops or from your deli counter. Do not settle for the over-salted, low-quality product found in tins in your grocery aisle. They are completely different in flavor and you would be better off using tuna instead.

Pressed Baguette Sandwiches
Inspired by and loosely based on Amy Scattergood's article in the LA Times

1 baguette, approximately 1 1/2 feet in length
10 - 12 white anchovies
1/2 cup arugula walnut pesto (recipe follows)
2 soft boiled eggs
4 slices of bacon, fried until crispy
1 medium boiling potato
1 T lemon juice
1 T red wine vinegar
1/4 t salt
1/4 t pepper
2 T olive oil
Handful of arugula leaves

Cut the baguette in half lengthwise and scoop out some of the crumb (interior) to make room for all of your fillings. Spread the pesto on the bottom half of the baguette and lay the anchovies on top. Slice the potato thinly and layer across the anchovies. Depending how softly your eggs were boiled, slice or crumble the eggs and yolk and lay them over the sandwich. Cut the bacon slices in half and place them over the eggs.

Whisk the lemon juice, red wine vinegar, salt and pepper together in a bowl, then slowly drizzle in the olive oil while whisking to emulsify the dressing. Drizzle the vinaigrette over the sandwich and finish with the arugula leaves. Top your sandwich with the other baguette half and wrap with plastic wrap. Put the baguette on a half sheet pan and place a baking dish over the sandwich. Weight the baking dish with canned food and place the whole thing in the fridge to sit over night.

A few hours before eating, remove the baguette from the fridge and let come to room temperature. Cut the baguette in half and serve wrapped in parchment paper.

Photobucket

Arugula Walnut Pesto
Makes 1 1/2 cups

2 + cups of packed arugula
2 garlic cloves, minced
1/2 cup walnuts, toasted
1 t salt
1/2 cup olive oil
1/2 cup + 2 T parmesan romano blend, grated

Place first five ingredients in a food processor and puree until creamy. Stir parmesan romano in by hand and serve.

Photobucket

Tuesday, August 26, 2008

English Pickle Spread

One of my must-make stops on our recent trip to London was my favorite sandwich shop when I lived there, Pret A Manger. It's a simple place that's committed to using the freshest ingredients and it really shows in the taste of their food. When we stopped in I found, to my delight, that they had created a cookbook. There is a spread that they use on their sandwiches called pickle and it's absolutely delicious. I made it to go on the sandwiches for our beach picnic. If you need some tart sweetness to complete a sandwich, this should be your go-to spread. My favorite application for it is Pret's mature cheddar sandwich. Absolutely delicious. I love finding new spreads for sandwiches to replace my usual mayonnaise. This picture is taken right after adding the water. After 45 minutes of simmering, it will be a dark mix of intensified flavors. Yum.

Pret Pickle
Adapted from Pret DIY
Makes 2 cups

1 T olive oil
1 onion, diced
1 t crushed ginger
2 cloves garlic, chopped
2 t tomato paste
1/4 cup sugar
1 lb braeburn or fuji apples
1/4 cup raisins
1/4 cup balsamic vinegar
3/4 cup water
salt to taste

Heat the oil in a medium pan and add the onion. Cook the onion until translucent. Add each ingredient, in order, allowing the mixture to warm through after each addition before adding the next. Once the water is added, but before adding the salt, bring the mixture to a boil and reduce to a simmer. Simmer for about 45 minutes until reduced and thickened but before the mixture is sticking to the bottom of the pan. For a smoother pickle (which I prefer) puree half the mixture in a food processor and then mix back in with the remaining half. Cool and then store in the fridge to use on sandwiches. Enjoy!

Wednesday, August 20, 2008

Simple Salsa - Using Up Mounds of Tomatoes

It seems like every other thing I make these days has tomato in it, is a sauce to go on tomatoes or is simply just a tomato, sliced, with salt on it. It's that time of year and it's almost bittersweet that we're all so overwhelmed with tomatoes right now and that in just one short month, those tomato plants will start to slow down and then stop production. My thought is seize the day. It's all about tomatoes for as long as possible.

My one determinate plant has been covered in cherry tomatoes this week and it was time to use a ton of them up before they all dropped to the ground. This is a simple salsa that's made my favorite way - quickly and in the food processor. The spice is totally controlled by how many of the jalapeno seeds you leave in so decide how hot you want it and proceed with caution. I make a big batch and serve half with chips, while keeping the rest on hand to serve over chicken or steak.

Simple Salsa

3 cups cherry tomatoes
1/2 yellow onion
1 jalapeno
10 sprigs cilantro
1/4 t salt

Cut onion into large chunks. Cut jalapeno in half and remove most of the seeds, leaving a few (or more if you prefer more spice). Dice the jalapeno into very small pieces. Remove cilantro leaves from the main stem. Add onion chunks to a food processor fitted with the metal blade, followed by the cilantro, jalapeno and finally the tomatoes. Sprinkle the salt over everything and pulse until very coarsely chopped. Serve with tortilla chips and enjoy!

Wednesday, June 18, 2008

Tzatziki


Mmmmmm...Tzatziki! I love this stuff. Any reason to eat garlic, raw garlic for that matter is good enough for me, but the creaminess of the yogurt and the way everything just comes together makes it one of my favorite condiments. Some people like to blend the cucumber up with a food processor so the cucumber is really mixed in with the yogurt. Others like a very thinly sliced cucumber for texture throughout. I say, why not both?


Tzatziki
1 Cucumber
Juice from Half a Lemon
2 Garlic Cloves
1 1/2 Cups Greek Style Yogurt
1 T Chopped Dill
Salt


Cut cucumber in half and peel and seed one half. Cut the same half into chunks and add to a food processor with garlic. Process until only very fine pieces remain. Remove S shaped blade and fit with the small slicing blade. Take the remaining half of the cucumber and cut it into quarters lengthwise. You should end up with four cucumber spears. Feed those through the slicing blade (you could also do this with a knife, just make sure you cut it paper thin).

Remove mixture to a bowl and add lemon juice, dill and yogurt. Salt to taste. Let mellow in the fridge for as long as you can - mine usually only makes it an hour before I dive in, but overnight is best. That's when the flavors really come together. Enjoy!