Showing posts with label Dessert. Show all posts

Thursday, April 11, 2013

Lemon Curd

 photo LemonCurd_zpsae73242c.jpg
I have a new, favorite lemon curd recipe.

This may not be groundbreaking news, but it is exciting when I find something that improves upon a steadfast recipe in my repertoire.

Lemon curd is extraordinary. Though nothing more than a combination of eggs, butter, lemon juice and sugar, patient stirring and gentle heat transforms the combination into something ethereal and quintessentially spring.

The recipe included below comes to you by way of NotWithout Salt, a wonderful blog with beautiful photography. I think it improves greatly upon my old recipe which was always a touch too tart for my taste. If you would like to see that recipe, along with instructions for a great pavlova, just click on the image of the bowl of lemon curd below.

When served with berries (or berries and whipped cream as Not Without Salt suggests) lemon curd sings. However, I find a spoon, for dipping into the jar of curd, to be a perfectly sufficient eating companion.

 photo PavlovaLemonCurd.jpg

Lemon Curd
Adapted from Not Without Salt
 
1 cup sugar
3/4 cup fresh lemon juice
3 large eggs
3 large egg yolks
¼ t kosher salt
1 t vanilla extract
1/4 cup (1/2 stick) butter

Whisk the sugar, lemon juice, eggs and egg yolks in a medium metal bowl. Set the bowl over a saucepan of simmering water, but do not allow the bottom of the bowl to touch the simmering water – in other words use a bain-marie.

Stir constantly until thickened, about 10 minutes, removing the bowl from the pan as needed to bring down the temperature and prevent the eggs from overcooking.

Remove the bowl from the heat and add the butter, salt and vanilla. Stir until combined. If desired, strain the curd to remove any bits of cooked eggs. Press plastic wrap directly onto the surface of the curd and chill.

Thursday, March 7, 2013

Lemon Blueberry Cupcakes

 photo LemonCupcakes3.jpg


I stumbled upon these delicious cupcakes while looking for something to bring into the office for my co-workers. No special occasion, just a desire to bake and not increase my waist size at the same time. My secret weapon of weight loss centers around pawning off leftovers on unsuspecting colleagues. They have yet to complain about my mode of moderation.
 
Make these for your co-workers or your family or yourself. Just make them. But beware their addictive nature if you don't have anyone on which to lovingly bestow (aka pawn off) the leftovers.

Lemon Blueberry Cupcakes with Cream Cheese Frosting
Makes 20 Cupcakes
Adapted from the Fine Cooking Blog Roll

3/4 cup unsalted butter, softened
1 1/2 cups sugar
3 large eggs at room temperature
2 cups + 1 T flour
1/2 t salt
1 t baking powder
1 t baking soda
1 cup buttermilk at room temperature
1 1/2 t vanilla
Zest of 3 lemons
1 1/2 cups fresh blueberries
1 T flour

Preheat oven to 350
Place 20 cupcake liners in two 12-cup muffin pans. Beat the butter, lemon zest and sugar until light and fluffy – about five minutes. Add the eggs, one at a time, and mix until combined. Toss the blueberries with 1 T flour.

Sift the remaining flour with the baking powder, salt and baking soda. Add a quarter of the flour mixture to the butter mixture and combine. Then add vanilla and a third of the buttermilk and combine. Repeat until the flour mixture and buttermilk are incorporated. Fold in the blueberries.

Using an ice cream scoop or large spoon, scoop the batter into the prepared muffin pans. Bake 18-20 minutes, until a toothpick inserted comes out clean. Cool pans on a rack for 5 minutes. Turn cakes out and cool completely.

Frost the cupcakes (recipe follows) and top each cupcake with a blueberry and a mint leaf (if desired).

Frosting

8 oz. softened cream cheese
1 stick softened butter
2 cups confectioner’s sugar
1/4 cup honey
Zest of 1 lemon
1 t vanilla
2 t fresh lemon juice
Large pinch of salt

Beat the ingredients in a stand mixer until completely smooth. If the mixture is too runny, add more confectioner’s sugar until desired consistency is reached.

 photo f5eba68d-3f0d-492e-b9b8-bb35dc71d8b0_zpsd5ed16f2.jpg

Sunday, October 31, 2010

Tarte Aux Pommes

Photobucket

Lest all of you think that I skipped out of town with my extra copy of the Thinkfood cookbook, I think it is high time I announced the winner. Thank you all for the beautiful stories you shared in the comments section on the last post. I love hearing about other people's food memories.

I used a random number generator to select a number between 1 and 25 (I know this is a cop out, but there were just too many good stories and I was having a really hard time choosing just one). The web site selected number seven, so, Saint Tigerlily, you are the winner! I will get in touch with you to arrange delivery of the cookbook.

In the meantime, as fall is most certainly upon us here in New York City, I think it is time to get down to some apple business. My friend Tanitra, FCI classmate and fellow food blogger, brought me a bag of apples from her recent apple picking outing to Mead Orchards. They are delicious, juicy and just the right balance of sweet and tart. I am using some of them this afternoon to make the Apple Vinaigrette from Phil and Lauren Rubin's new book, The Comfort of Apples. I will be sure and share that vinaigrette and the resulting salad with you shortly, but first I want to get to the apple tart that we are now making nightly in level 3 at The French Culinary Institute.

Get all ideas of apple pie out of your head before you make this tart. There is not a lot of sugar in this filling. If you are looking for a sweet, syrupy interior, stick with your favorite apple pie recipe. However, if you love recipes that let the natural flavor of ingredients shine, definitely give this a go. The tartness of the apples really comes through in the final product.

Tarte Aux Pommes

4 large Granny Smith apples
2 T water
4 T sugar
2 Golden Delicious apples
4 T butter, melted
1/4 cup apricot jam
2 T water, more as needed to thin the jam
Lemon juice as needed
1 recipe of your favorite tart or pie dough

Preheat oven to 400°
Roll out your dough and fit it to an 8" tart shell and place it back in the fridge to rest. If you have just made your tart dough, be sure and let it rest in the refrigerator for an hour before rolling it out.

Peel the granny smith apples and roughly chop them. Add them to a saucepan with two tablespoons of water and 4 tablespoons of sugar. Loosely cover and cook until the apples start to break down. You want the mixture to be approaching applesauce consistency, but with some remaining apples chunks. Set aside to cool.

Peel and core the golden delicious apples. Cut them in half vertically. Cut each half into very thin slices, no more than 1/8". These slices will be used to decorate the top of the tart. If you are not decorating the tart right away, toss the slices with a little lemon juice to prevent browning.

Remove the tart shell from the refrigerator and fill it with the cooled apple filling. The filling should come about 3/4 of the way up the tart shell. Arrange the thin apple slices in two concentric circles. No filling should show through the topping. Place in the preheated oven for 10 minutes. Reduce the heat to 350° and continue cooking for an additional 50 minutes.

Combine the apricot jam and two tablespoons of water in a small pan. Heat gently to thin out the jam. Use a pastry brush to glaze the tart with the jam. Let the tart cool to room temperature before serving.

Thursday, September 2, 2010

Ice-Pop Diaspora

Photobucket

It turns out that if you like to cook, you have a secret weapon when it comes to making friends in a new city. People like to eat and if you happen to throw say, an ice cream party, and have a bunch of people over to your house and feed them, people will like you for letting them eat good food for free.

I didn’t plan my ice cream party as a ploy to make friends, but in hindsight, it wouldn’t have been such a bad idea. It was meant to be a housewarming party, but really any party, at its base, is just a chance to get together with friends, strengthen relationships and hopefully make some new ones. I think the ice cream succeeded in bringing everyone together which, by the way, is what I love about food and cooking

I made a couple of my favorite frozen treats that you can find on Apples and Butter (lemon thyme sorbet, olive oil gelato and apple pie frozen yogurt) and one new recipe courtesy of Saveur Magazine. If you have made it even just a few pages into the current issue of Saveur (The Greece Issue) then you probably noticed the article on the ice-pop that changed a town in Mexico. We were not changing the social makeup of any town or creating a popsicle diaspora at our party, but the unexpected flavors (at least for American palates) of sweet mango and ancho chile powder did manage to start a few conversations. In other words, they served as the perfect icebreaker.

If you like the idea of salty and sweet combinations, then this combination of spicy and sweet won’t be too much of a reach for you. If it seems a little daunting, cut back on the amount of ancho chile powder so that the spiciness is more of an aftertaste. I will be making these again exactly as Saveur suggests. I think the recipe is perfect as is.

Mango-Chile Ice Pops
Saveur Magazine

1 cup store-bought mango juice or nectar
1/4 cup sugar
2 t fresh lemon juice
1/2 cup water
1 t ancho chile powder
I large mango, peeled, seeded and diced

Heat mango juice, sugar, lemon juice and water in a medium saucepan over medium heat until the sugar dissolves. Chill mixture in the refrigerator. Stir in the ancho chile powder and mango chunks. Transfer mixture into popsicle molds of your choice and freeze until solid.

Thursday, August 5, 2010

Rice Pudding, I’m just not that into you (usually) and why I want to be Noelle Carter

Photobucket

I’m not that into rice pudding. I’m really not. So, when I heard that I needed to try the rice pudding at Lazy Ox Canteen in Los Angeles, I didn’t give it a second thought. Thank goodness not everyone is as chocolate-focused as I am when it comes to dessert. On visit number three, a dining companion ordered it and I got a bite of what is now possibly my favorite dessert in any restaurant in Los Angeles. It is unlike any rice pudding I have ever had. It is light and fluffy and most importantly, lacking the gloppy quality that I associate with rice pudding It is so good that it set off a month-long craving and a newfound need to sample rice pudding wherever I went to see if I had been wrong all this time and was ignoring a dessert that I should actually love.

I was not wrong. I do not like rice pudding. I threw away the rice pudding from my otherwise favorite market on Third in Los Angeles and never took more than one bite of the stuff anywhere else. It always has that gloppy consistency and glop is not appetizing.

So, as one of my last meals in Los Angeles before moving to New York, I returned to the Lazy Ox in an effort to quell the rice pudding craving. A month of hankering had not grotesquely raised my expectations; it was even better than I remembered. I tried to sweet talk the waiter, but he wouldn’t offer forth so much as a hint. I then stooped lower. I waited for my boyfriend to leave the table, put a big smile on my face and let the waiter know I was moving to New York and wouldn’t be able to return to eat rice pudding for a year (poor me). Still no movement. I pushed harder and pleaded with him, letting him know that I was moving to attend culinary school and wanted to be a food writer and I was sure there was some whipped cream folded in at the end, but what else was going on that made this rice pudding such a standalone…nothing.

Enter Twitter one month later. I was checking my feed and noticed that Krista Simmons of the L.A. Times was on her way to Lazy Ox. I immediately messaged her to let her know that she would be my hero if she could secure the rice pudding recipe for publication. She then responded with surprising news. Noelle Carter had secured the recipe and it was already published.

If you are a measly culinary student begging a waiter for even just a hint at the recipe you get nothing. If you are Noelle Carter, head of the L.A. Times test kitchen wielding the power to provide a restaurant with mass amounts of publicity through publication in the L.A. Times food section, you get a full written recipe. Have I mentioned that I want to be a food writer?

Thank goodness for Twitter and that I happened to see that Krista Simmons was heading to Lazy Ox. I had missed the Culinary S.O.S. column the week the rice pudding was included because I was coordinating my move to New York. I am certain I would have found it eventually when the craving struck and I again tried a desperate Google search for any semblance of a recipe, but now I have been saved the trouble, and you, dear reader, are about to experience dessert bliss. Seriously. Make this now. I do not care if rice pudding isn’t your thing. It wasn’t mine and I think I would be happy eating only this dessert for at least the next year or so. Make it! And thank Noelle Carter for getting us what I was unable to secure.

Photobucket

Lazy Ox Canteen Rice Pudding
Adapted from Chef Josef Centeno by way of the L.A. Times
I did not make the almond brittle included in the original recipe found here

Rice Pudding Base
1/2 cup Arborio rice
2 cups water
Salt
1 (3-inch) cinnamon stick, preferably Mexican (canela)
1 quart half and half, more if needed
1/2 to 1 cup heavy cream
1/2 cup light brown sugar
1/3 cup condensed milk
1 t vanilla bean paste (the recipe calls for extract which is fine too)
2 cups whipped heavy cream to finish

Rinse the rice several times until the water runs clear. Bring the 2 cups of water, cinnamon stick and a pinch of salt to a simmer. Add the rice and simmer until of the water is absorbed, about 10 minutes. Add the half and half and bring to a boil. Reduce to a gentle simmer and cook for 30 minutes, occasionally stirring to keep anything from sticking and burning on the bottom of the pan. Stir in 1/2 cup of cream, the brown sugar, condensed milk and vanilla. Continue to simmer 20 – 30 minutes until the mixture is very creamy and the rice has no bite. Remove from the heat and add up to another 1/2 cup of cream if the mixture is too thick. The pudding will continue to thicken as it cools so you want a loose consistency. Place plastic wrap directly on the surface of the pudding and chill until firm (overnight in my case).

Fold the whipped cream into the rice pudding to achieve a light and fluffy consistency. Spoon into bowls or shape into quenelles (as pictured above and demonstrated here) and drizzle with caramel sauce (recipe included below).

Caramel
1 cup sugar
1/2 cup water
1 orange peel
1 cup heavy cream
2 T unsalted butter
Salt

Place the sugar and water in a medium saucepan and bring to a boil. Reduce to a simmer and cook until the mixture caramelizes to a light golden brown. Keep a pastry brush in a glass of water nearby and occasionally brush the sides of the pan to keep sugar from crystallizing on the sides. While the caramel cooks, place the cream and orange peel in a separate saucepan. Scald the cream and set aside to steep. As soon as the sugar caramelizes, use a wooden spoon to slowly stir in the butter. Remove the orange peel from the cream and slowly add the cream to the caramel. Season the caramel with a pinch (or two or three in my case) of salt and set aside to cool slightly.

Friday, June 18, 2010

Layer Cake - The Frosting

Photobucket

As promised, it is time to finish up that layer cake. The last post on layer cake brought us through baking and freezing the cake. Today is frosting day.

The first step is to pick your frosting. I wanted to match, not contrast, the rich, nutty flavor of my brown butter cake. Martha Stewart’s brown sugar buttercream seemed like it would provide a great flavor that would go well with the cake. Plus, I happen to like the sound of brown butter cake with brown sugar buttercream. Follow the recipe below or choose any frosting you like to complement your cake.

Once the frosting is made, take your cake layers out of the freezer and let them thaw slightly before trying to frost them. They do not need to thaw all the way, in fact a cool and slightly hard cake is a little easier to frost, but I found that my layers had warped ever so slightly in the freezer. 20 minutes on the counter was all they needed to return to their frostable (yes, I made up a word), level shape.

Photobucket

While researching layer cakes I discovered what it seems most of you already knew – if you want a smooth final product, you need to start with a crumb coat. It is unfortunate that I am just learning this now because it’s a genius step that results in a professional looking product.

If you, like me, are new to the crumb coat, here are the basics. After stacking your layers with whatever filling you are using (in my case, more frosting) slap a very light coat of frosting over the entire cake. It doesn’t need to completely cover the cake and it doesn’t need to be smooth. I like to think of it as frosting spackle. It fills in the nooks and crannies so after a bit of chill time in the fridge, it is 10 times easier to get the final layer of frosting looking fabulous.

Once your crumb coat is on, let your cake hang out in the fridge for at least an hour. The frosting will firm up and hold onto the cake as you apply the final layer. If you have time, chill the cake one more time after the final layer of frosting is on before adding any decorations. I was ready to be finished with my cake so my decoration consisted of a pint of raspberries scattered over the top of the cake. A move more lazy than calculated, it paid off as the fresh raspberries were a welcome break from the sugary frosting. Serve your cake at room temperature and enjoy the end result of all your hard work!

Photobucket

Brown Sugar Frosting
Adapted from Martha Stewart

6 large egg whites
1 1/2 cups brown sugar
4 1/2 sticks butter, cold and cut into tablespoons

Place the egg whites and sugar in the heatproof bowl of a stand mixer and set over a pot of simmering water in a double boiler set up. Whisk the egg whites and sugar together until the mixture reaches 160* (a candy thermometer comes in handy here).

Place the bowl on a stand mixer fitted with the whisk attachment and whisk until the egg white and sugar mixture holds stiff peaks, then continue whisking for six more minutes until the mixture is cooled. Switch to the paddle attachment and beat on medium-high while you add the butter, a few tablespoons at a time. Once all the butter is incorporated, stir with a spatula until smooth.

Saturday, June 5, 2010

Layer Cake - The Cake

Photobucket

Special occasion baking is not my forte. I love to make cookies and cupcakes and even the occasional truffle, but cakes of mine have never crept above two layers.

Enter my first multi-day project cake. It turns out that tackling a huge and impressive layer cake can be completely manageable if you stretch the whole affair over a few days. This is good news because as much as I love to be in the kitchen, I do not want to spend an entire day baking, frosting, chilling and re-frosting when I have people coming over for some kind of celebration.

There are just a few easy steps to make sure your not-baked-today cake still turns out moist, delicious and professional looking:

1. After the cake layers have cooled, wrap them tightly in plastic wrap and freeze them.
2. Allow the layers to defrost slightly before frosting to get rid of any warping from the freezer.
3. Apply a crumb coating of frosting to the cakes and chill for at least an hour before applying the final layer of frosting.

My cake schedule looked something like this: Thursday night brown the butter for the cake and chill; Friday night after work bake, cool and freeze cakes; Saturday afternoon make frosting (I always make more than I think I’ll need and I always use it); Sunday morning apply crumb layer of frosting and chill; Sunday afternoon finish frosting and leave cake out for everyone to admire before serving.

If you’re interested in making your own layer cake, I highly recommend the following recipe for brown butter and vanilla birthday cake. It is from Kate Zuckerman’s book about desserts from the now closed Chanterelle in New York. It is the best cake I have ever tasted and that is coming from a self-admitted chocoholic.

In keeping with the multi-day theme, I’ll post the cake recipe today and the frosting recipe, along with crumb coat instructions, in a post later this week.

Whipped Brown Butter and Vanilla Birthday Cake
Adapted from The Sweet Life to make three layers

1 1/2 t vanilla bean paste
4 1/2 sticks of butter (18 oz)
2 1/2 cups sugar
3 whole eggs at room temperature
6 egg yolks at room temperature
3 3/4 cups + 3 T flour
4 1/2 t baking powder
1 1/2 t salt
1 3/4 cups milk + 2 T at room temperature

Place the butter in a saucepan over medium-high heat. Cook the butter, stirring occasionally, until it caramelizes and emits a nutty aroma. Stir in the vanilla paste. Pour the butter into a bowl. If desired, you can pour the butter through a strainer to catch any browned milk solids that have formed at the bottom of the pan. Chill the butter for at least two hours or overnight.

Preheat oven to 350*
Grease and flour three 9-inch cake pans.

Place the chilled butter in a stand mixer fitted with the paddle attachment and beat on medium for one minute. Add the sugar and beat until creamed (at least 10 minutes). Add the eggs and additional egg yolks one at a time until incorporated.

Combine the flour, baking powder and salt in a separate bowl. Set the mixer to low and add the dry ingredients to the batter in three additions, alternating with the milk until both are fully incorporated.

Divide the batter evenly between the three cake pans and bake for 40 to 45 minutes. Let the cakes cool slightly in their pans, then invert the cakes onto a wire rack to cool completely. If not using the cakes right away, wrap tightly in plastic wrap and freeze.

Tuesday, March 16, 2010

A Chocolate Lover Makes Carrot Cake

Photobucket

I am an admitted chocoholic, especially when it comes to dark chocolate. Whether it’s flourless chocolate cake, dark chocolate pecan clusters, or even chocolate covered, peanut butter filled pretzels, once a piece of chocolate crosses my lips, I want more.

Not surprisingly, I’m known to only order chocolate desserts at restaurants. Though lately I’ve made a concerted effort to expand my horizons and have been rewarded with things like Mozza’s Torta Della Nonna which I am now in the process of feverishly trying to recreate at home (note to Nancy Silverton and Matt Molina – if you could finish up with that Mozza cookbook, I’d really appreciate it. Thanks). Also not surprisingly, when I’m cooking at home I tend to be drawn to dessert recipes that call for chocolate.

So, why isn’t this a post about a recipe for a chocolate dessert? Because I happen to be in a relationship with someone who loves carrot cake the way I love chocolate and in my never ending quest to please both our palates, I have a hard time passing up any carrot cake recipe that comes my way.

This particular version comes from the latest issue of Everyday with Rachael Ray. The addition of crushed pineapple makes for a very moist cake and in a deviation from tradition, the frosting calls for sour cream. It’s a nice change from the usual cream cheese and the tang the sour cream imparts is a great compliment to the carrot cake.

I have yet to hear what the carrot cake fanatic thinks of this recipe since he won’t get the chance to try it until tonight, but I think it’s a definite keeper. If you can’t get over the absence of cream cheese frosting, try the cake recipe and top it with your favorite frosting. I think it would be equally delicious.

One final note - The next time I make this recipe I’m going to double it. My bundt pan is clearly larger than a 6-cup capacity and the more cake I’m left with on this one, the better.

Photobucket

Carrot-Pineapple Bundt Cake with Sour Cream Frosting
Adapted from Everyday with Rachael Ray

1 cup flour
1 t baking powder
½ t baking soda
½ t ground cinnamon, plus more for dusting
¼ t salt plus an extra pinch
1 cup packed light brown sugar
½ cup sour cream, divided
¼ cup vegetable oil
1 egg
1 t vanilla bean paste
1 cup shredded carrot
½ cup crushed pineapple, drained (or chopped fresh pineapple)
½ cup chopped walnuts
1 cup powdered sugar, sifted
3 tablespoons butter, at room temperature

Preheat oven to 350*
Grease a 6-cup capacity bundt pan and set aside. In a medium bowl combine the flour, baking powder, baking soda, cinnamon and ¼ t salt. In a larger bowl, combine the brown sugar, ¼ cup of sour cream, the vegetable oil, egg and vanilla and whisk until smooth. Add the carrots, walnuts and pineapple and stir until combined. Add the flour mixture and stir just until combined. Pour the batter into the prepared bundt pan and bake for 55 minutes or until a toothpick test comes out clean. Let the cake cool for 15 minutes in the pan before inverting onto a wire rack to cool completely.

Use a wooden spoon to combine the powdered sugar and butter. Whisk in the remaining ¼ cup sour cream and pinch of salt. Pour the frosting over the cake and dust with cinnamon if desired.

Monday, March 8, 2010

Candied Kumquat Tart

Photobucket

There was a kumquat tree in my front yard when I was young. Unfortunately, it met the chopping block when my parents re-landscaped the front yard. I’d like to think the gardeners lovingly transplanted the tree elsewhere, but this was the eighties and sustainability wasn’t exactly “in” at the time. Sadly, I didn’t enjoy kumquats when I had an abundance of them at my fingertips. My young taste buds couldn’t appreciate the tartness of the tiny citrus fruit and something about eating the whole thing, rind and all, was off-putting to a six-year-old.

Photobucket

I’m certain I have eaten a kumquat at some point between the time the tree was removed and now, but the moment escapes me. So, this weekend when there were bags upon bags of kumquats available at the farmers’ market, I couldn’t resist the opportunity to try them again.

It turns out that my adult taste buds very much appreciate the balance of sweet and tart along with the convenience of eating the entire fruit, rind and all. In fact, I started popping the little suckers like candy. I knew I needed to make something with them before I worked my way through the whole bag.

Photobucket

I was already working on a tart crust made primarily of quinoa flour and almond meal for my first experiment in gluten-free cooking. I don’t have any problem digesting gluten, but I have girlfriends who do and to be honest, I was more curious than anything. I still needed something to fill the tart and the kumquats, with their bright orange color, promised to at least make the tart look appetizing if nothing else.

Appetizing indeed. I candied the kumquats which turned out to not only be delicious, but the process actually intensified their orange color. The crust was a partial success. It was tasty and imparted a peanut butter flavor to the tart, but it was a bit crumbly and could have held together better. This may have been my fault for rolling the dough out too thinly in an attempt to stretch it between two tarts. Either way, it was good enough to try again. Will I be giving up my all purpose flour and butter and lard-laden crusts? Absolutely not. But this will be a nice alternate to have on hand, especially when my gluten-free friends are coming over for dinner.

Photobucket

Candied Kumquat Tart
Crust adapted from a Whole Foods recipe
Filling adapted from Epicurious

Crust
1 cup quinoa flour
1/2 cup almond meal
1/4 cup sugar
1/2 t xanthan gum
1/4 t salt
1/2 cup (1 stick) unsalted butter
1 egg yolk

Filling
1 lb fresh kumquats
1 cup water
2 cups plus
2 T sugar
1 t fennel pollen
2/3 cup ricotta
1/3 cup sour cream

Crust
Place the quinoa flour, almond meal, sugar, xanthan gum and salt in a food processor and pulse to combine. Cut the butter into small cubes and add to the food processor. Pulse until the mixture looks like wet sand, but the butter is not fully incorporated. Form the dough into one disc for a round tart or two oblong discs for two smaller rectangular tarts and chill for 30 minutes.

Preheat oven to 400*
Remove the dough from the refrigerator and roll out to the shape of your tart pan. In order to keep the dough gluten-free, use quinoa flour to dust the dough while rolling it out. Transfer the dough to your tart pan and use a fork to prick the crust all over. Bake the crust for 15 – 20 minutes until golden brown. Remove from the oven and allow to cool on a wire rack.

Filling
Thinly slice the kumquats and remove any seeds. Bring the water and 2 cups of sugar to a boil and simmer for 5 minutes. Add the kumquats and simmer for 10 minutes. Drain the kumquats through a strainer set over a bowl to catch the syrup. Reserve the syrup for another purpose (I’m mixing mine with mineral water for drinks).

Combine the remaining sugar and fennel pollen with the ricotta and the sour cream. Spread the ricotta mixture evenly over the cooled tart shell. Place the kumquat slices in rows over the filling until the tart is fully covered. The crust is very delicate so slice carefully when serving.

Thursday, February 4, 2010

Pâte à Choux

Photobucket

Pate a choux, pate a choux, pate a choux. I had a sneaking suspicion that when I finally tried you, I would fall in love, but truthfully, I never could have guessed to what extent. My only regret is that I waited so long.

Pate a choux is featured in the current issue of Donna Hay – my favorite Australian import. This prompted me to finally try my hand at the pastry responsible for so many little puffs – errhhh appetizers and desserts. Unfortunately, whether it is to be blamed on my poor job of translating grams to tablespoons or simply that my kitchen is in the northern hemisphere, my first attempt did not turn out well. The pate a choux didn’t rise due to too much butter and the resulting mounds looked more like discs than puffs.

Photobucket

I knew I could trust Michael Ruhlman and his ratios for try number two. Pate a choux is a simple formula of 2 parts water to 1 part butter, 1 part flour and 2 parts eggs. Following this formula resulted in a perfectly puffed pastry on the first try.

Pate a choux is not entirely delicious and enticing on its own. Its job is to serve as a blank canvas for whatever fillings – both savory and sweet - you can come up with. For my first go round, I decided to stick with a classic cream puff. I filled the pastries with store-bought pastry cream and drizzled homemade dulche de leche over the top.

Photobucket

My taste testers were in love as well. They demanded more pate a choux as soon as possible. I complied with a savory version that is apparently the best thing I have ever made – at least according to one taste taster. More on that soon. For now, I highly recommend you take a stab at pate a choux - if you haven’t already.

Photobucket

Pâte à Choux
Ratio from Michael Ruhlman

2:1:1:2
(Water: Butter: Flour: Eggs)

1 cup (8 oz) water
4 oz butter (a bit less than a stick – weigh if you can)
4 oz flour
4 eggs (large eggs are about 2 oz per egg)

Preheat oven to 425*
Place the butter and water in a medium saucepan and heat over medium heat until the butter is melted and the liquid is simmering. Add the flour and stir vigorously with a wooden spoon until the dough pulls away from the side of the pan. Transfer the dough to a stand mixer fitted with the paddle attachment. Add one egg at a time, making sure each egg is fully incorporated before adding the next. You can mix the eggs in by hand, in the same pot if you prefer.

Place the dough in a piping bag with a plain tip or a large Ziploc bag with one corner cut off. Pipe the dough into 1-inch diameter mounds on a baking sheet lined with parchment paper and place in the 425 oven for 10 minutes. Lower the heat to 375 and continue cooking until fully cooked - about 20 more minutes depending on the size. Just look for them to be golden brown all over and you’ll know you’re done.

Once they’re cooled, what you do with them is really only limited by your imagination. I filled mine with a store-bought pastry cream and topped them with homemade dulche de leche.

Monday, February 1, 2010

Dulce de Leche

Photobucket

Dulce de leche is something I used to think of as more of a flavor – one introduced to me by Haagen Dazs ice cream. I knew there was more to it than that, but I had never had a real dulce de leche sauce. Thanks to Alton Brown that all changed this past weekend.

I was flipping channels and landed on Alton’s milk episode. Always interested in all things dairy – especially if those things have anything to do with aged, bacteria-laden dairy – I stopped and watched. While this episode had little to do with cheese, it did reveal a few secrets of tres leches cake and, the subject of this post, dulche de leche.

Photobucket

I couldn’t resist the simple preparation. Milk, sugar, vanilla and baking soda combined and then left to reduce. It takes a good amount of time for the milk to cook down to a rich caramel-colored sauce, but most of that time you can totally ignore it. Just let it go (aside from the occasional stir) and two to three hours later you’ll be left with a generous cup of dulche de leche that will last up to a month in the refrigerator.

With that kind of shelf life, you have plenty of time to find your favorite uses. Mine? So far I haven’t been able to beat dulce de leche drizzled over homemade cream puffs (more on that coming soon.)

I use vanilla bean paste in place of a vanilla bean. If you stick with Alton’s use of a split vanilla bean, you need to remove the bean after one hour of cooking or it will impart a bad taste.

Photobucket

Dulce de Leche
Adapted from Alton Brown

1 quart whole milk
1 1/2 cups sugar
1 T vanilla bean paste
1/2 t baking soda

Combine the milk, sugar and vanilla bean paste in a large saucepan over medium heat. Once the sugar is completely dissolved, stir in the baking soda. Reduce the heat to low to maintain a bare simmer and let the mixture cook, uncovered, for 2 1/2 – 3 hours. Stir occasionally, being careful not to reincorporate the foam that forms on top of the mixture (you will strain this off at the end). After 2 1/2 – 3 hours, when the sauce is a deep-brown and you have just a bit more than a cup left, strain through a fine mesh strainer into a clean jar. Store in the refrigerator for up to a month.

Thursday, January 28, 2010

Finding Solace in the Kitchen

Photobucket

Food is a solace for me. Taking a break from a busy day and sitting down for a meal, especially a meal with people I care about, is a way to recharge - even more so, if I am preparing that meal myself. I can spend hours in the kitchen working on a dish and feel like 20 minutes have passed. I have heard people say that cooking is their meditation and while I wouldn’t go that far, the singleness of purpose I find in the kitchen is very soothing.

I first discovered these little cakes when I was in need of some solace. My life had gotten busy again and I had not written anything for Apples and Butter in weeks. I was missing the comfort of both cooking and writing about food.

I turned to my favorite magazines and some fellow food bloggers for inspiration. Without fail, these sources will light a fire under me. I always find a dish that piques my interest and gets that little voice saying, “I have to make this – right now.”

Photobucket

These chocolate snack cakes are from David Lebovitz, one of my favorite pastry chefs. Deb over at Smitten Kitchen posted about them which is how I came to know of them and how that little voice got switched on. It didn’t hurt that Deb used a specialty kitchen pan to make these, one that I did not own. Inspiration in the kitchen that called for a trip to Sur La Table? I was in.

Make sure you don’t overcook these. The second time I made them, I let them go just a bit too long and they were dry and not nearly as delectable as the almost under-cooked first batch. When not overcooked, they provide a perfect dose of chocolate in a little package. Not too rich and not too filling. Perfect for an afternoon snack paired with tea or coffee.

I’m sure these will work just as well in a cupcake pan if you don’t have a mini-cheesecake pan and don’t want to purchase one. Just be sure and keep an eye on them. Cooking times will vary if you’re using more batter for each cake.

Photobucket

Chocolate Yogurt Snack Cakes
Adapted from David Lebovitz via Smitten Kitchen

7 oz semi-sweet chocolate
1/2 cup vegetable oil
1/2 cup plain yogurt (whole-milk is important here)
1 cup sugar
3 eggs
1 t vanilla bean paste (or extract)
1/2 t almond extract (I didn’t have any so I skipped it)
1 1/2 cups flour
1 1/2 t baking powder
1/2 t coarse salt

Preheat oven to 350*
If you’re using a cupcake pan, line it with paper liners. If you’re using the mini-cheesecake pan, just spray it with cooking spray. Melt the chocolate with 1/4 cup of the oil in a double boiler. Stir until smooth and then remove from the heat. In a separate bowl, mix together the other 1/4 cup of oil with the yogurt, sugar, eggs, vanilla and almond extract if you’re using it. In another bowl, combine the flour, baking powder and salt. Add the yogurt mixture to the dry ingredients and stir just until combined. Add the melted chocolate and stir until smooth.

Divide the batter between your mini-cheesecake pan or cupcake pan, filling each about a 1/4 inch below the rim (you may have leftover batter). Bake for 20 – 25 minutes (remember note about not overcooking). Let cakes cool slightly before unmolding. These can be served immediately while still warm or later at room temperature.

Monday, December 21, 2009

Christmas Used to Last Forever

Photobucket
When I was a child the holidays seemed to go on for months. At the beginning of December the decorations would go up and as schedules slowed and school let out, we were left with plenty of time to sit around the tree with a cup of cider or hot cocoa and take in the season.

Today, I’m lucky if it feels like Christmas the week leading up to the 25th. Usually I get in the holiday spirit as I run around town, fighting crowds in an effort to cross off my Christmas list. While I love finding gifts for the important people in my life, I find it somewhat sad that I can’t get in the spirit until the shopping begins.

Photobucket

I didn’t know this was true for me until my family decided not to do Christmas gifts this year. In an effort to focus on what’s most important – time together – this year we are cooking meals with each other instead of buying gifts. Though I did just receive notification that one Thomas H. Durff has sent me a gift subscription to The Atlantic Monthly (someone’s cheating!).

The sad news is that without the many shopping trips in search of the perfect gift, I found myself totally lacking in Christmas spirit. Determined to redefine Christmas traditions so I can get in the holiday mood without racking up a huge credit card bill, I turned to the kitchen.

Photobucket

I wanted to make something in bulk so I could use the resulting product as gifts, but I didn’t want to make cookies. Decorated cookies may look festive, but I don’t really care for the way they taste. Then I stumbled on an article about homemade truffles in one of the Martha Stewart publications. I knew I could get creative with flavored ganache fillings and really how difficult could they be? Note to self: If I ever think, ‘really how difficult could they be,’ again, I will clear my calendar for the weekend and prepare to make seven trips to the store for more toppings, chocolate and gift boxes. When you’re doing something for the first time and not really using a set recipe, look out, things are going to get ugly.

While Martha’s ganache truffles seemed to stay perfectly firm with no coating, mine melted on contact with any finger that was near room temperature. And while all the articles I could find on coating truffles with chocolate seemed to think it wasn’t really necessary to temper the chocolate, my coating turned into a clumpy glob when I did not. I’m still attempting to make up with the boyfriend who was the recipient of, “get the f*$% out of the kitchen,” when the coating wasn’t going on smoothly.

Photobucket

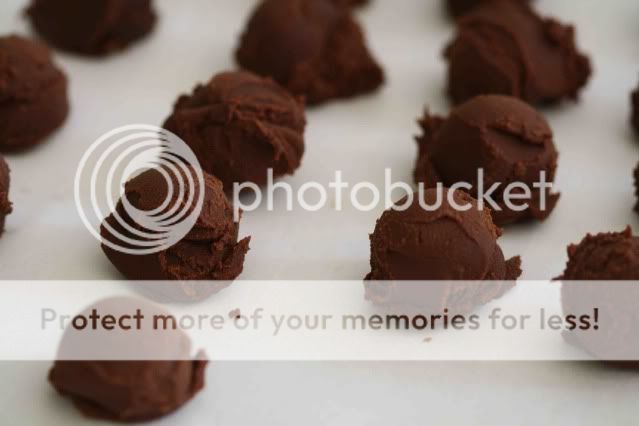
So, did I fail miserably at getting myself into the Christmas spirit? Not entirely. First, the crazed trips to the store seemed to bring back that sense of holiday urgency that had been missing from my December. Second, by the time I got through the fifteenth bag of chocolate and had the kinks worked out, I was left with some decent looking truffles and the feeling that I would be able to spread a little chocolaty holiday cheer after all.

If you have time left in your holiday schedule and want to try these at home, I’ve included the basic ratio of cream to chocolate for the ganache filling as well as the four variations I created to add more flavor. If you don’t want the truffles melting on contact, coat them with chocolate that has been tempered. You can read about how to temper your chocolate here. It’s not that difficult and worth the time.

Photobucket

Ganache Truffle Filling
Makes about 40 truffles

16 oz chocolate (dark, semi-sweet or milk – your choice)
1 2/3 cups heavy cream

To use these variations, add the flavoring to the cream right as it comes to a simmer, but before you turn off the heat:

Chile truffles – 3/4 t cayenne pepper
Peanut butter truffles – 3/4 to about 1 cup of creamy peanut butter
Mint truffles – replace 12 oz of the chocolate with mint flavored chocolate
Earl Grey truffles – place 12 bags of Earl Grey in the cream, turn off the heat and let steep for 20 minutes. Remove the tea bags and reheat the cream slightly before adding to the chocolate.

Place 16 ounces of the chocolate of your choice in a heatproof bowl. Place the cream in a small saucepan and bring just to a simmer. Keep a close watch as simmering cream will very quickly boil over. Add any of the flavorings included above to the cream or create your own variations. Pour the warm cream over the chocolate and whisk until fully incorporated. Allow the mixture to cool slightly and then let it set in the refrigerator overnight.

Cover a cookie sheet with parchment paper and use a small ice cream scoop or melon baller to portion out the ganache into small spheres, about 1-inch in diameter. Roll the ganache pieces between your hands to make a smoother circle. It’s not necessary, but I highly recommend using disposable, protective gloves for this part. It’s more sanitary if you’re giving the truffles as gifts and you’ll be washing your hands every five minutes if you don’t. Allow the ganache pieces to chill in the refrigerator again while you prepare the chocolate coating.

Select your chocolate coating (again, your choice of dark, semi-sweet, milk, etc.). I found that it took about 24 ounces to coat 80 truffles. Temper the chocolate according to the directions found here and use a dipping tool or toothpicks to submerge the ganache in coating. I read everything I could find on the best way to dip, but trial and error seemed to be the most helpful. Just submerge the ganache in the coating and try to get the excess off before setting it back on the cookie sheet to harden. If you’re topping the chocolate coating in anything (chopped nuts, sea salt, candy cane pieces, etc.) do this right away before the chocolate begins to harden. Place the coated truffles in the refrigerator overnight or for at least four hours, if you’re in a hurry, to fully harden.

Package as desired and spread your own version of chocolaty holiday cheer.

Wednesday, August 26, 2009

Olive Oil Not Gelato Not Ice Cream

Photobucket

There are two things that happen a lot once your friends and family realize how crazy you are about food. The first is you tend to get food-related gifts for every birthday and holiday. This is a huge bonus. The second thing is that they bring every food-related question to you, assuming you must know everything there is to know about food. Truth be told, this is a huge plus as well. It’s taught me that I really do know a great deal about food because I can thoroughly answer a number of questions that come from the home cook. It also has helped me realize what I don’t know and what I want to learn more about.

The question I get asked the most, with far more frequency than anything else, is to explain the difference between gelato and ice cream. My default answer has been that it’s mainly in the churning process and that if you’re talking about a custard-based ice cream, the ingredients are generally the same.

That default answer was no longer good enough after tasting the olive oil gelato at Mozza in Los Angeles. It was so good I tracked down the recipe in one of Mario Batali’s cookbooks, because as much as I would love to eat at Mozza every time a craving for that gelato hits, my bank account cannot handle the pressure. I dutifully followed Mario’s gelato recipe, but, lacking a gelato machine, I was forced to churn the custard in my ice cream maker. I needed to know whether I could call what I made gelato or if it was ice cream.

After a quick google search I realized this question could have easily been answered a long time ago. It turns out that I was partially correct. Gelato is churned at a slower speed than ice cream which means less air is whipped into the final frozen treat, yielding a much thicker, denser product. Additionally, gelato has less fat than ice cream. What? That doesn’t make sense! Isn’t gelato the richer, creamier version of ice cream? Well, according to Alon Balshan as quoted in Jessica Harlan’s article on About.com, the extra fat in ice cream coats your mouth and the flavors don’t come through as strongly. There’s less standing between you and that intense flavor punch in a good gelato.

Gelato vs. ice cream dilemma solved. What to call my creation? Neither really. I used a recipe for gelato which didn’t include as much fat as ice cream and I churned it in an ice cream maker that whipped in too much air to call the final product gelato. So here is a recipe for Olive Oil Not Gelato Not Ice Cream. If you have a gelato machine, by all means, follow the instructions and end up with delicious gelato. If you, like me, don’t yet possess one, follow the directions, make something quite delicious and join me in adding gelato machine to your long list of necessary kitchen products.

Olive Oil Not Gelato Not Ice Cream
Adapted from Mario Batalio

6 egg yolks
1 cup sugar
3/4 cup extra-virgin olive oil (I used Valderrama – my current favorite)
3 cups milk
1 cup heavy cream

Place the egg yolks and sugar in the bowl of an electric mixer and use the whip attachment to beat to the ribbon stage (about five minutes on medium speed). You’ll know you’ve hit the ribbon stage when the mixture is pale yellow in color and it falls back into the bowl in a ribbon pattern. With the mixer running, drizzle in the olive oil and beat until combined. Continue mixing as you add the milk and cream. When everything is combined, freeze according to your gelato or ice cream maker’s directions.

Friday, July 31, 2009

Semifreddo Popsicles

Photobucket

I always get a bit nostalgic for the summers of my childhood around this time of year. The advertisements for back-to-school shopping are starting and I can walk into any bookstore to find some of my favorite food magazines already touting the best stews for fall. When I was growing up, summer seemed to last forever. Those were the days before we scheduled every spare minute of a child’s life with sports and activities and year-round school had yet to catch on. If you weren’t enrolled in summer school, which I rarely was, you had a solid three months, from June through the end of August or even Labor Day, to enjoy the summer, and enjoy it we did.

As with most things in life, my memories of summer center on food. The American flag cake my mother made using blueberries and raspberries for the Fourth of July one year, eating almost every family dinner out on our back patio with citronella candles burning to ward off the bees and oddly enough, because I don’t think we used them that much, the Tupperware popsicle molds that we experimented with one year.

The only clear memory I have of trying out the molds is the ultra-gourmet diet coke popsicle I created. While I did like to play with food when I was young, my experiments, much like this one, rarely produced something you would actually want to eat.

I’ve seen many recipes for truly gourmet popsicles that far outpace my diet coke concoction. From puréed fruit mixed with prosecco to coconut milk with lime juice and most recently, a semifreddo recipe frozen in popsicle molds for individual servings. That is the recipe that pushed me over the edge and sent me out on a search for my own set of molds. It was surprisingly hard to find the old-fashioned popsicle sticks. Since most molds come with their own plastic stick, grocery stores, at least the ones by me, don’t seem to carry them anymore. I ended up in an Office Depot in the craft section to hunt them down. Tools in hand, I rushed home to try my hand at a semifreddo (first one I’d ever made) and making my own popsicles (first foray into the non-diet coke flavored arena).

These came out delicious and rich and sweet, but not overly so. When I make them again, I won’t use my dark-yolk eggs. That deep yolk color made the popsicles more yellow than the beautiful off-white I was going for. Other than that, these are perfect as is. The original recipe called for frozen raspberries, but I went with fresh. Use whatever you have on hand.

Photobucket

Raspberry Semifreddo Popsicles
Adapted from Donna Hay

2 eggs
1 egg yolk
1 T vanilla bean paste
1/2 cup sugar
1 cup cream
2 cups raspberries

Place the eggs, egg yolk, vanilla and sugar in a heatproof bowl and place over a bowl of simmering water (you can use a double boiler, but a bowl works better with the electric mixer). Use a handheld mixer to beat the mixture for 6 - 8 minutes until thick. Set aside.

Beat the cream to stiff peaks using a stand mixer or clean off the handheld mixer and use it. Gently fold into the egg mixture. Divide the raspberries between 12 popsicle molds. Pour enough semifreddo to come about one inch up the popsicle mold. Tap the molds against the counter to get the semifreddo to settle into the base of the mold, around the raspberries, then finish filling the molds with semifreddo. Cover the molds with aluminum foil and insert popsicle sticks through the foil - this will help the sticks stay upright while freezing. Freeze until solid, about six hours.

Thursday, May 7, 2009

Pavlova with Lemon Curd and Berries

Photobucket
I’m certain that when Anna Pavlova visited New Zealand in 1926 she was more concerned with the quality of her ballet performances than of the desserts she consumed. Fortunately for us, a local chef troubled himself with the later and created a dessert in her honor that consists of a pillow of meringue, topped with whipped cream or lemon curd (or both) and finished off with a scattering of fresh fruit. Best of all, it looks terrifically impressive and is perfect for company, but it’s also completely manageable if you’re willing to commit to a multi-step dessert.

I was willing to make such a commitment for a recent Sunday afternoon meal. However, my only company was the boyfriend and he thinks – or at least pretends to think – that everything I make is terrifically impressive (another one of the many reasons I keep him around). In the absence of guests to impress, I went ahead with the Pavlova recipe because really, when have I ever let the absence of an audience stop me from making something delicious?

And the Pavlova was delicious. It’s truly an exercise in varied textures. The crunch of the outside of the meringue contrasts with its marshmallow-like interior - achieved through slow and low cooking in the oven - and the creamy tartness of the lemon curd plays off the firm sweetness of the fresh fruit topping. All of these components come together to make not only an enjoyable mouthful, but also something beautiful to look at. And if you look closely, you may be able to imagine the ballerina’s tutu that inspired that pillow-like base.

The next time around I may add a little more sugar to the curd or use Meyer lemons as the tartness actually turned my tongue raw. Or maybe next time I will stop at one or two helpings instead of carrying on to three or four. Either way, your choice. I’ve included the recipe as it was printed in the April issue of Gourmet.

Photobucket

Pavlova with Lemon Curd and Berries
Adapted from Gourmet Magazine

Meringue:
1 cup sugar
1 T cornstarch
3 eggs at room temperature for 30 minutes
3 T cold water
1 t white vinegar

Curd:
3 egg yolks
2/3 cup sugar
1 T cornstarch
1/8 t salt
1/3 cup fresh lemon juice
4 T (1/2 stick) unsalted butter
2 t grated lemon zest

Assembly:
1 cup heavy cream
4 cups mixed berries

Photobucket

Preheat oven to 300*
Meringue:
Trace a 7-inch circle on a piece of parchment paper cut to fit your baking sheet. Turn the parchment over and place on the baking sheet. Whisk the sugar and cornstarch together in a small bowl. Place the egg whites and a pinch of salt in the bowl of a stand mixer fitted with the whisk attachment and beat at medium speed to soft peaks. Add the cold water and beat to soft peaks again. Increase the mixer speed to medium high and add the sugar and cornstarch mixture one T at a time. After the all the sugar has been added, beat for one minute more. Add the vinegar and beat for approximately five minutes until the eggs hold stiff peaks. Use a spatula to spread the meringue inside the circle drawn on the parchment paper. Shape a small crater in the middle by forming the edges higher than the center so you will have a place for the filling. Bake for 45 minutes until the meringue turns a tan color. Turn off the oven and prop open the door with a wooden spoon. Cool the meringue in the oven for an hour.

Photobucket

Curd:
Whisk the egg yolks together in a small bowl and set aside. Stir the sugar, cornstarch and salt together in a medium saucepan. Place the pan over medium heat and add the lemon juice and butter. Bring to a simmer and continue to cook for one minute longer, whisking constantly. Temper the mixture by adding a 1/4 cup of the lemon and butter mixture to the egg yolks in a small drizzle, whisking constantly. Whisk the tempered egg yolks back into the pan with the remaining lemon mixture. Reduce the heat to low and stir constantly for about two minutes longer, until the curd has thickened. Stir in the lemon zest and transfer to a bowl. Cover with plastic wrap directly on the surface of the curd so a skin does not form and chill until cold 1 – 1 1/2 hours.

Assembly:
Beat the heavy cream until it holds soft peaks. Use a spatula to gently fold 1/4 cup of the whipped cream into the lemon curd. Spread the lemon curd over the crater in your meringue and pile berries on top. Serve with the whipped cream to cut the tartness of the curd.

Photobucket

Tuesday, April 7, 2009

Buratta Sundae

Photobucket

"A dessert without cheese is like a beautiful woman with only one eye." - Brillat-Savarin

I have never started a post with a quote, but I thought it appropriate in this situation as it was this quote that led to the discovery of my new favorite dessert that really isn’t a dessert at all, but should be. Let me explain.

While visiting a dear friend in New Mexico recently, we consumed an exorbitant amount of an unbelievable cheese called Brillat-Savarin. Upon my return to Los Angeles, I embarked on a mission to find it and buy more of it immediately. It was that good. The first stop was Dean & Deluca’s site where I knew the cheese had been ordered as a birthday gift for my friend (and yes, I try to only surround myself with people who love cheese as much as I do). Unfortunately, it is sold as part of a $90 set that included two cheeses I did not want. A quick google search revealed that the cheese is in fact named for Jean Anthelme Brillat-Savarin who authored the book, The Physiology of Taste, which is familiar to American foodies because it was translated into English by M.F.K. Fisher. Spurred on by the discovery that this cheese really is something special and has a great back story, I contacted my cheese dealer and learned that they do not carry Brillat-Savarin at this time. Somewhat disappointed, I shared the quote I had found while researching Jean Anthelme and we began discussing cheese as dessert. It was at this point that David shared with me an idea so brilliant, I am truly and completely disappointed I did not think of it myself.

David is extremely creative with uses for cheese so it never surprises me when he comes up with great pairings and new ideas, but this was truly something spectacular. Burrata is a wonderfully creamy cheese made of mozarella and cream that unfortunately, has a very short shelf life. That means when it comes in, David has to move it quickly. In order to show customers another way to use burrata, David came up with Burrata Sundaes. He uses burrata as the base of a “sundae” that subs in pink peppercorns and chives for the sprinkles and aged balsamic for the chocolate sauce. I could picture the flecks of pink and green as he described the dish and being a die-hard fan of burrata, I knew I had to make this at home. David let me know when the next shipment of burrata was coming in and I set a calendar reminder to get over to Surfas before they sold out.

Photobucket

I think I can safely say that Burrata Sundaes are the new favorite dish of everyone I served them to at the BBQ I hosted this past weekend. Totally unexpected and novel this makes great party food. Or, if you’re like me, it also makes great, “eat at home while no one is looking so you don’t have to share even one morsel of it” food.

Burrata Sundaes
This served 5 of us as a dessert, but I could have eaten all of it myself

1 16 oz container burrata
1 T freshly-cracked pink peppercorns
2 T finely chopped chives
1 T Spanish olive oil (or fruity, low acidity olive oil of your choice)
2 T aged balsamic vinegar (preferably Surfas’s balsamic with blackberries and ginger)

Use a small ice cream scoop to fashion burrata scoops resembling ice cream. Place 2 – 3 scoops in each bowl depending on the size of your scoop. Drizzle just a few drops of olive oil over the top of each scoop. Scatter the peppercorns and chives over each sundae and finish with a generous drizzle of vinegar so it looks as though you have chocolate sauce running down the sides. Warn your guests, or don’t, about the curious nature of the dessert coming their way.

Photobucket

Thursday, April 2, 2009

Olive Oil Cake

Photobucket
The first time I grasped the fact that all olive oils aren’t created equal, I was sitting in the back office of the public relations agency where I worked, taking part in an olive oil tasting. We had just landed a new California olive oil company as a client and the owner was taking us through a tasting to point out the significant differences between oils. While up until this point I had been entirely happy to use cheap brands found in every grocery store, after having sipped a tiny bit of the stuff (yes you’re supposed to sip olive oil during a tasting), I swore it off for good. It was rancid. It would have been clear to the most unsophisticated palette that it was rancid and our taste test director assured us the bottle had just been purchased that morning.

The test went on and we were able to recognize the differences between the good oils as well. Some were fruity, some were peppery with an almost spicy finish felt just at the back of your throat and my favorite was a bright grassy one that luckily belonged to my new client. I was thrilled with my education on what had just hours before seemed a most basic and somewhat boring ingredient. Little did I know the bill I would run up in years to come as I sought out distinctive bottles of oil with varying characteristics.

Don’t think I’m suggesting that you must spend lots of money in order to have a nice olive oil. My standby, use-in-everything-oil, is the California Estate Olive Oil from Trader Joe’s. It costs just under six dollars. I save the more expensive oils for finishing dishes and salad dressings where I know the flavor will be most prominent. If you’re interested in learning more about California olive oils, visit the California Olive Oil Commission. You’ll find a wealth of information including locations in California where you can visit producers and have your own olive oil tasting.

Since I’ve developed this appreciation for olive oil I took note when recipes for olive oil cakes started showing up in a number of places. A few weeks ago it came up again when Melissa Clark wrote about her olive oil cake in the New York Times. I clipped the article and decided it was finally time to try my hand at one. The opportunity presented itself last weekend when my father was in town visiting for the wedding of a family friend. We needed a quick pick me up before the wedding and this, along with a pot of PG Tips, was the perfect solution. I would recommend eating this cake the same day you make it. It did not have the same delicious flavor the next day. It may have been my imagination, but it tasted as though the oil was off. Don’t let that deter you. It really was delicious the first day it was made.

Photobucket

Blood Orange Olive Oil Cake
From Melissa Clark in The New York Times

3 blood oranges
1 cup sugar
1/3 – 1/2 cup buttermilk
3 eggs
1 3/4 cups flour
1 1/2 t baking powder
1/4 t baking soda
1/4 t salt
2/3 cup extra virgin olive oil

Preheat oven to 350*
Grease a loaf pan (mine was 9-by-4). Grate the zest from two of the blood oranges into a medium bowl. Add the sugar to the zest and rub together until the zest is well incorporated and the mixture resembles damp sand. Supreme the zested oranges (Clark gives great instructions for this in the New York Times article). Break up the resulting orange segments into small pieces in a bowl. Go small - I did not go small enough. Clark suggests 1/4" pieces. Mine were probably closer to 1/2" so make sure you follow her suggestion.

Juice the remaining orange into a glass measuring cup and then add enough buttermilk to bring the liquid to 2/3 cup. Add the liquid to the sugar mixture and then whisk in the eggs. In another bowl, whisk together the dry ingredients (flour, baking powder, baking soda and salt) and gently add them to the wet ingredients. Use a spatula to fold in the olive oil, a little bit at a time. Fold in the orange pieces and pour the mixture into your prepared loaf pan.

Bake the cake for 55 minutes (I started checking mine after 45 and it needed the full cooking time). Let the cake cool slightly in the pan and then unmold onto a cooling rack to cool completely before serving.

Tuesday, March 24, 2009

Yogurt Panna Cotta

Photobucket

Unless you count the odd batch of Jell-O growing up, I haven’t done much cooking with gelatine. It’s not that I have anything against the substance or the wobbly forms created by it; I just have not been drawn to recipes that call for it. That is until I came across a recipe for vanilla yogurt panna cottas in a recent issue of Delicious. The recipe called for some of my favorites: Greek yogurt and vanilla bean paste (truth be told it calls for real deal vanilla beans, but I knew the paste would work great) and if it meant I would have to run out for a rather unfamiliar ingredient – gelatine, that would make it all the more fun of an experiment.

This dessert was easy to make and turned out perfectly. In fact, the most challenging task was finding a good mold for the panna cottas. After a trip to Sur la Table and a number of internet searches turned up nothing, I ended up with a silicone muffin tin that provided the flat bottom and slightly rounded sides I was looking for. This turned out to be less than ideal for unmolding the desserts since I couldn’t unmold each one individually. If you can track down shallow, individual molds with the rounded sides and flat bottom, by all means use them and please tell me where you found them!

Since these desserts are so simple and use ingredients that I almost always have on hand (even gelatine now that I’ve stocked up on envelopes), they would make a great last minute end to a fabulous meal if it weren’t for their necessary four hour chilling time. Be sure to start these early in the day so you have ample time for them to set.

Now that I’ve had success with gelatine and gotten to enjoy the slightly firm little wobbly desserts that it can create, I think I’m hooked. After all, it really is one of the earliest forms of molecular gastronomy. Don’t you think?

Yogurt Panna Cotta
Makes 6 - 8 (depending on size of molds)

1 envelope gelatine
1 1/4 cups milk
1 1/4 cups heavy cream
1/2 cup sugar
1 1/2 T vanilla bean paste
3/4 cup Greek yogurt

Dissolve the gelatine in 1/4 cup of the milk. Place the remaining milk, cream, sugar and vanilla in a medium sauce pan and bring to a simmer. Remove the pan from the heat and stir in the milk with the dissolved gelatine. Strain the mixture through a fine mesh sieve and cool to room temperature. Whisk in the yogurt. Divide the mixture between your 6 molds (or more if you have additional liquid) and chill for at least four hours. Dip the molds in hot water briefly before unmolding to help the panna cotta slip out. Serve with fresh fruit.

Thursday, March 12, 2009

PG Tips Granita

Photobucket
If I’m not mistaken, PG Tips is still the number one tea in England. Apparently, I drank a cup or two while living there during college, but I hardly remember the experience. I wasn’t reintroduced to the tea until I started dating my boyfriend who has a slight obsession with it. His father is British and he grew up drinking the tips. At the time, almost four years ago, you would be very hard pressed to find a box of PG Tips anywhere in California aside from very specific specialty stores. To surprise him for a birthday, I located a source online and ordered a $60 case of the tea. He was thrilled and supplied with all the PG Tips he could drink for at least four months.

PG Tips has since expanded distribution in the U.S. significantly. It started with Whole Foods and recently, I have been able to locate the pyramid shaped tea bags at my local Ralphs. This availability has increased the number of pots of tea we enjoy on weekends as well as given me an opportunity to try cooking with it. I love steeping the tea bags in different concoctions and seeing what I end up with. By far my favorite experiment was a PG Tips ice cream. I steeped tea bags in a mixture of cream and milk and added sugar to taste before freezing the whole thing in my ice cream maker - absolutely delicious and somewhat addictive.

More recently, I’ve been experimenting with granitas. They’re such a simple dessert and on the lighter side of ice cream. A granita is a semi-frozen dessert that is made up of sugar, water and any number of flavorings ranging from coffee and chocolate to pureed fruit. Fruit-based granitas have been my favorite so far and I’m sure as some of the best fruits of spring hit the markets, I will do a post or two on them here. However, this past weekend as I was wondering what to do with a half drunk pot of tea, I decided to try out a granita of PG Tips. I opted not to add any sugar because I love the taste of PG Tips that much and because I’ve been trying to give the waistline a bit of a break lately, but feel free to mix in sugar or any other kind of sweetener you like. Next time I may try out sugar and just a touch of milk so that the granita is just like a frozen cup of tea.

Photobucket

PG Tips Granita

4 cups brewed PG Tips (or more, this is just what I had left over)
Sugar to taste (or any other sweetener you like)

Pour tea mixture into a shallow baking dish or rectangular tupperware dish. Place the mixture in the freezer. Begin checking the dish after about 45 minutes. As soon as little ice sickles and a bit of frozen crust start to form, get out your fork and begin scraping the mixture and breaking apart the frozen pieces. Continue to check the dish every 30 - 45 minutes or so and scrape as necessary to break up the tea to keep it from forming into a frozen block. The end result should be a collection of frozen crystals that can be stirred with a fork or spoon. I served the tea granita alongside some fresh fruit for a very light dessert. It also would be lovely served in glasses as an afternoon refreshment on a warm day – an alternative to a large glass of iced tea.

Photobucket