Showing posts with label Fish. Show all posts

Tuesday, September 17, 2013

Smoked Trout Pâté

Photobucket

A simple pulse in the food processor turns four simple ingredients into a delicious pâté. Perfect for serving with crusty bread as an appetizer or as part of my favorite Sunday supper - a platter layered with cheese, bread and European butter. The zing of the horseradish butter helps balance out the richness of the pâté.

Smoked Trout Pâté with Horseradish Butter
Adapted from Good Food

Pâté
1 oz unsalted butter
Zest 1/2 lemon
160g pack smoked trout
1 spring onion, roughly chopped

Horseradish Butter
1/2 oz unsalted butter
1 t horseradish
1 t chopped parsley + a few whole leaves

Combine melted butter, zest, trout and spring onion in a food processor and blend until smooth. Place the pate in a ramekin and smooth the top.

For the horseradish butter, melt the butter with the horseradish and stir in the chopped parsley. Pour over the pâté and lay the parsley leaves on top with a few grinds of cracked pepper. Chill thoroughly to set the butter. Serve with a baguette and extra butter.


Photobucket

Wednesday, April 28, 2010

Butter Bean Salad

Photobucket

I love butter beans. Growing up, we had what we called lima beans as a side dish at least twice a week. My mother would drain the lima beans (always from a can – never fresh in those days), heat them up and serve them with butter. I used to mash up the beans on my plate, incorporating their silky butter coating into a butter bean mash. I didn’t know it at the time, but I was creating one of my favorite ways to serve butter beans (and most beans for that matter) - whizzed with a little butter and served as a side dish in place of mashed potatoes.

The other way I serve butter beans is in a cold, deli-style salad. I make healthy, hopefully delicious, deli-style salads almost every Sunday. I whip up a large batch and bring it with me to work for a week’s worth of lunches.

This butter bean salad is very simple to make and holds up well (actually improving in flavor) after a few days in the refrigerator. Beans, tuna, a little lemon for brightness and green onions are the stars. Add salt, pepper and olive oil and you have a great salad that will keep you fed throughout the week.

I like this salad just on its own, but I added some toasted, garlic-rubbed slices of baguette for a little more heartiness for the boyfriend. It would also be great served over a bed of lettuce or added to pasta for a cold pasta salad.

Butter Bean Salad
Serves 3 – 4

1 can butter beans
2 cans solid white tuna (I use water packed)
Zest of one lemon
Juice from one lemon
2 – 3 T of extra virgin olive oil
4 green onions, cut in half lengthwise and thinly sliced
½ t salt
¼ t of freshly ground pepper

Drain and rinse the butter beans. Drain the tuna. In a medium bowl combine the lemon zest, lemon juice, 2 T of olive oil, the onions and salt and pepper. Taste the dressing and if it is too tangy from the lemon, add an additional tablespoon of olive oil. Add the tuna and beans to the dressing and stir until combined.

Friday, March 27, 2009

Pissaladiere

Photobucket

I read recipes frequently enough that by now, I usually know immediately if I want to make the dish. Often I’m drawn in by a picture and I know visually, the dish will be stunning. Then there are the times where the ingredients sound so perfect together that I just can’t wait to dive in, often being able to taste the flavors just from my imagination. When I get both of these reactions to the same recipe, I’m on my way to the market as soon as possible for supplies. Recently, I read a recipe for pissaladiere and almost immediately found myself at the Whole Foods olive bar.

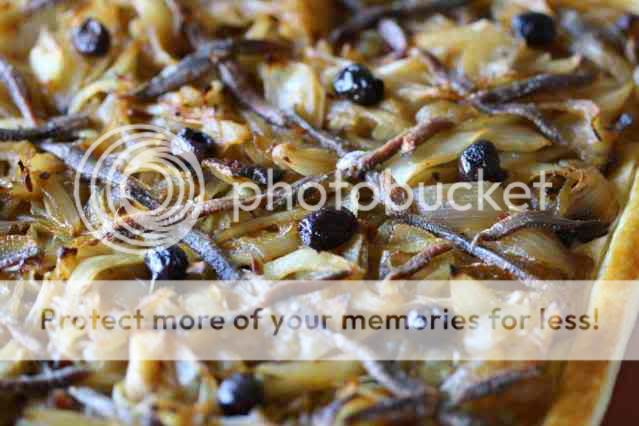
The technical definition of pissaladiere describes a pizza without cheese or tomato sauce, made up of sautéed onions, olives and anchovies. This dish dates back to the time of the Romans and while it may have originated as a pizza-like creation, it has since evolved into more of a tart. Of course, the star ingredients, olives, anchovies and sautéed onions, still come into play. The recipe I found used puff pastry as a base – one of my favorite starts to a tart, both for it’s simplicity of preparation and indulgent flavor. I knew the crisscross pattern of anchovies would make a beautiful photo and the sweet flavor of the caramelized onions would match beautifully with the salty, savory bite of the anchovies and olives.

That salty sweet combination is habit forming in my house and true to form, the majority of the pissaladiere was inhaled within minutes of being cool enough to eat. I was concerned with overwhelming the boyfriend’s palate with too much anchovy so I used fewer filets than called for and cut them in half lengthwise. I had enough anchovies for the pattern on the tart, but was able to reduce the strength of their pungent flavor. It seemed perfectly balanced to me (an anchovy fan) and I would recommend taking this route to all but the most dedicated devotees. And by the way, if you don’t count yourself as a fan, try this recipe anyway with the smaller amount of anchovies. I think you’ll find you like the salty contrast.

Pissaladiere
Serves four as a lunch dish or eight as an appetizer

1 sheet puff pastry, thawed
1/3 cup olive oil
2 1/4 pounds of onions (about four medium)
2 T sun dried tomato paste or sun dried tomato bruschetta
1 – 2 T red wine vinegar
1/2 t salt
2 t sugar
1 egg yolk whisked with 1 t water
2/3 cup olive tapenade
2 t fresh thyme leaves + additional sprigs for garnishing
3.5 oz jar of good quality anchovies (about 12 – 15 filets)
15 – 20 pitted nicoise olives

Peel onions, cut in half and slice thinly. Warm oil in a large, heavy sauté pan over medium low heat. Add onions, sun dried tomato paste, 1 T of vinegar, salt and sugar to the pan. Sauté until onions are tender and begin to caramelize, about an hour to an hour and 15 minutes. Only stir the onions every 10 minutes or so, just to keep them from sticking to the bottom of the pan. When finished cooking, taste the onions and add the additional 1 T vinegar, if desired. I did not desire.

About 20 minutes before the onions are finished, preheat the oven to 400*. Place the thawed puff pastry on a baking sheet covered in parchment paper or a silpat. Score a 3/4 inch border around the pastry and chill for 10 minutes. Spread the tapenade over the puff pastry, inside the scored border. If your tapenade is chunky like mine was, the pastry won’t be fully covered. Just make sure it’s relatively evenly distributed and sprinkle with thyme leaves. When the onions are sufficiently caramelized spread them evenly over the tapenade.

Drain anchovies and slice them in half lengthwise. Lay them over the onions in a crisscross pattern as shown in the picture above. Place one olive in the center of each diamond area created by the anchovies. Brush egg wash lightly over the border area. Bake the pissaladiere for 10 minutes, then reduce the heat to 350* and cook for an additional 10 – 15 minutes until the border is golden and flaky and the crust is cooked through. Scatter thyme sprigs over the tart if desired and let cool slightly before slicing.

Photobucket

Thursday, January 29, 2009

Anchovies and Bagna Cauda

Photobucket
Anchovies. It’s a food that can bring thoughts of revulsion to many, along with memories of bad pizza experiences and those smelly, brown, tinned things that bear no resemblance to actual fish. And yes – anchovies are actual fish. A fact that is, surprisingly, news to some. But served fresh or preserved properly, they are somewhat sweet and quite good in many applications.

I picked up a pack of white anchovies from Spain for my pressed baguette sandwich. They were not cheap and therefore I wanted to be sure to find a good use for the remaining filets.

Enter Bagna Cauda. It’s an Italian dip that is traditionally served with fresh vegetables. I added a loaf of homemade bread and sautéed shrimp to my Bagna Cauda platter and a light lunch was served. Interestingly, I found that the veggies were not a very good pairing for the dip. However, the homemade bread and shrimp were fantastic. Aside from anchovies, the dip is made up of butter, olive oil and garlic – always a delicious sauce for bread and shrimp.

I saved my leftover Bagna Cauda to toss with pasta. All it needed was a light sprinkling of parmesan and I had a great dish. Two dishes for the price (and effort) of one. Love that!

Bagna Cauda
Makes about 1 cup

1/2 cup good quality olive oil
4 – 6 cloves garlic
12 white anchovy filets
1 oz butter (1/4 of a stick)

Heat the olive oil in a small pan over medium heat and add the anchovy filets. Stir occasionally until the anchovies begin to dissolve in the oil. While you’re waiting for the filets to dissolve, use a microplane to grate the garlic cloves into the sauce. Let everything simmer together for 8 – 10 minutes and then finish by stirring in the butter. This sauce needs to stay hot so serve it in a butter warmer or other dish that has a heat source. Serve with what you like, but I recommend the shrimp and fresh bread.

Sunday, December 14, 2008

Salt Cured Salmon

Photobucket

Beautiful pictures are my first attraction to a dish. It's why I subscribe to more food magazines than I know what to do with and why I continue to buy cookbooks when I have 30 at home that haven't had more than one or two recipes made out of them. I'm a sucker for food photography. It's why, when I was reading the latest issue of Donna Hay, I immediately knew I had to make their salt cured salmon. The beautiful pink flesh contrasted with the green of the dill made an amazing picture and since salmon is my favorite fish, this was a sure bet.

Photobucket

The recipe is very simple and I think the biggest secret was splurging on a beautiful piece of fresh salmon from my local fish monger. Not cheap, but worth it for this dish. I got home from the fish monger and within just ten minutes, had the fish curing in the fridge for brunch the next day. Then it was time to head off to Surfas, a restaurant supply store in Culver City. Heaven on earth for someone like me. I'm there pretty much every other week and am always spending more money than planned.

When I got to Surfas, I was pleasantly surprised to see that they had installed a cheese and charcuterie counter. When I realized that the person working the counter was a friend of mine, surprise turned to elation, followed quickly by a sense of loss for the recent progress on my workout routine and healthy eating. I knew having David as the gatekeeper to this wonderful world of cheese would be a blessing and a curse in my life. Mostly blessing, but there would be consequences, and mostly in the area of my clothes not fitting properly.

I spent the next fifteen minutes tasting different cheeses and talking about everything that David had available. I left with a great selection (after heading in with no intention to buy or having any specific need for cheese) and amongst that selection was a beautiful chunk of aged gouda called Beemster Classic. It's delicious and smooth with little crystals that crunch in the back of your mouth as you chew. We all agreed that if ever there was a breakfast cheese, this was it. I was excited knowing that I had the perfect dish, curing at home, that desperately needed a delicious cheese to go with it.

Photobucket

To cure the salmon use this simple recipe that I'm borrowing from Donna Hay. I cut the recipe since I'm only cooking for two, but this can easily be doubled to serve more. Smoked salmon is a tradition at my house on Christmas morning, but this year I think we'll be curing ours at home.

Salt Cured Salmon

1 1/2 pounds fresh side of salmon, skin removed
1/2 bunch of dill, chopped
1/2 cup rock salt
2 t white peppercorns
1 T sugar
2 t water

Coat salmon in chopped dill. Stir together salt, peppercorns, sugar and water. Place half the salt mixture on a piece of plastic wrap, place the salmon on top of the salt and coat the top and sides of the salmon with the remaining salt mixture. Wrap tightly in the plastic wrap and place in a rimmed baking dish (the salmon will give off a good amount of liquid). Place another dish on top of the salmon and weigh down with a few cans of food. Refrigerate for 24 hours. Remove from the plastic wrap and wipe off the salt. Slice thinly and serve with the following recipe or as desired.

Photobucket

Salt Cured Salmon and Beemster Classic on Toast
Serves 2

2 large slices good sourdough, or in this case, Gilroy Garlic Bread
6 - 8 shavings of Beemster
2 eggs
1 tsp vinegar
6 slices of salt cured salmon
Butter for the bread

Heat a small pot of water to poach the eggs. When the water is almost simmering, add the vinegar and swirl the water in a circular motion. Add one egg and cook for 3 - 4 minutes. Remove with a slotted spoon to drain on paper towels and repeat with the second egg. Toast and butter the bread. Layer the Beemster, salt cured salmon and finally the poached egg on the toast and enjoy! 

Thursday, October 2, 2008

Salmon Nicoise

I love it when restaurants will take a little twist on the traditional nicoise and use salmon instead of tuna. I like tuna, but I love salmon. Unfortunately, when I ordered a salmon nicoise out at lunch recently, it was somewhat of a disappointment so I knew I would have to make my own at home soon to make up for it. This was a great version and the vinaigrette was a new experiment using some grapefruit vinegar. If you don't have grapefruit vinegar on hand, just use whichever kind you prefer. 

Salmon Nicoise
Serves 1

1 salmon filet
1 T olive oil
3 small creamer potatoes
4 caper berries
6 green beans
1 tomato
1/4 cup nicoise olives
3 cups lettuce
2 T olive oil
1 T grapefruit vinegar
salt and pepper

Heat the olive oil in a small pan and cook the salmon for about four minutes on each side and remove to a cutting board. Microwave creamer potatoes for four minutes until soft and green beans for 1 minute until just tender. Slice the tomato into quarters and drain the olives and caper berries. Mix together the olive oil, vinegar, salt and pepper and dress lettuce. Place lettuce in a serving bowl and top with potatoes, salmon, green beans, capers, olives and tomatoes. Enjoy!

Monday, September 8, 2008

BBQ Salmon with Sweet Corn Succotash

Trying to eat more veggies is something we could all probably put a little more effort into.  Sometimes I feel like I would have to constantly be putting vegetables in my mouth just to meet the recommended daily amount. One way I try to get a head start on a few of those servings is by making a simple succotash from a few fresh veggies. For this succotash I put together what may turn out to be the last of the cherry tomatoes from my garden with some corn, lima beans and green onion to make a bed for salmon glazed with sweet BBQ sauce.
Sweet Corn Succotash
Serves 2

3/4 cup corn kernels
3/4 cup sliced cherry tomatoes
2 green onions
3/4 cup lima beans
salt

Slice the green onions (green and white parts) and stir in with the corn, tomatoes and lima beans. Sprinkle with a little salt and set aside while you make the salmon.

BBQ Salmon
Serves 2

2 salmon fillets (around 6 oz each)
2 T BBQ sauce
1 T olive oil
salt

Rinse and dry the salmon fillets and sprinkle with a little salt. Heat the olive oil in a non-stick pan over medium high heat. Add the fillets to the pan flesh side down and cook for 3 - 4 minutes. Flip the fish over and cook for an additional 3 - 4 minutes. While the fish is cooking skin side down, use a pastry or marinade brush to glaze the flesh side with the BBQ sauce. Flip the fish over one more time to allow the BBQ sauce to caramelize just slightly. Remove from the heat and serve over the sweet corn succotash. Enjoy!

Wednesday, September 3, 2008

Salmon Skewers

Back to school for me means the return to normal routines and this year in particular, a return to the gym and some healthy eating...hopefully. 

Salmon is my favorite fish and it's a great choice because it packs a lot of flavor punch when you're trying to stay away from adding heavy sauces. Here I've coated a cut up salmon fillet with a yogurt marinade and grilled it up for a quick and easy dinner. I like to double skewer the meat so that it's easy to flip in the grill pan. These would also make a great do-ahead dish for a BBQ.

Salmon Skewers
Serves 2

2 salmon fillets around 6 oz each
4 oz Fage nonfat yogurt
1/4 t celery salt
1 t prepared horseradish
squeeze of lemon juice

Cut the salmon fillets into 1" chunks. Mix the yogurt, celery salt, horseradish and lemon juice together in a medium bowl. Add the salmon to the yogurt mixture and stir gently to coat. Coat a grill pan with cooking spray and place over a medium-high flame. While the pan is heating up, skewer the salmon, using 4 - 6 pieces per skewer. Grill for 4 - 5 minutes on each side and enjoy!

*I served the salmon with a really quick salad of spinach and brown rice. Simply prepare brown rice and while it is still steaming, place 2 cups of rice in a bowl with two big handfuls of spinach. Stir so that the heat from the rice, wilts the spinach. I also stirred in a 1/4 t of celery salt to mimic the flavor in the salmon.

Monday, July 28, 2008

Seared Tuna Tacos

I usually use some sort of white fish when making fish tacos, but decided to mix it up by searing some tuna. Fontina is a great melting cheese and I think it works really well here, but use whatever cheese you like to go with these tacos.

Seared Tuna Tacos
Serves 2 (2 tacos per person)

3/4 pound good quality tuna
1 t canola oil
8 oz green cabbage
1 mango
1 avocado
1 cup sour cream
3/4 bunch of cilantro
1 t chile powder
1/2 t cumin
1/4 t salt
1 cup shredded fontina cheese
salsa to serve
corn or flour tortillas

Add sour cream, cilantro, chile powder, cumin and salt to a food processor and pulse until dressing is smooth. Toss cabbage with dressing (you may not need all the dressing) and set aside. Peel mango and avocado, cut in half and slice thinly. Sprinkle tuna steak(s) with salt and pepper. Heat pan on high and add canola oil. When the pan is smoking hot, add tuna and sear for about two minutes on each side. If the tuna steaks are very thin, reduce time. Remove tuna from pan and slice into strips. Set out tuna strips with shredded cheese, mango, avocado, cabbage, salsa and tortillas and let people build their own tacos. Enjoy!